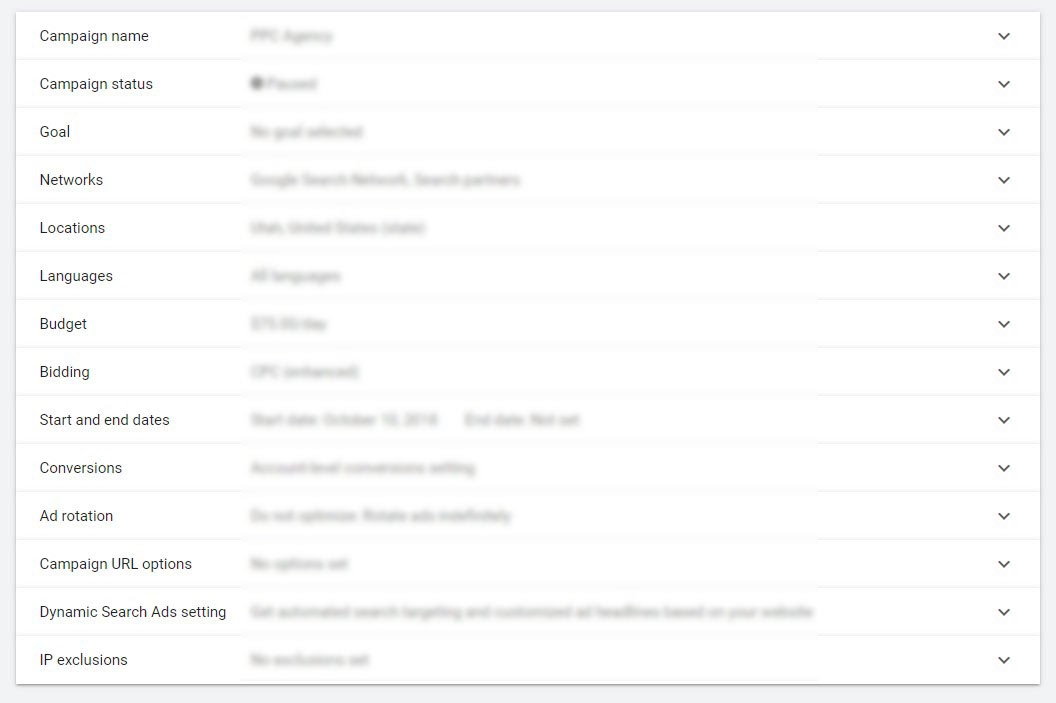
There are many Google Ads campaign settings and a lot of conflicting advice out there about how to set them up.
Regardless of the high intent keywords you choose or superior ads you write, incorrect settings will limit your performance.

Bad settings can mess you up.
So I’m here to set the record straight and show you the best choice for every setting in your Google Ads campaign.
Additionally, we keep this article up-to-date so you won’t be looking at screenshots from the old Google Adwords interface.
How to Edit Google Ads Campaign Settings
Before you change campaign settings in Google Ads (formerly Google Adwords), you need to know how to find them.
First, sign in to your Google Ads account. Next, click Settings on the left-hand page menu.
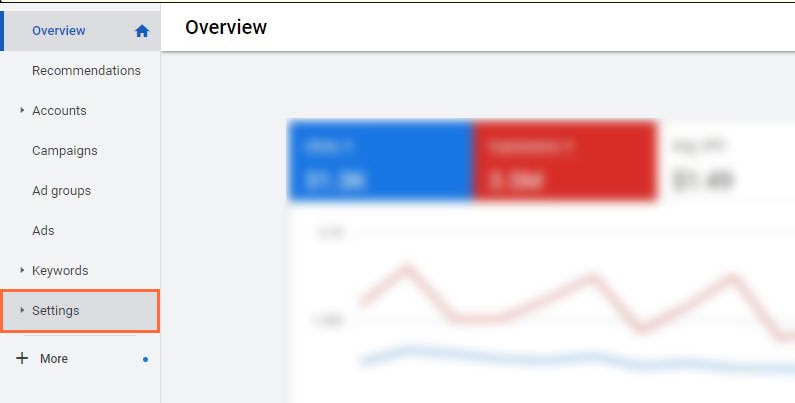
Next, select the campaign you want to work in, and click the setting you want to change.
Finally, make your changes, and don’t forget to hit save.
Now let’s jump into campaign settings.
1. Campaign Goal
I’ll be honest, it doesn’t matter what you choose here if you know what you’re doing, but it’s technically a campaign setting, so I’m going to cover it.
First, when you create a new campaign, set your campaign goal.
Google Ads provides you with seven different settings but only allows you to pick one.
Each campaign goal represents a different guidance system that aims to help you better manage your Google Ads campaign. Selecting a goal doesn’t affect how your account performs. However, it will limit ad format options later on.
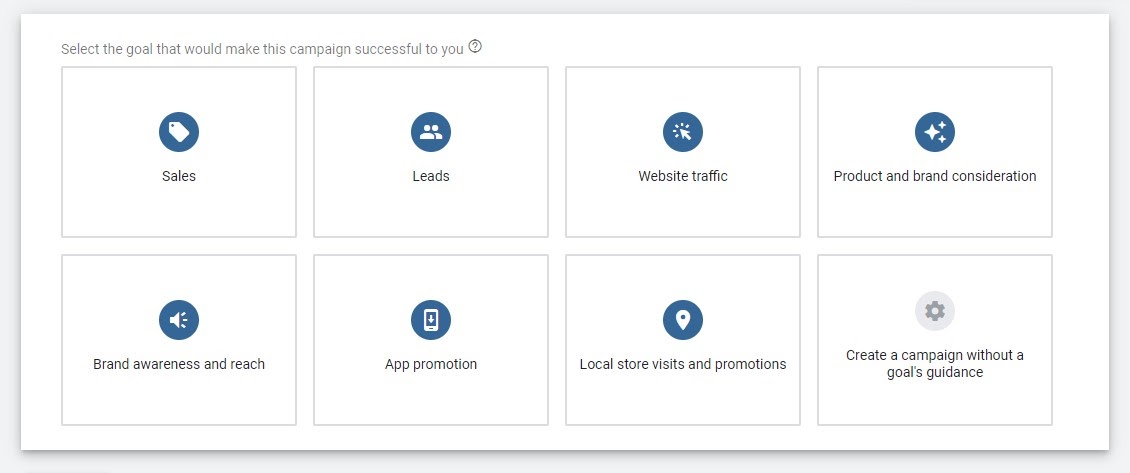
Each goal is listed inside a box that can be hovered over to reveal more information.
In the screenshot above, each goal is listed inside a box. You can hover over each to see more information.
Here’s a quick breakdown of what each campaign goal does.
- Sales – Suggests changes to your bidding and budgeting strategies that may increase clicks from potential customers.
- Leads – Advises improvements to audience targeting, extensions, and ads.
- Website Traffic – Instructs you to set up dynamically generated headlines, extensions, and bidding strategies that may increase clicks.
- Product and Brand Consideration – Provides advice for automated bidding, targeting, and visually appealing ads that help drive engagement.
- Brand Awareness and Reach – Suggestions for creating compelling visual ads and bidding strategies to attract more views.
- App Promotion – Advises changes to bidding strategies that may increase clicks and potentially app downloads.
- Local store visits and promotions – Focus on in-person visits and promotions.
- Create a Campaign Without a Goal’s Guidance – Blaze your own trail.
Keep in mind that campaign goals and the suggestions they provide may or may not be helpful or accurate. Sometimes they’re downright misleading. So air on the side of caution before taking Google’s advice.
2. Campaign Type
Okay, this setting definitely matters. Once you choose your campaign type, you will be stuck with it. You can’t change a display campaign to a search campaign or vice versa, so pay close attention and make sure you pick the right campaign type.
If you’re like most advertisers, you’ll want to start with the Search network.
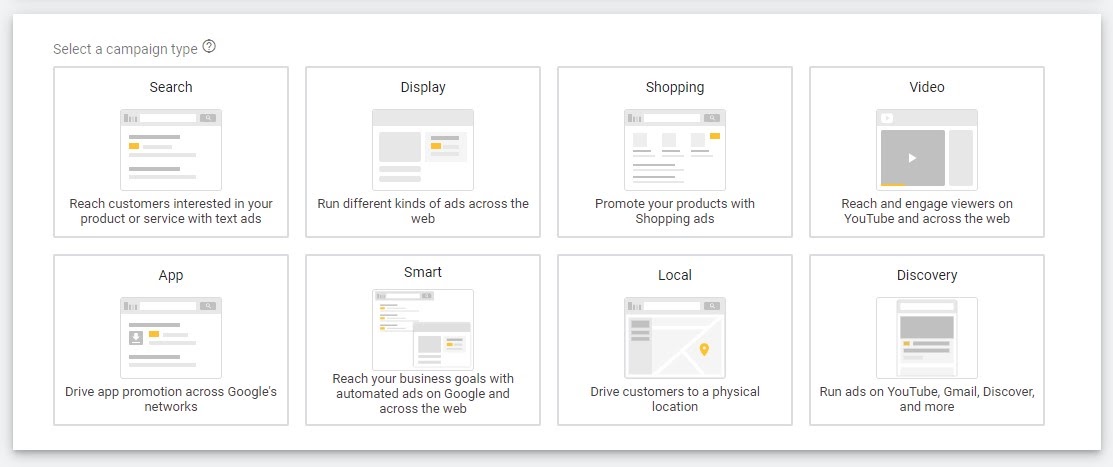
So many campaign types.
Selecting the search network as your campaign type allows you to show your ads on Google.com, Google’s search partner sites, and the display network. However, always opt-out of display when you’re setting up a search campaign.
It’s important to realize that visitors from different networks also belong to different buying cycle stages. Basically, it’s tough to convert visitors who click on a display ad using a high threat offer compared to visitors from the search network who are ready to purchase.
Network options for search campaigns.
Search partner sites are okay to include at first. Then after a few weeks, you can check your ads reporting to see how Search partners compare to Google. If you see that search partners are hurting your performance, you can always turn it off.
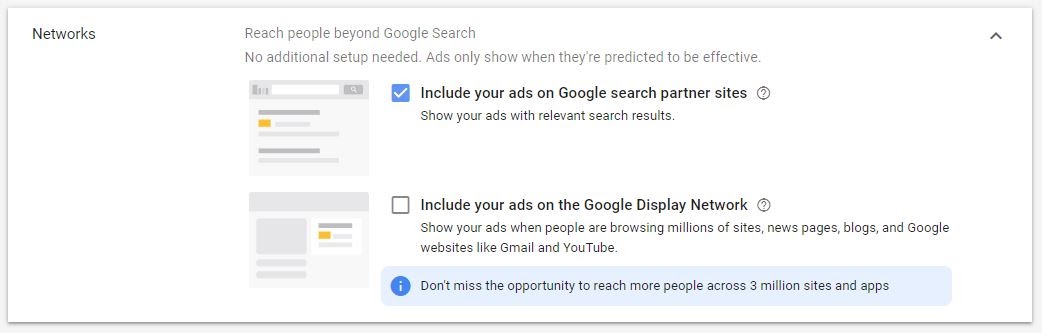
3. Networks
Selecting a campaign type also automatically limits you to certain networks. So this section is less about recommending a setting and more to inform you about each network.
There are five different networks to choose from inside the Google Ads umbrella. Here’s a quick breakdown of each for you to consider before selecting a campaign type.
Search – Shows your text ads on Google.com and search partners.
Display – Shows your banner ads across thousands of sites across the web.
Shopping – Allows you to display product-based ads that appear above other ad types in search results.
Video – Plays your video ads on YouTube and other partner sites.
App – Advertise Android or iOS mobile apps.
Each network serves a different purpose and allows you to show your ads anywhere your prospects might hang out. For this reason, and many others, Google Ads has become the number one PPC platform for advertisers worldwide.
4. Your Campaign Name
Naming your Google Ads campaign might seem unimportant, but following a naming structure will keep you organized as your account grows.
In this case, the less complicated your campaign names, the better.
For example, you could put ad groups related to office chairs in one campaign named Office Chairs.
You can also break out your campaigns into different categories as follows:
Generic Terms – Keywords closely related and don’t contain your brand name or competitors’ brand names.
Branded Terms – Keywords that contain your brand name.
Competitor Terms – Keywords that contain your competitors branded terms.
The easiest way to do this is to preface your campaign name with the category. For instance, if you sell ULINE branded office chairs, you could group all the keywords related to ULINE office chairs into a new campaign named ‘ULINE Office Chairs.’
Pro Tip: If you’re ever in doubt about whether or not you need to create a new campaign, start by asking yourself, will these ad groups require their own landing page? If the answer is yes, you should consider making a new campaign to house them. If the answer is no, then consider keeping them under one roof for now.
5. Locations
Targeting the right geographic areas is vital to your campaign’s success. You can get everything else right, but none of it will matter if you target the wrong locations.
Like my karate teacher always said, it doesn’t matter how hard you kick if you miss the target.

A little to the right.
So let’s get your locations set up the right way and make sure you don’t end up like this poor guy.
By default, Google Ads is set to the United States, which is okay if you want to target the whole country. Select Enter another location for more specific targeting.
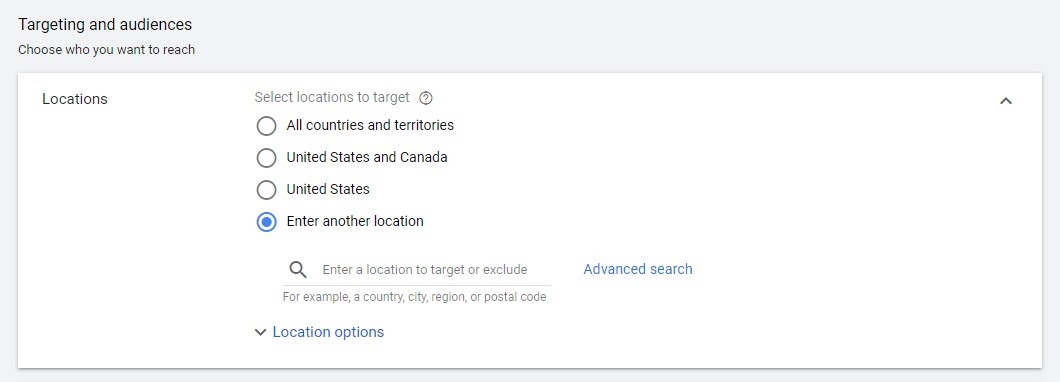
Advanced search is the way to go.
From here, add locations using the search bar or click ‘Advanced search’ to open up a whole new world of possibilities.
Inside the advanced search window, include or exclude locations, use radius targeting, and add locations in bulk.
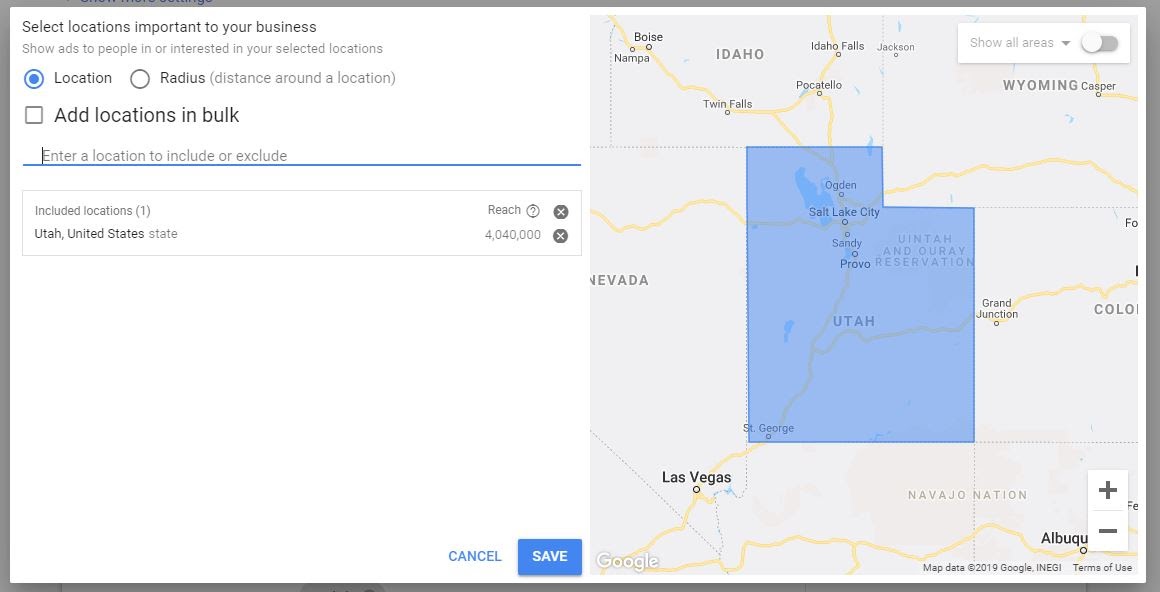
Your location options are endless.
One of the least known secrets is the ability to select locations by clicking directly on the map.
Enable this feature by clicking ‘Show all areas’ in the upper right-hand corner of your map.

Gotta love hidden features.
After you’ve enabled this feature, you can choose how you pick locations from the dropdown. You can choose from the following options:
- Postal Codes
- Neighborhood
- City
- Airport
- Country
- University
- Congressional District
The map will then be divided accordingly. All you have to do is click on the areas you wish to include or exclude. Do this when you want to target areas in unfamiliar locations; it should save you the time of ever looking up another zip code.
Brick and Mortar Location? Use Radius Targeting
In addition to the other basic location settings, we have to mention radius targeting.
Radius targeting is a feature in Google Ads that lets you set a targeting perimeter around a specified location.
So when should you use radius targeting? Radius targeting is perfect for any business that requires customers to travel to a physical location. It’s also useful for companies that travel to customers and have a limited service area.
Expert tip: You can use radius targeting to control bid amounts depending on how far away your customers are. For example, you could increase bids for people that are closer to your physical location. Doing so will help ensure Google shows your business’ ads to people most likely to buy. For example, we set a 20, 15, 10, 5, and 2-mile ring ‘bullseye’ for brick and mortar stores.

The most aggressive bids should be at the “bullseye” of the radius.
But what happens when your brick-and-mortar location is visited by people up to 40 miles away? Should you just throw in another 30-mile or 40-mile ring to your bullseye? 🤔
I cover that inevitability next.
How to Set Location Targeting for Larger Areas > 20 Miles Away
In large cities or suburban areas connected by major highways, brick and mortar businesses often have a larger ‘customer radius.’ Often, rather than wanting a larger area in every direction, companies want a more targeted approach.
In this case, consider testing cluster targeting rather than expanding your bullseye radius targeting.
How do we do this? I’ll break it down for you.
First, set the radius to 5 miles, turn on pin mode, and go crazy.
Seriously, use the same radius targeting method to create multiple clusters within the city and major commuter routes.
There are a couple of things to remember before I set you loose.
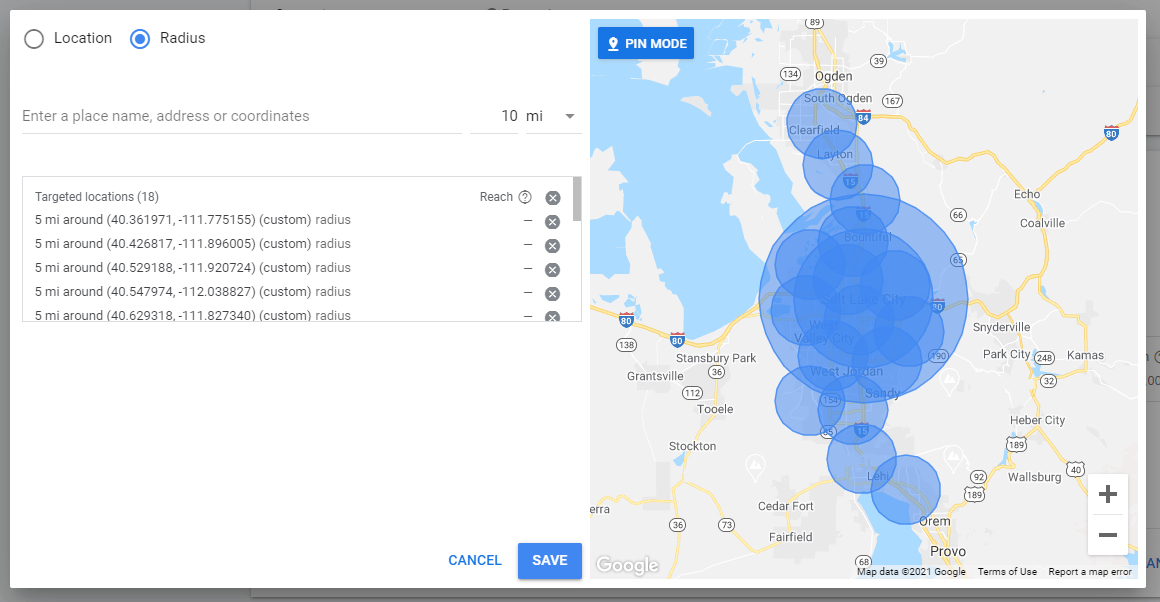
Use multiple clusters of radius targeting to customize your location settings.
For instance, remember your ideal customer persona. There will be differences, like socioeconomic statuses, across the area you target. Let Google do the heavy work to determine which side of the city matches your customer persona the best.
After, take your 5-mile pin tool and extend it out along major highways into suburban areas that would still frequent your business.
Finally, change the radius to 15 miles and type in your exact location. Repeat a cluster using 10, 5, and 2 miles. You may feel a little confused when looking at the map you created, but Google won’t be. The point is to give Google all the segmented information it could ask for.
Whether you optimize the campaign yourself or let Google optimize with an automated bidding strategy, you’ll be glad when you can pinpoint the exact location your customers come from (and where they don’t!)
6. Location Options
Here’s the thing, even if you set up the correct location targeting using the tips from the above section, Google can still show your ad to people all over the world.

Really Google? Really?
Luckily there’s a quick fix for this, but you’ll need to expand the Location options. Google Ads will default to the first setting: “People in…or who’ve shown interest in your targeted locations.” This setting would allow someone halfway across the world to see your ads and click on them.
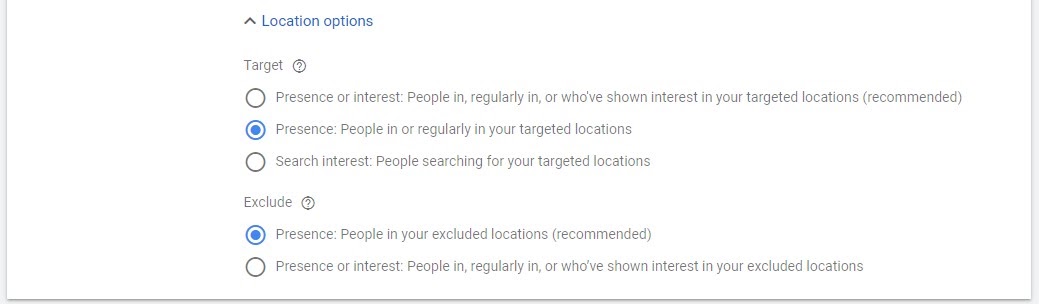
Only show ads to people in your locations.
Simply change this setting to the second option – people in these locations. This will prevent you from wasting ad spend on people outside your targeted locations and give you better control over who sees your ads.
If you’re feeling extra cautious, you can also exclude everywhere outside of your targeted areas.
7. Language Choice
Contrary to popular belief, you don’t need to target the English language when your ads are written in English.
Instead, target All languages. Why? Because your keywords act as the only language filter you need.
For example, ‘mesa’ and ‘table’ register as different search terms, even if the keywords represent the same item. If someone inputs the term ‘mesa’ when you’re bidding for the English keyword, it won’t trigger your ad anyway.

All languages for the win.
By contrast, if you set your language to English, you exclude anyone whose browser or device settings are set to another language. Exclusions also include people with devices from other countries who might be searching from a different Google domain (google.au, google.mx, google.fr, etc.).
Bottom line, you don’t want to miss out on a customer just because their device is from another country or they didn’t use English settings. All languages will make sure you keep those opportunities.
8. Budget
Your daily budget doesn’t matter much. But you already knew that, right?

Right…
If setting a budget is giving you mad anxiety, then start low and increase it over time. However, remember the more you spend, the faster you’ll be able to make improvements and see results.
Additionally, there are a few easy formulas that you can use to pick a starting daily budget if you really don’t know where to begin.
Take your max CPC (cost per click) and multiply it by ten or twenty–whichever amount suits your wallet best. For example, let’s say your max CPC is around $5. A reasonable starting budget would be somewhere between $50 – $100 per day.

To calculate how much you’ll spend in a month, multiply your daily budget by 30.4 (or the average number of days in a month.) Keep in mind, Google Ads can spend up to twice your daily budget in a day but will never exceed your budget for the month.
To demonstrate, let’s say your daily budget is $50. With this budget, Google Ads could spend up to $100 on some days, but never more than $1520 ($50 x 30.4) for the month.
Pro Tip: A larger daily budget increases your impression share. Because you can afford to pay for more clicks in a given day, your ad is more likely to appear in search results.
9. Conversions
You have two Conversions settings options for your campaign within Google ads. You can choose to Use the account-level “include in Conversions’ settings” or Choose conversion actions for this campaign.

Don’t let this section confuse you too much. We recommend you stick with the default conversion settings: Use the account-level “include in Conversions’ settings.”
Why? Well, the default carries a few benefits.
1. It includes a whole bunch of goodies on your reporting page, like what kind of conversion actions users are taking in the campaign. You can toggle your view to see all or just a few of these conversions.
2. Gives you a bit more control over automated bidding. You can tell Google which conversions you’d like it to optimize in campaigns with automated bid strategies.
3. Gives a clear picture with the “Conversions” column, so you know what’s up when you manage bids manually.
For example, consider this real-life application of conversion settings.
We identified two main conversion actions for a floral business: online sales and call-in orders. Using the Use the account-level “include in Conversions’ settings” default, we observed how many of each conversion type contributed to the overall conversion numbers in reporting. Additionally, we assigned values to each conversion action. As a result, we could determine which conversion type was driving more value (ROAS) in the campaign and react accordingly.
To sum up, the default setting lets you include valuable conversion action data in the Conversions reporting column. Having that data also facilitates better decisions about bids, whether Google’s making them or you are.
Speaking of bids…
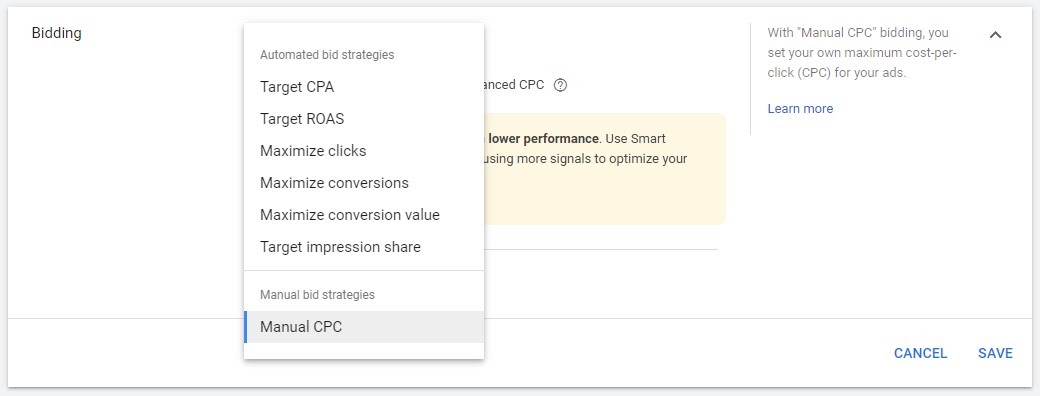
10. Bidding Strategy
Currently, there are nine different bidding strategies to choose from, which can be downright overwhelming. For now, focus on these two types of bidding strategies: manual and automated.
Manual: You set your own keyword-level bids and decide how much to pay for clicks. Your manual bidding strategy option is Manual CPC.
Automated: Google adjusts your bids automatically based on data they collect. They also decide how much you should pay for clicks.
Google Ads Bidding Options.
Automated bidding strategies present themselves as a helpful shortcut that will save you from spending hours manually adjusting your bids. On top of that, Google has made massive improvements to these strategies, which use real-time signals we often can’t compete with. For more tips on using automated bidding strategies, check out our guide to PPC bid management.
While it’s true that automated bidding will save you time, here are few situations where setting manual bid settings could still serve you best.
1. You have a new account. When your account is brand new, it also means you have no conversion data — a must if you want to make the most of your ad spend and lower your cost per click (CPC). Consider allowing your account to collect this needed information over a month or two before switching to an automated or Smart Bidding strategy.
2. Automated bidding is running wild. Manual CPC is always an option if you observe an automated bidding strategy departing from your goal. Simply switch back for more precise control.
Google Ads will default to an automated bidding strategy, so you’ll need to make a few quick changes to unlock manual bidding.
First, click on Select a bid strategy directly. Next, open the dropdown and select Manual CPC from the list. Finally, uncheck the box to disable Enhanced CPC.
That’s it. You’re all set for manual bidding.
11. Ad Schedule
When you set up your first Google Ads campaign, it’s usually a good idea to leave the ad schedule set to its default setting. Default will run your ads 24/7/365 and allow you to gather data about which times of day and days of the week perform best.

Schedule when your ads are shown.
If you’re running a lead generation campaign, it might be tempting to limit your campaigns scheduled to run only during office hours. However, you may still be able to drive high-quality conversions even with limited office hours and call-only campaigns. You’ll just need to be diligent at returning their call the following business day, but you’ll never know if you limit your ad schedule from the start.
Bonus Tip: You can use start and end datesto run seasonal campaigns or limited-time promotions.
12. Ad Rotation
Since the switch to Google Ads (formerly Adwords), Google has added and retired several features.
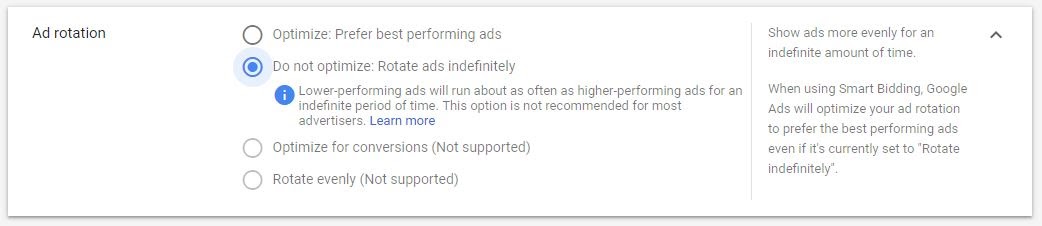
It’s best to test your ads manually.
You now have two options when it comes to Ad rotation.
- Optimize: Prefer best performing ads.
- Do not optimize: Rotate ads indefinitely.
Google Ads defaults to the first setting and will attempt to pick the best performing ads for you automatically. However, ad rotation campaign settings depend on your situation. If you’re short on time, feel free to select Optimize; just keep an eye on your account.
Alternatively, if you want more control and have the time to make fine-tuned changes, set your ad rotation to ‘Do not optimize’ and use an ad script to flag your winning and losing ads. This will give you a more accurate way to A/B test your ads and ultimately lead to the best performing ads.
Pro Tip: Contrary to what some people (ahem… Your Google Ads Rep) say, you don’t need to have three ads running for each ad set. In fact, most of the time, you’ll want to stick with a simple A/B test unless you have enough traffic to justify splitting your traffic out to three ads. If you don’t have enough traffic, then splitting your traffic three ways will slow down your test results and hurt your performance.
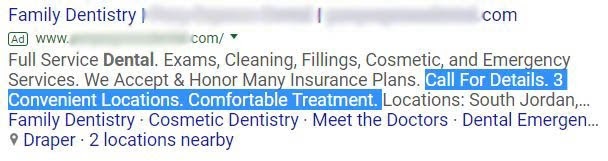
13. Ad Extensions
What if you could make your ads bigger than all your competitors’ ads without spending more money? That’s basically what ad extensions will do for you.
Google ad extensions are hands down one of the best ways to improve your click-through rates (CTR) and maximize your campaign performance.

Example of a seller rating extension.
Ad extensions are additional lines of text that appear below your ad’s description. As a result, they make your ad bigger and more noticeable in search results. The more prominent your ad, the more likely searchers will click it. This results in a domino effect that improves nearly all your key performance indicators from increased CTR, decreased CPC, and lower costs per conversion.

Your Competitors Tiny Ads vs. Your Ads With Ad Extensions
The best part is ad extensions are easy to create and add to your campaign.
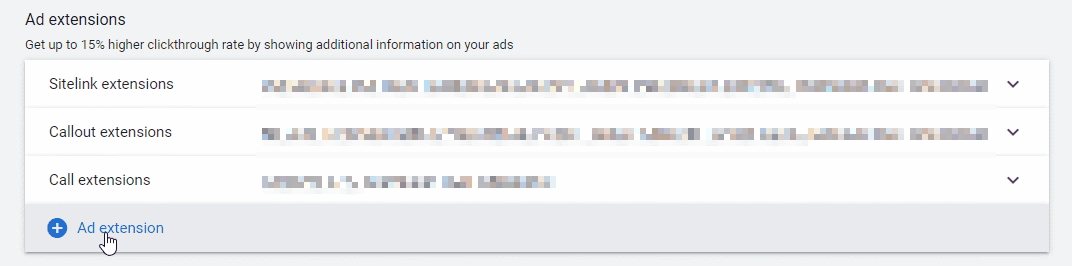
Lots of ad extension choices.
You’ll have nine different ad extensions to choose from, all with their unique characteristics and advantages.
Don’t get overwhelmed by all your options — start with universal extensions. These include the three ad extensions Google recommends every advertiser use: sitelinks, callout extensions, and structured snippets.
Sitelinks: add additional links under the main text ad in search—sitelinks direct searchers to important pages on your site.

Sitelink extension.
Callout extensions: these are 25-character chunks of text that give the most exciting and valuable qualities about your business a shoutout.
Callout extension.
Structured snippets: niche product types? A unique range of services? Structured snippets give searchers a glimpse into the small details you think your customers will find most valuable.

Structure snippet.
See more about ad extensions in our article: Google Ad Extensions: 10 Types and How to Use Them.
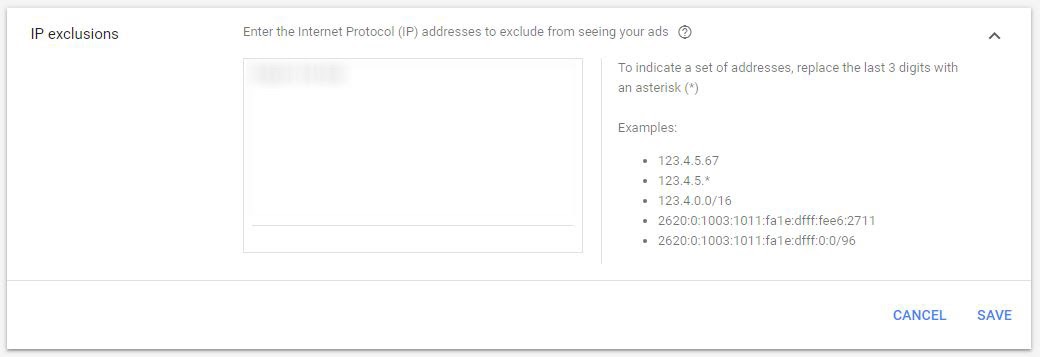
14. IP Exclusions
IP exclusions allow you to block specific IP addresses from seeing your ads.
These exclusions are particularly useful if you think your competitors might be clicking on your ads. It’s also a good idea to exclude your IP address, so you don’t skew the data by accidentally viewing your own ads.
To emphasize, let’s look at an industry with one of the highest costs-per-clicks: law. We’ve heard first-hand accounts of law firms hiring people just to click on their competitors’ ads. The result? Thousands of wasted advertising dollars (and usually an ad budget that runs out first thing in the morning, so your competitor’s ads show instead). So if you’re involved in PPC for lawyers or simply have a CPC of over $50, then definitely spend some time with IP exclusions.
So how do we check to see if this is needed? Use the Ad Preview and Diagnosis tool.
The right way to search for your ads.
You can add IP exclusions to your Google Ads campaign after the initial setup process is complete.
Competitors don’t need to see your ads.
To set them up, navigate to your campaign settings, click additional settings, and select IP exclusions. Then enter the IP addresses you wish to exclude and click save.
15. Campaign URL Options
This setting allows you to add URL tracking parameters on the campaign level.
Campaign-level URL tracking is helpful if you need to track something specific on only one campaign. Ultimately, you can save yourself some time and redundancy by adding your tracking template at the account level. This will apply the same tracking template to all campaigns in your account.
Nonetheless, you can find your campaign URL options on the campaign Settings page under additional settings.

Easily add URL tracking parameters.
You can use a tool or build your tracking template from scratch. Once you have the code snippet, copy and paste it into the tracking template field and click save. Now Google Ads will automatically append this to every URL in your campaign.
Tracking parameters give you additional insight into prospects and can be used to complete hidden form fields on your landing pages.
Finish Up Google Ads Campaign Settings
If you followed along and created your campaign with all the correct settings, then I’ve got some good news for you: you may only have to do it this once!
In fact, after you create a Google Ads campaign with the correct settings, you can easily apply these settings to all future campaigns.
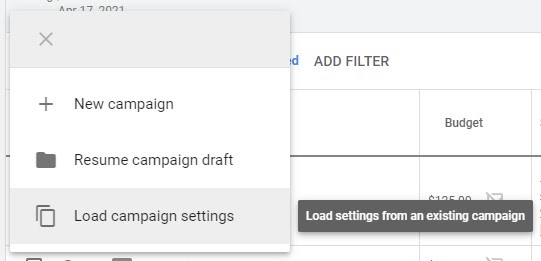
Quick and easy!
Just click ‘Load campaign settings’ when you click the button to create a new campaign, and Google will automatically load those settings from existing campaigns. You’ll avoid the hassle of running through settings each time you make a new Google Ads campaign.
What’s more, choosing the right setting for your campaigns will improve your Google Ads performance and help you maximize your ROI.
Do you have questions about your Google Ads campaign settings that I didn’t cover in this article? If you do, leave them in the comments below!

Luke Heinecke
Founder/CEO
Luke is in love with all things digital marketing. He’s obsessed with PPC, landing page design, and conversion rate optimization. Luke claims he “doesn’t even lift,” but he looks more like a professional bodybuilder than a PPC nerd. He says all he needs is a pair of glasses to fix that. We’ll let you be the judge.
Leave us a comment.
Subscribe to our blog
Subscribe to our blog
Get weekly PPC & CRO advice sent straight to your inbox.