Bear with me; I swear this is going to tie into setting up Google Analytics in just a moment. But you remember that scene in Disney’s Sleeping Beauty where the fairies are making a dress for Aurora?

Right, this scene.
And you know how it turns out, right? Well, spoiler alert (for a 1959 movie), the dress looks pretty awful because the fairies don’t measure it. (Although being fairies, they wave their wands and fix it pretty quickly.)
Now compare the (unmagicked) dress to the one Cinderella gets from the mice. Before the wicked stepsisters ripped it to shreds, the dress actually looked pretty solid. You know why? Because the mice meticulously measured it out.

They ain’t taking any chances with this dress.
And just like making a dress, your ads and marketing strategy needs to be meticulously measured. In real life, there is no fairy godmother to wave her wand and fix everything – especially if you didn’t measure your results from the start.
Setting up Google Analytics is crucial to your success, but you can’t just toss some code on your page and call it good. You’ll end up with an Aurora dress. Let’s take a look at how to properly set up your Google Analytics account for successful data collection.
The Entire Point of Setting Up Google Analytics
If you have any questions about the value of Google Analytics, let’s cover those first. If you’re already sold on it, feel free to skip ahead to the next section. I’ll cover the setup from there.
Perhaps you weren’t convinced with my dress comparison. That’s fair, but let’s seriously look at how setting up tracking helps you out.
Let’s say you have a business, and you have a website for this business. Naturally, there will be things you want people to do on your website. Certain actions you’d like them to take. Sometimes these actions will be to fill out a form, sign up for a newsletter, make a purchase, or find directions to your store.
You’ll want to track at least two things: if these actions were completed and who made them. Obviously, privacy laws prevent you from seeing that John Doe at 1111 West Point Street was the person that signed up for your newsletter. However, you can see important information about this person anyways. For instance, setting up tracking will allow you to see the pages they visited, where they came from, and what they did.
How this helps you? You’ll be able to track patterns between who performs the action and who doesn’t. This will allow you to optimize your website, your ads, etc. So are you ready to start setting up the tool that will change your way of gathering data?
Let’s get started.
First And Foremost
You will need a Google Account. You’ll need to be able to log into Google Analytics, which is linked here.
From there, you’ll need to put the Google Analytics Tracking code onto your website. If you don’t have a code on your website, then Google Analytics won’t track anything on there. You have a few options for adding the code in.
First, you can install the code manually on your website. This works just fine.
Secondly, you can use the Google Tag Manager. If you’ve never heard of the Google Tag Manager, let me be the first to advocate for it.
If you’re trying to track things on your website, you may end up with a lot of extra code on there. (Google Analytics, Facebook Pixel, Hotjar, CallRail, etc.) All that extra code will bog down your site, and cause your clients to do this:

Seriously, no one likes waiting for slow websites.
If you’d like to avoid that, adding all your code into the Google Tag Manager can help. The GTM will hold your code and triggers in an organized dashboard. Then you’ll put one, and only one, code onto your website. It’s pretty great.
Because I do heavily advocate for the GTM, here’s a breakdown of how to add the Google Analytics tag into your Google Tag Manager.
Adding The Google Analytics Code Into Google Tag Manager
Naturally, the first thing you’ll need to do will be to sign into Google Tag Manager.
Once you’re in, you’ll want to make sure you have your account set up and the code added into your website. (More detail about this can be found in our article about Google Tag Manager.)
Once you’re in your account, click on Tags and then New to add a new tag:
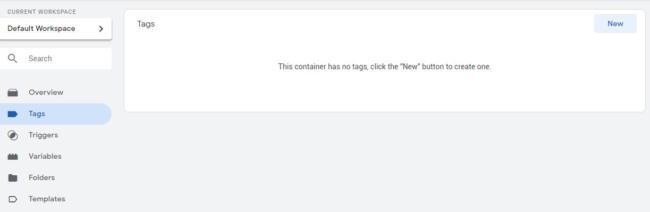
Tags > New
After you click to add a new tag, click on Tag Configuration to add in the code:
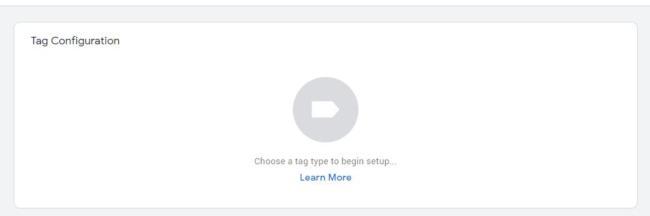
Click anywhere in this box to continue.
From there, Google Analytics will be one of the first options to appear as a tag type. Find it and click on it:
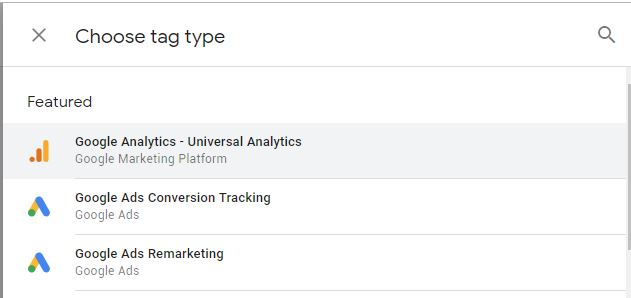
This is what it looks like.
You’ll set your Track Type as Page View, and your Google Analytics Settings needs to be updated; you’ll click new variable for the settings. It’ll open a new tab that looks like this:
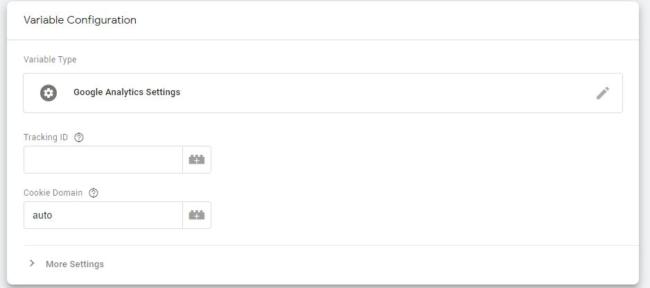
New Variable
You’ll need to enter your Tracking ID into the box labelled Tracking ID. This can be found in Google Analytics by going to Settings. From there, you’ll look for Tracking Info under the Property Column. And then you’ll find the Tracking ID under Tracking Code:
Settings > Property Column > Tracking Info > Tracking Code
Copy and paste the number starting with UA into the Tracking ID box:
Here’s where you’ll enter that code.
Once you’ve entered the code, you’ll just need to pick the Trigger. This is what will make the tag fire and report to Google Analytics. The first trigger you’ll want will just be an all pages page view:
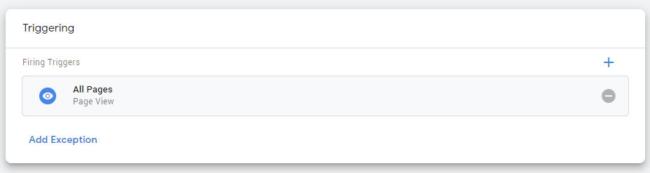
Your first trigger.
Once all of this is filled in, name your Tag (pro tip: make sure it has a specific name such as “Google Analytics Tag”) and save it.
If you’d like to set up cross-domain tracking, custom dimensions, etc., you can find out how in our Google Tag Manager guide.
Your work isn’t done after you save it, though. You’ll need to make sure you submit the workspace to save it.
Block Your Own IP Address
The part we’ll focus on right now will actually be under All Filters. At Linear, we exclude our own IP Address from our clients’ Google Analytics. I generally spend a lot of time on a client’s website – whether I’m scrolling for ad copy ideas, publishing a blog, or reviewing it with my designer. Because I’m not a customer, this should never be tracked.
Once you click to add a new filter, you’ll be taken to a screen with a few options:
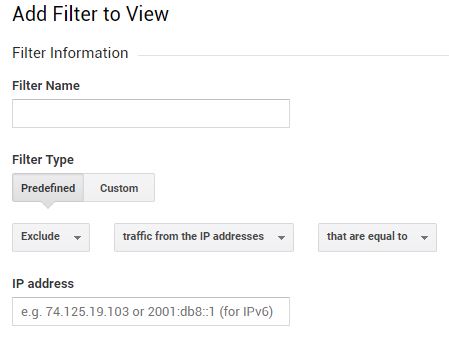
You’ll want to match this set up.
You can start by naming the filter something that you’ll remember. Then it’s easy to make a predefined filter that excludes traffic from the IP addresses that are equal to. After that, you’ll type in your IP address, add it to the views and save it.
Turn on Remarketing
Something that’s often forgotten when setting up Google Analytics is turning on Remarketing.
You can find this setting under the Property column in Settings. You’ll go to Tracking Info and then Data Collection from there:
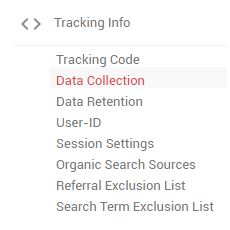
Remarketing can be found here.
Remarketing enables Google’s tracking ability. This is absolutely necessary if you ever want to retarget your customers or use RLSAs. If you don’t have remarketing turned on for Google Analytics, you’re running data collection with both arms behind your back and bound legs.
Data Retention Settings
Right below the Data Collection option is the Data Retention settings. You’ll want to double check that this also set up properly, too.
Data retention is is how old your data can be. Google’s longest time frame at the moment is 26 months. You’ll want to set it to the maximum and turn on to reset on new activity:

Data Retention settings should look like this.
This way Google can track and keep your information about customers, website performance, goals, conversions, etc.
Linking Google Ads to Google Analytics
In the next column, you’ll have options for this specific property. This is where you get the code for your website, but that’s not all you do.
If you’d like to link your Google Analytics to Google Ads (and you should, if you use Google Ads), then you’ll link it here:
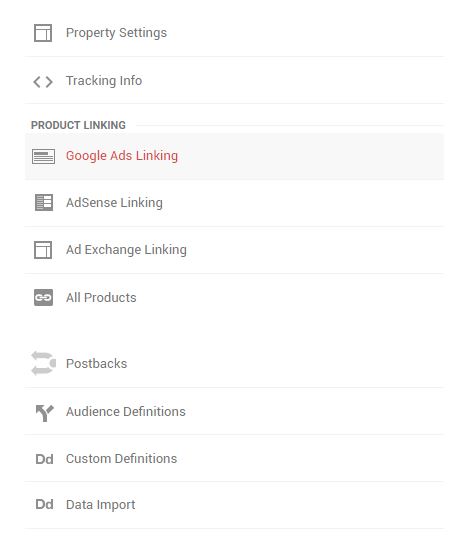
Property > Product Linking > Google Ads Linking
Once you click on Google Ads Linking, you’ll have a new panel open up that will show you your current linked Google Ads Accounts. You’ll click on New Link Group to add a new Google Ads account.
This is where it’s useful to have one Google sign in for everything. If you click on New Link Group, it’ll show you the Google Ads account/s you have available to link. Just select yours and save it.
Brand Terms
The last universal basics step you should take will be to manage your brand terms. This is how Google knows who you and your brand are. Brand terms can be found under the View column, under Channel Settings:
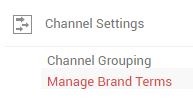
Manage Brand Terms here.
Basically, what you’ll do, is you’ll type in your business’ name. You’ll type in the full name, then any associated nicknames it has. You can check in here from time to time to see to see if Google suggests any terms for you to add as well.
Ecommerce Settings
In the final column, you’ll have one more option to consider, if you’re an Ecommerce.
If your website is an Ecommerce site, find Ecommerce Settings and just turn it on!
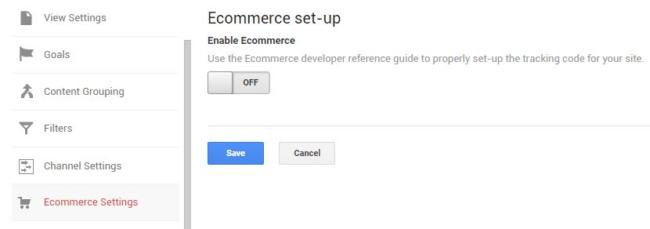
Turn the off to on and save it.
This allows Google Analytics to start tracking information about sales, etc.
An Overview Of Google Analytics’ Structure
When you first pop open your Google Analytics page, it can feel like an absolute information overload. There’s no hiding it, Google Analytics tracks a lot of information, and it presents it in multiple ways for you.
There are three main parts of Google Analytics: the dashboard, the side navigation bar, and the settings tab.
Homepage Dashboard
In Google Analytics, you’ll have a variety of visually appealing dashboards to look at. From the home dashboard, you’ll see audience overviews, which will tell you information such as how many people have been on your site, what percentage bounced, and the average session length.
You’ll also find live information such as how many people are on your website at the very moment you’re looking at Google Analytics.
There’s a bar graph that will show you where your visitors come from (paid search, organic, direct, social, etc.), and that’s pretty neat. You’ll also find where in the world your visitors are viewing your page from, and you can see what time of day/day of week your website is hopping.
Scrolling down on the homepage, you’ll find the most frequently visited webpages of your site. You’ll find a report that covers a day-over-day comparison of website visitors. There’s also a devices section that’ll show you what device your visitors are viewing your website on.
You can also find a retention graph, a goal completion chart, and if linked, a Google Ads performance chart. We’ll cover how to set up those goals and link to Google Ads just a little later.
The Side Bar
The side bar of Google Analytics looks like this:
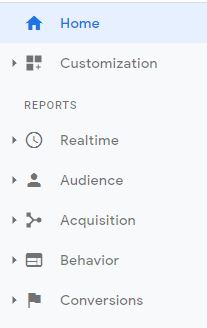
The side bar has a lot of options.
Let’s take a quick breakdown of your options here:
Realtime
Your realtime breakdown shows you just what you think it should…how your website is performing in real time.
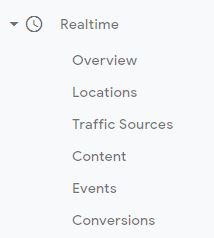
Realtime drop-down
Of course, your overview will show you basic data such as how many people are on your site, where they are, and what page they’re on as well.
Each further option, Locations, Traffic Sources, Content, etc. will just show you a more detailed look into that aspect of real time.
Audience
Audiences provide you an in-depth look at who has visited your website.
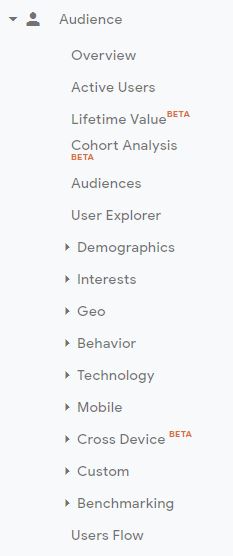
There are a lot of options here.
In overview, you can see new users vs. returning users, languages their devices have been set to, demographics, etc.
Active users, of course, show you who is currently on your site, Lifetime Value would be for ecommerce accounts, and Cohort Analysis will show you different stats for your audience.
In Audiences, you can see the audiences you’ve made (more later) and how they’re performing.
User Explorer is where Google Analytics tracks the unique visitor IDs with stats.
The next grouping: demographics, interests, geo, behavior, technology, and mobile, break down your visitors into the specifics of who they are. Of course, there is never any personal information shared by Google, but you can better optimize for who is relating to your brand and who your customers are.
The last two parts I’m going to touch on here are the Custom – where you can build your own custom definitions of a customer and view them here, and Users Flow. Users Flow shows a visual graph of where your customers start, where they go on your website, and when they leave. Absolutely worth examining.
Acquisition
Acquisition goes in-depth for how the people on your website found you. This is honestly a relief because no one ever quite remembers how they found a new brand or who they heard about you from.
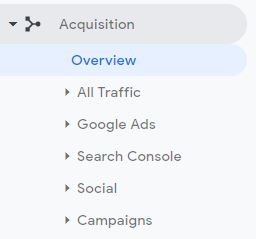
Acquisition is how you got your website visitors.
In Acquisition, you’ll find a breakdown of Paid Search, Organic, Direct, Social, Referral, and Other.
One of the more valuable parts for marketing will be your Google Ads breakdown:
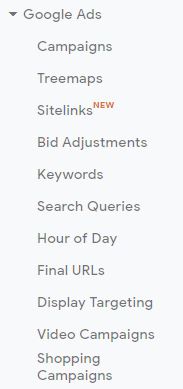
So much information.
This will show you what in your Google Ads is actually bringing in results. Of course, you can find information in Google Ads, but this will show you a site view of what’s working.
The Google Ads view doesn’t just break down campaigns, either. You can find sitelink extensions, bid adjustments, and keywords that have brought you results. In Google Ads, you can see and edit everything, but in Google Analytics, you just get data side by side. For tracking and learning purposes, Google Analytics is what you want.
Behavior
Behavior is very simply put, the behavior of your website visitors. It also tracks the behavior of your website. Take a look:
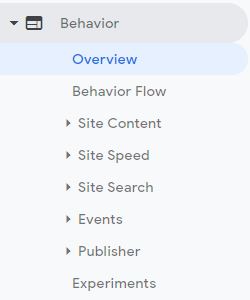
It covers both your customers & your website behavior.
The Overview and the Behavior Flow will show an overview of your Audience – similarly to what you can find under your Audience tab.
Under the Site Content, you’ll see a breakdown of behaviors on all pages, which you can compare side by side to your landing pages and exit pages.
If your website isn’t getting results like you’d like, or if your bounce rate is really high, take a look at your Site Speed. If you’ve ever tried to load a webpage that was taking forever, you know exactly why site speed is important. Even though a webpage may only be taking 15 seconds to load, those 15 seconds can feel like an eternity. Someone who’s on their mobile phone or someone who’d like to accomplish a goal quickly is likely to bounce away from a slow site.
Site search is useful for those who have the search bar in their website – generally these will be eccomerce accounts. You can see the search terms and pages they loaded.
Events are part of a goal that you set up, and we’ll cover that later. You can find information on the events under Behavior.
Conversions
The last section of the side bar is your conversions data.
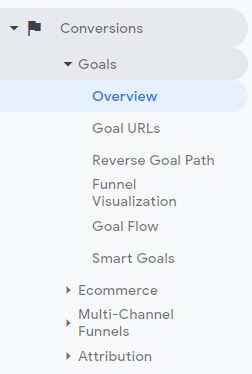
The conversion options.
Although this isn’t where you set up your conversions, this is where you can find specific data about the performance of your conversions. Under the overview, you can see the goal completions on the different webpages you have so you can see what page is driving the most goals.
If you have a funnel set up for your conversions, Funnel Visualization is a great tool for seeing where your customers are, where they’re dropping off, and the goals they’re completing.
Under the Ecommerce tab, you’ll have an overview, a view of product performance, transactions history, and time to purchase.
The last part I want to mention is the Attribution – Model Comparison Tool. If you’ve ever wondered if changing your attribution model would change your statistics then here is where you can check it. Attribution models can be confusing, but here is where you can compare side-by-side how your data would change if you changed the window.
The Admin Tab
At the very bottom of the side bar is the admin tab:
Admin tab has a gear icon.
The admin dashboard has a ton of options; it’s split into three columns. I’ll go over important parts of each of them, but I encourae you to spend some time getting to know this section of your account.
The admin dashboard is where all of the setup happens. I’ll quickly touch on some of the important ones here before we go over some in-depth set up you’ll want.
Account Settings
The first column holds your account information.
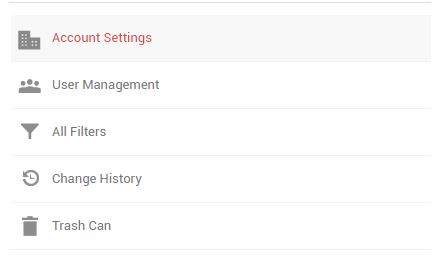
This is where you can see account info.
Account Settings lets you change the name; User Management is where you add new people. Change History lets you see the history of the account, and the trash can is where the deleted things go.
Setting Up Google Analytics Goals
When it comes to tracking conversions and actions taken, there are three things specifically you’ll want to set up. These will be your goals, your events, and your audiences. Goals and audiences will be set up directly in Google Analytics. Events can either be coded into your website or added into the Google Tag Manager. (I’ll cover the Google Tag Manager way in this article.)
Overall, you’ll want to set up this tracking to really get to the meat of Google Analytics tracking abilities. Think of some actions you’d like your website visitors to take. Google Analytics doesn’t automatically track every single thing. Chances are, there are some conversions that aren’t in Google Analytics’ auto tracking software.
List those out. Goals will be the actions you track on your website. A general list will be page visits, form submissions, calls, session durations, pageviews, etc.
Google Analytics Goals will be set up under the View column, or the column on the far right.
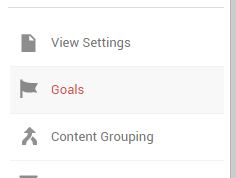
Goals in Google Analytics.
When you set up your goal, start by clicking on New Goal. You’ll then have three steps to complete:
Step One
The first step is whether or not you’d like to use a template.
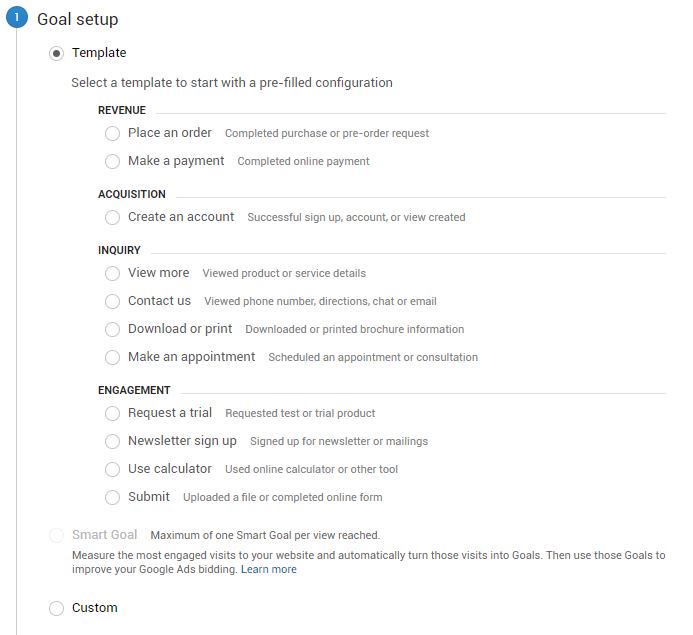
Choose from the template options or make a custom one.
In this example, we’ll select a custom goal to continue on to option two.
Step Two
Here is where you name the goal and decide what type it is (if you’re using a custom goal).
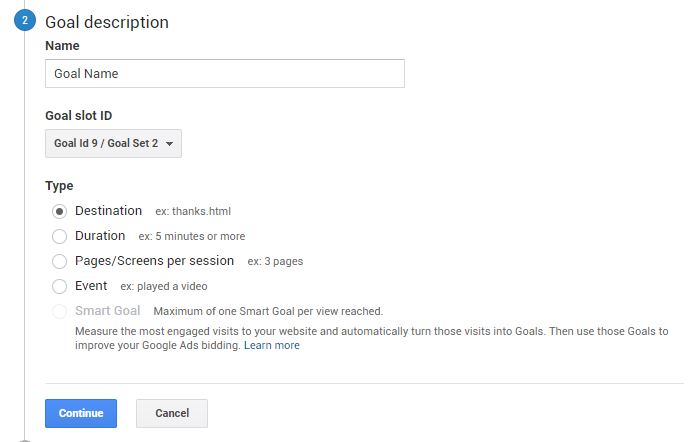
Name your goal and choose the type; don’t worry about the slot ID.
In this case, let’s say we’re tracking everyone who’s reached our thank-you page. So we’ll select destination as our goal type and hit continue.
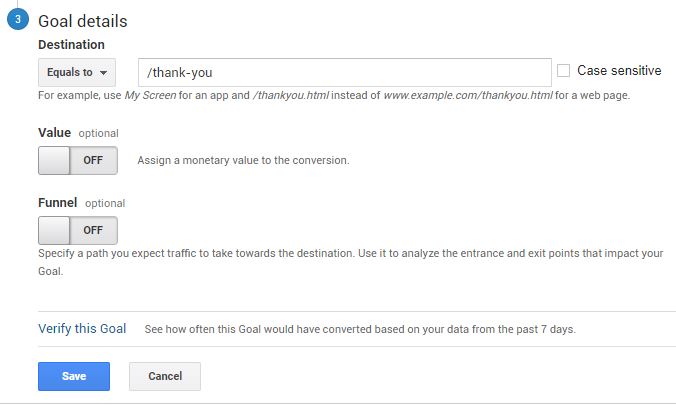
Step Three
The last step is where you choose the details of the goal. You’ll set up the destination URL. As specified in the fine print below, you don’t need to type in your full website URL. You just need the URL path (i.e., you don’t need to type in www.example.com/thank-you but instead /thank-you).
Goal details.
You’ll determine if it’s case sensitive in the box next to the URL, you can assign a value to it, and set it in a tracking funnel. The last part is that you can verify the goal. This is absolutely necessary. It’ll show you that it’s set up properly before you save it.
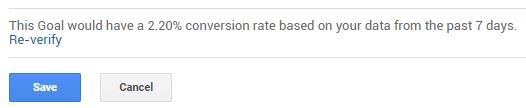
A verified goal is ready to be saved.
Once everything is set up and verified, you can save the goal and move on to the next step.
A few things to keep in mind about Google Analytics are that you can have up to 20 goals on a view, you can’t delete a goal, and you can pause your goals.
For Setting Up Google Analytics Audiences
After you’ve set up your goals, you now have the “action” part of the equation. You know what you want your people to do. Now you need to set up the who side of it for tracking. You’ll need a place to contain the people who have fulfilled a goal.
You’ll also want these people to be shared with Google Ads so you can make remarketing campaigns, optimize targeting, etc. You’ll start in the Property column, which is in the middle. You’ll then go to Audience Definitions and select Audiences.
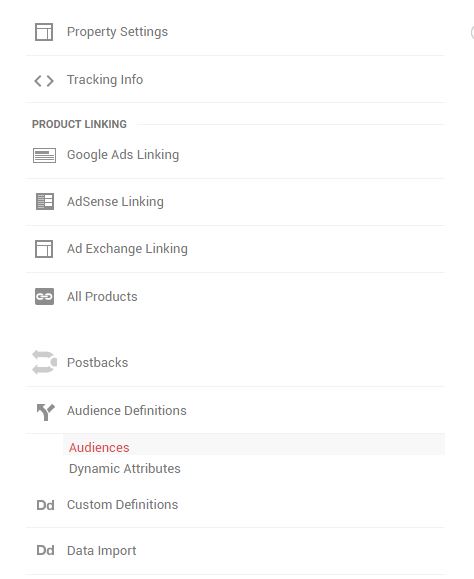
Where Audiences is located in Google Analytics.
When you open your Audienced tab, you can see all the existing ones you have. However, if you need to make an audience, you’ll start by clicking the red New Audience option. Just like with the goals, there are three steps in the creation process.
Step One
The first step is to choose your audience source. Once you set the audience source, you generally don’t have to come back and change anything for future audiences.
When you’re choosing your audience source, make sure to select your website that you’d like to track people from. After you’ve selected your website, you’ll continue to the next step.
Step Two
The next step is where you decide what attributes you want the audience to have. Basically, what you want them to do.
In all fairness, you could skip the goal step and set up audiences for some conversions such as landing page visitors, but to keep everything organized and for the sake of continuity, we set up goals first. Here are the options you have for defining an audience:
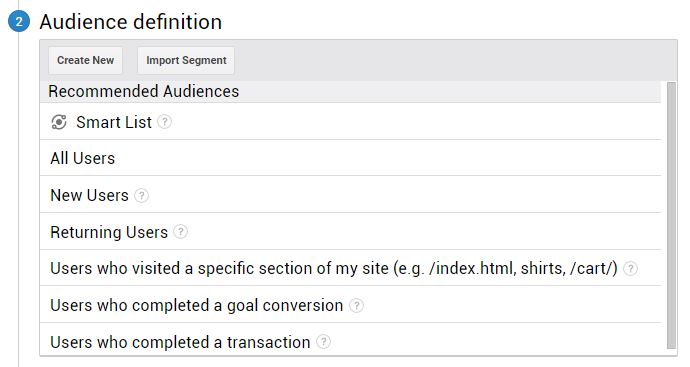
Audience definition options.
As you’ve already established goals, you’ll select the Users who completed a goal conversion option.
From here, you’ll define the audience, select the member duration, and name it. Here’s what the screen looks like:
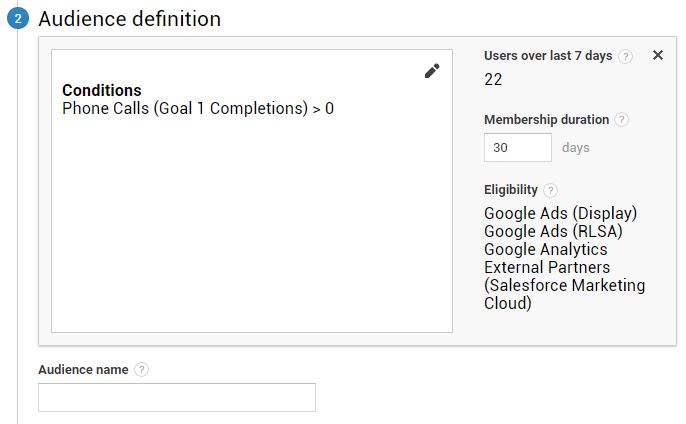
Conditions, membership duration, and audience name are all the settings you’ll want to fill out.
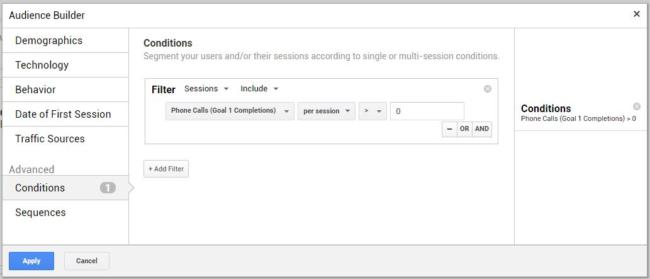
Now to set the condition, you’ll click the pencil icon next to Conditions. From there, you’ll want to choose which goal you’re tracking for this audience.
The Audience Builder.
As a note, you don’t need to touch anything else at all in this window. Just click the drop down for the Goals, select your goal, and apply it. When you’re choosing your goal, make sure to always select the completed version of it.
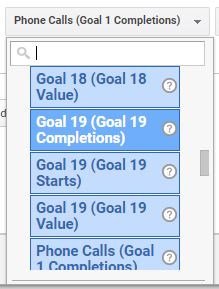
Select the Goal Completions.
There are three options here; starts, value, and completions. You’ll only need completions. After the goal is fine, you’ll choose the duration, name it, and continue to the next step.
Step Three
The last thing you’ll do in Google Analytics for audiences will be to select destinations.
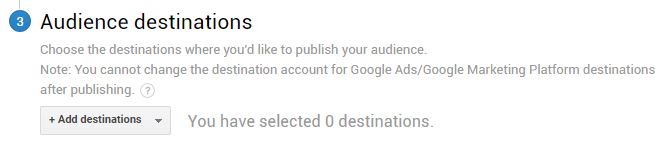
Audience destinations.
You’ll just click the drop down, and if you’ve already linked Google Analytics to Google Ads, you’ll select Google Ads and the Google Analytics account, and publish it. From there, you’ll just need to import the audiences into Google Ads.
Step Four
Importing the audiences into Google Ads is super easy. Naturally, you’ll first need to log into your Google Ads account.
If you haven’t linked Google Analytics to Google Ads from the Google Ads side, you’ll need to do that first. It will be under the tools options, in the Setup column, and under Linked accounts.
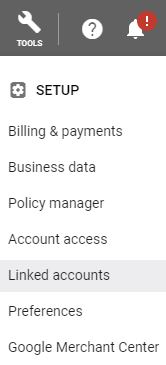
Tools > Setup > Linked accounts
Under linked accounts, you’ll select Details under Google Analytics. It’ll show you all the accounts you can link to Google Ads, and you’ll just link the applicable one.
After that’s all linked up, you’ll go back under Tools, but this time, we’ll go to the Audience manager. It’s under the Shared Library.
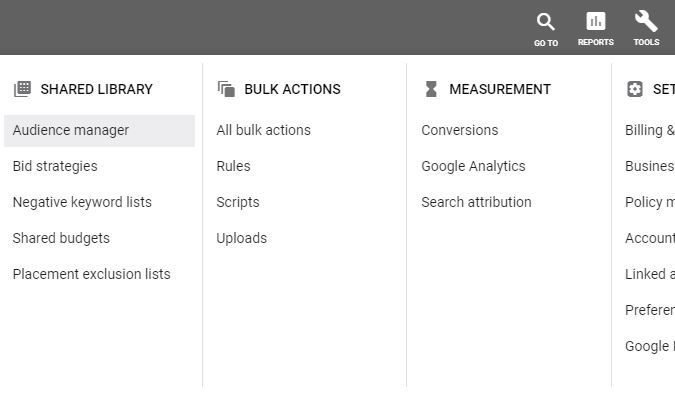
Tools > Shared Library > Audience manager
Audience manager will show you the audiences you’ve created in Google Analytics. From there, you’ll apply them to all your created campaigns.
Pro Tip: Start them all on observation only so you can gather data without excluding anyone – yet.
And that’s a wrap for audience creation!
Setting Up Google Analytics Events
Setting up events for Google Analytics can take a bit of time and planning. It is absolutely, unequivocally, and without a doubt, worth it.
You use events to track the smallest events on your webpage; this helps you understand more in-depth your visitors. Events are independent from web page loads. You’ll be tracking things like downloads, video plays, ad clicks, AJAX embedded elements, etc.
A more detailed explanation and guide to events can be found here. But I’ll give you a quick overview here:
Google Analytics is made up of three parts; they are:
- Category (such as a video)
- Action (such as play – you know, the video being played)
- Label (not required, but something like Home Page will do – to signify the video on the home page has been played)
This will be added into Google Tag Manager using some of the same steps we covered above. You’ll create a new tag for each event you’d like to track.
After you’ve linked Google Analytics to the Google Tag Manager’s new tag, you’ll change the event and fill out the following options:
Category – You’ll just fill in the category of what you’re tracking.
Action – You’ll actually have a lot of options here depending on the variables you’ve already created.
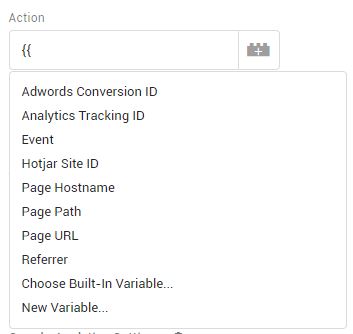
Lots of options for variables.
Label – Type in how you want this to be labeled.
After you have that all filled out, select what you want to trigger this event. (Page view recommended.) Name it, save it, and you’re good to go!
The Wrap on Setting Up Google Analytics
Alright! There we go, that’s a wrap on setting up Google Analtyics.

Me every time I finish a Google Analytics Set Up.
Although this isn’t an in-depth, crazy-detailed review of Google Analytics, (such an article will add a good hour to your read time.) , this should help you get started in Google Analytics.
We’ve had a lot of large companies come to us for management, and you’d be surprised how many of them have made mistakes in their Google Analytics account.
Here at Linear, we always say, “test everything!” and Google Analytics is vital to running tests and improving your results.
Follow this guide as a checklist, and you’ll have a pretty solid foundation for data tracking. What are your thoughts on Google Analytics? Have you used it before? Did we miss anything in the set up? Let us know in the comments below.

Evie Welborn
Account Manager
Evie is dedicated to keeping an eagle eye on her PPC and digital marketing accounts. When she’s not scouring through her accounts to make sure they’re flawless, she can be found ascending new heights in the local mountains or hiding inside the rock climbing gym when it’s too cold.
Leave us a comment.
Subscribe to our blog
Subscribe to our blog
Get weekly PPC & CRO advice sent straight to your inbox.