Table of Contents
Introduction to Google Ads Interface
Advertising On The Search Network
The Google Ads Display Network
Tracking More Than Conversions
What Is Google Ads?
From a business perspective, Google Ads is a behemoth responsible for 84% of Google’s total revenue, which exceeded $100 billion dollars in 2018.
Functionality wise, Google Ads is a pay per click (PPC) based advertising system, which means you’ll pay Google each time someone clicks on (or shows interest in) your ads.
The History of Google Ads
It’s crazy to think that Google has only been around for 20 years. I mean what did people do before you could “Google” something?

Oh ya.. Now I remember..
Anyway, Google opened up shop back in 1998 and launched Adwords 2 years later in October 2000. Which is pretty damn fast if you think about it…
Adwords began with only 350 advertisers and a sales team that sold top placements on Google search results, but that’s obviously not the case today. Over the last 19 years, Adwords has grown substantially reaching one million advertisers all around the world.
On July 24th, 2018 Google AdWords rebranded to Google Ads to better represent its growing network, which now includes banner ads, video ads, shopping ads and more. So if you’ve been confused about the name that should clear things up.
How Does Google Ads Work?
Google Ads works on a silent auction, meaning you’ll know what your bid is, but you’ll never be able to see what your competitors are willing to pay. This type of auction is called a Vickrey auction and Google completes almost 4 million of them every minute.
As you can imagine, with this many searches, there’s a lot of factors to consider. Like which ads to show and in what order.
Fortunately, that’s exactly what ad rank does by instantly comparing the following factors: max cost per click, quality score, ad format, ad extensions, and bid modifiers. Ads with the highest score rank first and take priority over those with lower scores.
Why Advertise on Google Ads?
Correction, the question is, why would you not advertise on Google Ads.
According to Google, advertisers see an 8:1 return for every dollar they spend on Google Ads. If I gave you $8 for every $1 you gave me would you do it? Of course, you would, it’s a no-brainer.
But if you’re still not convinced then I recommend taking a moment to consider the cost of not advertising.
Your competitors are using Google Ads, and even if you rank organically, their ads are appearing first. They might even be bidding on your brand terms and stealing customers away from you. How much is that costing you?
Introduction to Google Ads Interface
By offering different levels of control, Google Ads aims to please agencies and companies alike. If you’re an agency or someone who manages multiple Google Ads accounts then you’ll want to set up a My Client Center (MCC) Account. If you’re a solo company or only plan to manage one Google Ads Account then a regular Google Ads account will suit you just fine.
To create your MCC Account you’ll need to fill in some basic information:
- Your email address
- The name of your account (usually your company’s name)
- How you will use your manager account (your accounts or other peoples accounts)
- Your country/territory (where you’re located)
- Your time zone (so your data matches with where you are located)
- Your currency (USD, EUR, etc.)
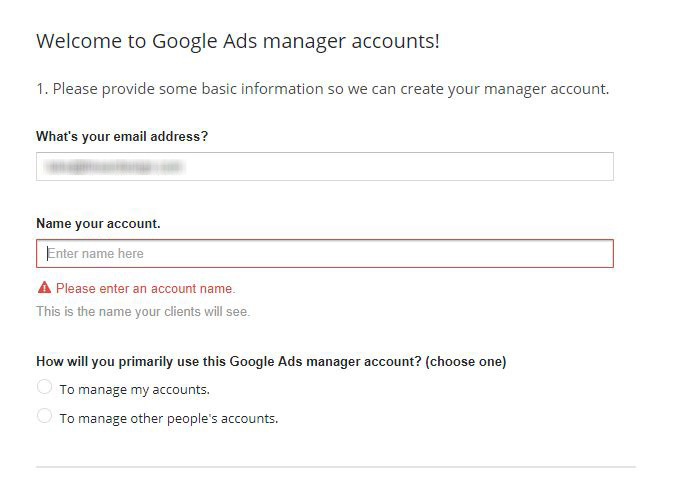
Creating your Google Ads MCC account.
After you complete the signup process and login you’ll see the left navigation bar, left page menu, subpage menu, top bar, and table toolbar. In the top bar, you’ll see reports, tools, help, notifications, your profile, and a dropdown that lets you switch between accounts.
Navigation Menu
The dark grey navigation menu on the far left side lets you switch between search, display, video, app, shopping, and smart campaigns.
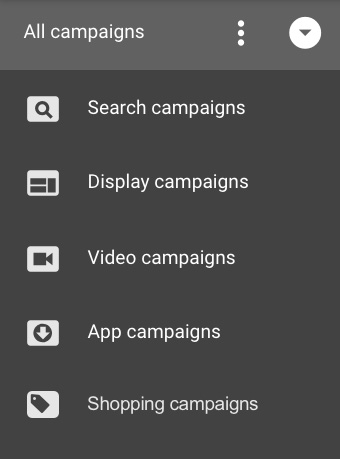
Switch between viewing Search, Display, Video, App, Shopping, Smart or All Campaigns.
Clicking on any of these main tabs will update your main screen and the campaigns listed below. Now you can select and expand the campaigns to view their ad groups.
And to make things even better you can filter by campaign and ad group status.
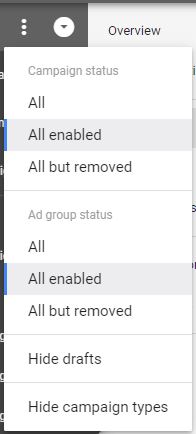
Filter your campaigns and ad groups to show all, all enabled, or all but removed.
This makes it easy to hide campaigns and ad groups that are paused or removed.
Page Menu
The light grey menu located just left of your Navigation Menu is your Page Menu. The Page Menu lets you navigate through all different levels of your Google Ads campaigns. For example, you can view ad groups, ads, keywords, extensions, audiences and much more.
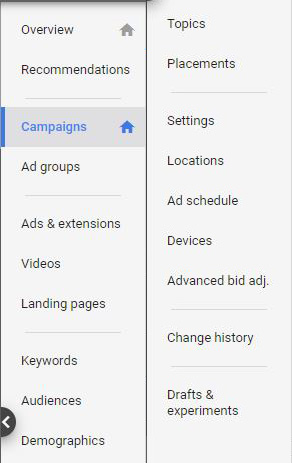
The Page Menu is kept on the far left next to your Navigation Menu.
Here’s a list of all the tabs you’ll be able to select from your Page Menu:
- Overview
- Recommendations
- Accounts (Only available on MCC accounts)
- Campaigns
- Ad Groups
- Ads & Extensions
- Landing Pages
- Keywords
- Audiences
- Demographics
- Placements
- Settings
- Locations
- Ad Schedule
- Devices
- Advanced Bid Adjustments
- Change History
- Drafts & Experiments
- Partners Program (Only available on MCC accounts)
When clicking through the tabs in your Page Menu you can also switch between campaigns using your Navigation Menu. Since your view won’t change from one campaign to the next, you can easily compare your findings.
Each view also comes with an additional Subpage Menu that gives you more performance insights.
Subpage Menu
Most items in the Page Menu have different Subpage Menus. So the Subpage Menu you see will depend on what Navigation Menu and Page Menu you have selected.
For example, clicking on Keywords will show you a Subpage Menu with Search Keywords, Negative Keywords, Search terms, and Auction insights.
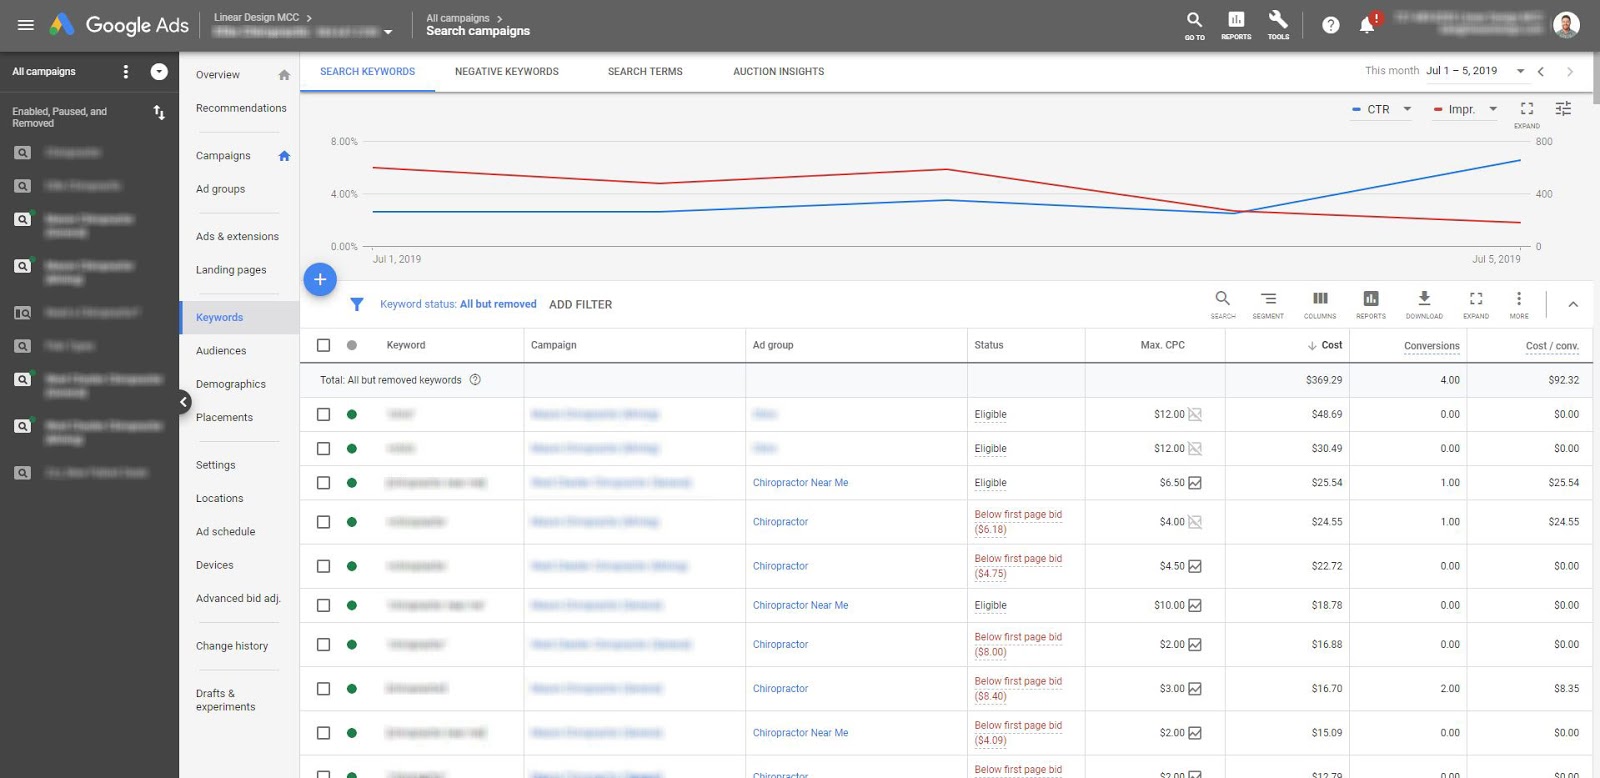
Below the Subpage Menu, you can also view a live graph.
However, if you were to click on the ad groups tab you’d see a different Subpage Menu like the one below.
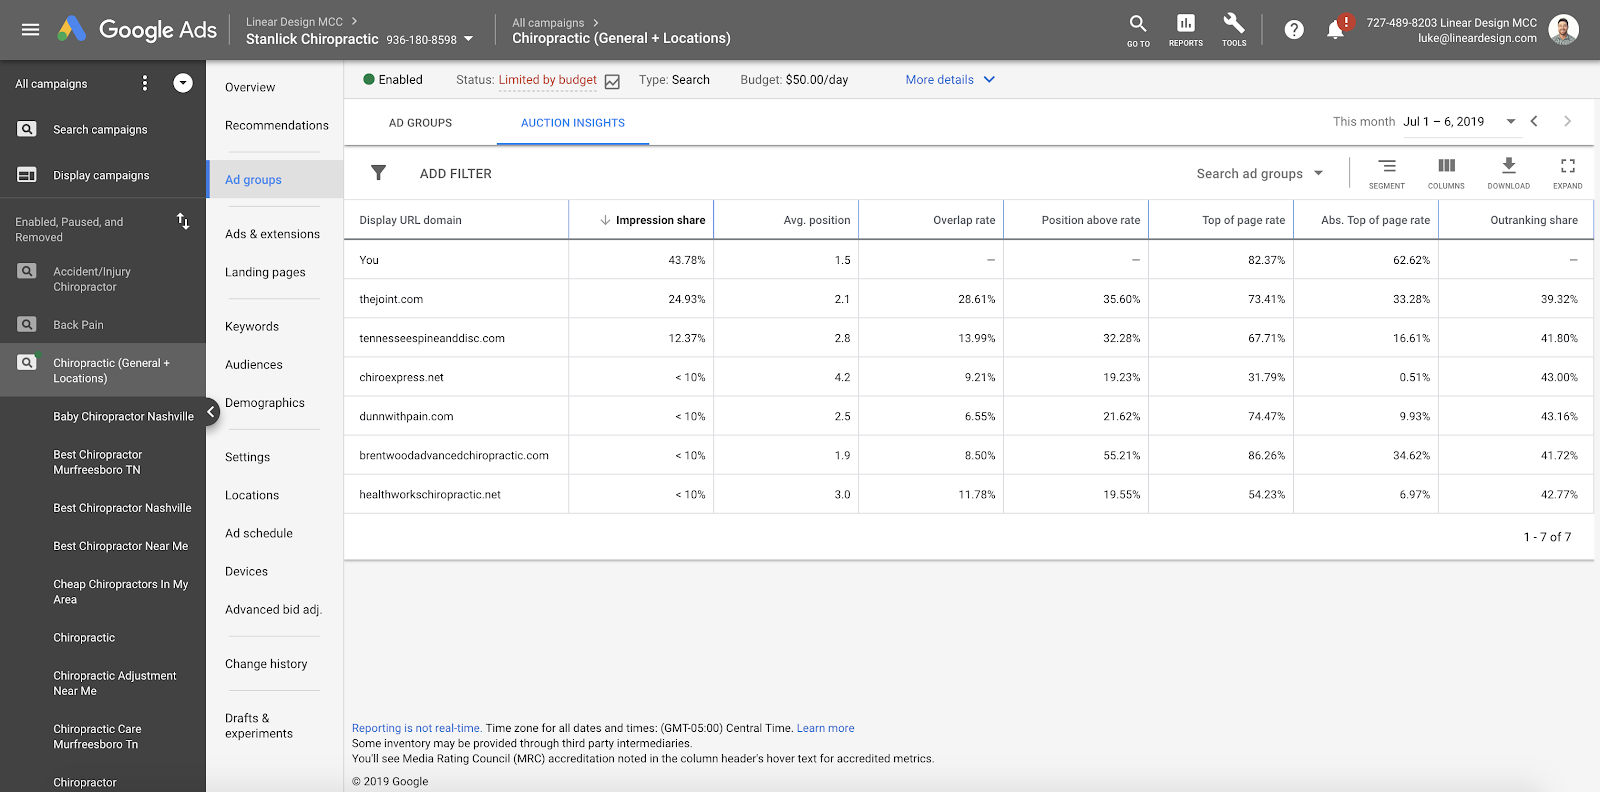
You can use this Subpage menu to view your ad groups or the auction insights report.
So as you can see Google gives you different options and tools depending on what tab you select. This kind of organization makes it easy to make data-driven changes to your account without ever running a report or opening a spreadsheet.
Top Bar
The top bar is the only consistent menu inside the Google Ads interface. It stays the same no matter what account, campaign, or Subpage Menu you have selected.
Table Toolbar
The Table Toolbar lets you adjust tables, customize and segment your columns, and create filters for your reports.
Overview Tab
When you click on any of the campaigns or ad groups in your account you’ll be greeted by the Overview Tab. You can find the Overview Tab located at the top of the Page Menu.
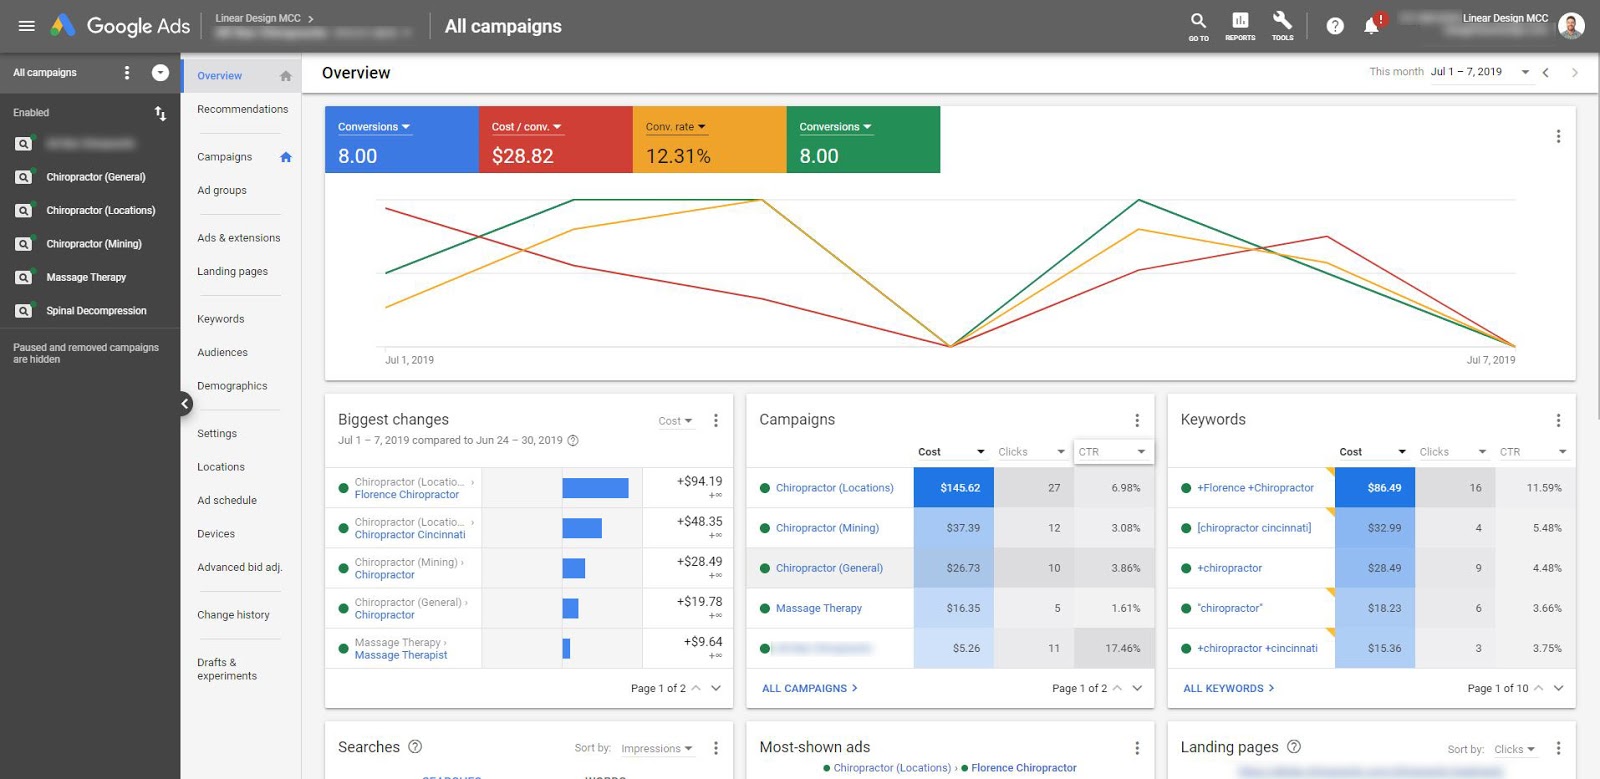
The Overview Tab shows your biggest changes, most-shown ads, recent search terms and more…
You can also customize all of the windows on your Overview Tab. For example, the Biggest Changes window lets you see changes in cost, clicks, conversion and many other KPIs.
Live Performance Graph & KPIs
Another added benefit of the Overview Tab is the live performance graph at the top. You can pick up to four KPIs and toggle them on or off to see a live performance graph.
Live performance graphs can also be used to compare week over week or month over month performance.
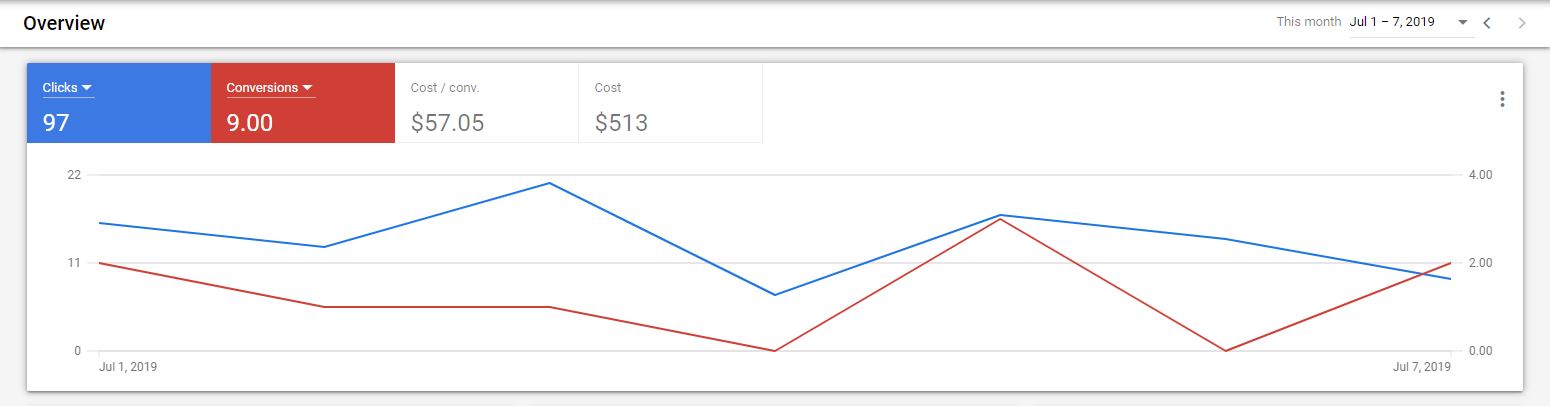
See how your campaigns perform over time
Think of the live performance graph as a fifty thousand foot view of your campaigns. You can use it to stay one step ahead and put a stop to downward trending KPIs before they become a major problem.
Tools Tab
Your tools tab is located in the Top Bar of your Google Ads dashboard and it’s home to some of the most important Google Ads options.
Tools let you preview ads, set up conversion tracking, add users, and more…
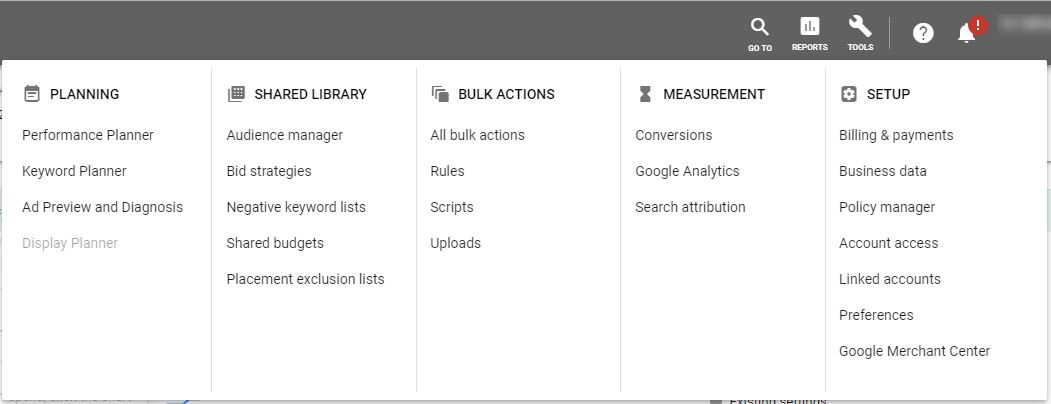
When expanded, the tools tab turns into a tool chest with five different categories of options and actions.
- Planning
- Shared Library
- Bulk Actions
- Measurement
- Setup
Of course, each one of these categories houses between three and seven tools. And even though this might seem a tad overwhelming it’s a big improvement from the old Adwords interface.
The Planning Category is home to your Performance Planner, Keyword Planner, Display Planner, and Ad preview tools. However, the Display Planner will be greyed out if you’re not running any display campaigns.
Shared Library
The Shared Library is home to some vital targeting, bidding, and budgeting information including:
- Audience Manager
- Bid Strategies
- Negative Keyword Lists
- Shared Budgets
- Placement Exclusion Lists
Audience Manager is where you’ll go to create new audiences and find existing ones. You can also view audiences insights and sources. Google Ads will even tell you what type of tracking is enabled and if there are any tracking issues.
The Bid Strategies tab lets you create and assign bidding strategies to multiple campaigns or ad groups. You can also use the Table Toolbar to filter bid strategies by performance. This makes it possible to find and apply the best-performing bid strategies all from one tab.
Negative Keyword Lists make it easy to remove pesky search terms from multiple campaigns or your entire account.
We usually frown on Shared Budgets because they give Google Ads control over how and where your budget is spent. Be that as it may, you can create and assign budgets across any of your campaigns with the Shared Budgets feature.
Placement exclusion lists are similar to Negative Keyword Lists, but for the display network. These lists tell Google Ads what websites, YouTube Channels, and Apps you want to exclude. And like Negative Keyword Lists, Placement Exclusion Lists can be applied to multiple display campaigns.
The Search Feature
The Go To feature in the Top Bar, just to the left of Reports, makes it easy to search for anything in your Google Ads account. However, it doesn’t let you go to specific campaigns, ad groups, or keywords. So it’s more of a navigational shortcut than a search feature. You can use it to quickly hop to and from any of the pages found in your Page Menu.
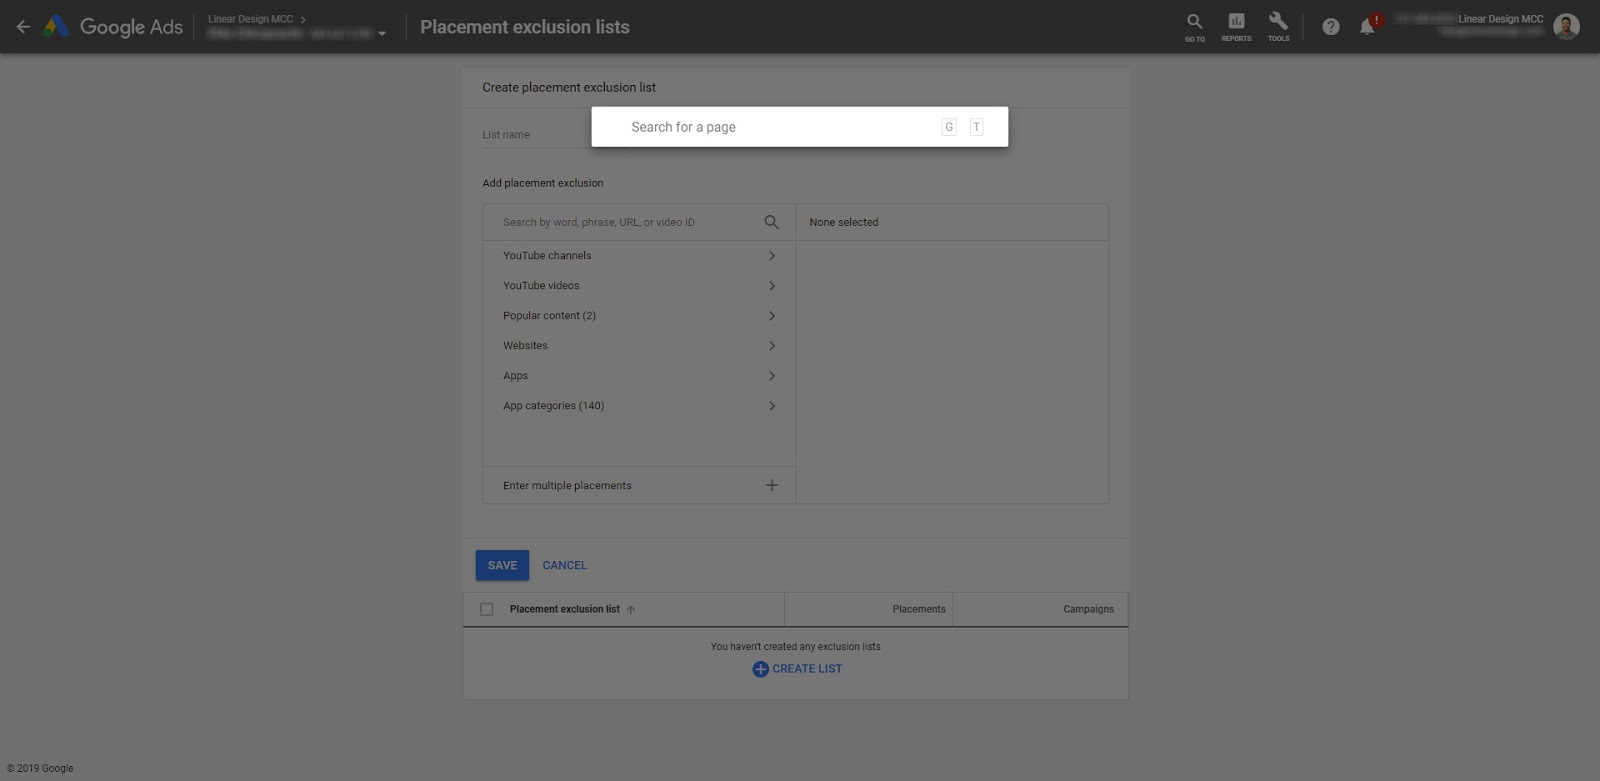
Use the Go To feature in Google Ads to more quickly navigate your account.
Even though the Go To feature might not be as robust as we hoped it can be accessed with the G then T keyboard shortcut. So if you know what you’re looking for this feature can really speed up your optimization routine.
Google Ads Networks
Google Ads has six different campaign types, but we can mash them all into three categories.
First, you have the Search Network where you bid on keywords that will match up with users’ searches and trigger your ads. This is also where Shopping Ads live since they are technically search-driven. The Shopping Network pulls data from your Merchant Account Center (MAC) and matches items in your inventory to user’s searches.
Second, you have the Display Network where you use targeting criteria to show your ads to users that match a certain demographic, age group, or browsing behavior. Aside from Display campaigns, App Campaigns and Smart Campaigns also utilize Google’s display network.
Third, is the YouTube Network that allows you to utilize YouTube and other Google partner sites that offer video streaming. You’ll choose between several campaign subtypes like non-skippable in-stream, outstream, drive conversions, ad sequence, and shopping.
Now that we’ve covered the basics of each network, let’s take a closer look at each of them.
The Search Network
The Search Network is probably the most well known of all the Google Ads Networks. It’s also the network with the highest commercial intent. This means people who search Google also have the potential to purchase something from you. This makes it the network of choice for advertisers who want to drive conversions and sales.
Advertising on the Search Network is a reactive form of marketing because you’re only showing your ads to people who are interested. We like to think of these people as the “low hanging fruit”. These are the prospects who are already looking for what you offer so it’s much more likely that they’ll make a purchase.
In marketing terms, traffic from the search network is warm traffic they’re already at the bottom of the funnel. You don’t have to try to convince them nearly as much as visitors in the early stages of your funnel. This means you can ask visitors from the Search Network to convert on your core offer, fill out a form, buy a product, etc.
The Display Network
The Google Ads Display Network is made up of over two million websites and reaches more than 90% of the internet.
Here’s how it works – publisher websites and apps partner with Google Ads using something called AdSense to allow ads to be displayed on their site. After a publisher has opted into Adsense placements they’ll get a portion of the ad revenue that their site generates. This type of revenue sharing is one of the reasons Google Ads Display network has continued to expand.
Ads on the Display Network come in many different shapes, sizes, and formats. You can even use the Display Network to advertise on Gmail. However, visitors from the Display Network are much colder than those from the Search Network. These people aren’t actively searching for what you have to offer so getting them to buy something is much more difficult.
Display Network visitors are usually higher up in your funnel and still in the research phase. This means asking them to fill out a form, call your office, or buy something is the wrong move. They just aren’t ready to make that kind of decision yet, but you can still get conversions if you pick the right offer.
So, instead of trying to get them to convert on your core product or service try offering them something of value first. Ask them to download a free guide, eBook, or sign up for a webinar. Offers like this warm your visitors up and help move them closer to the bottom of your funnel.
The YouTube Network
YouTube is the world’s second-largest search engine with over one billion active users. Combined these users consume more than one billion hours of video per day. What’s more important is that 96% of consumers surveyed said videos helped them make online purchase decisions.
Video ads on the YouTube Network come in six different advertising formats all with unique characteristics. You can choose from Skippable, Non-Skippable, Bumper, Display, Overlay, and Sponsored Cards. In addition, you can pair your video ads with companion banners and call to action overlays.
Advertising on the YouTube Network can be a highly effective way to generate conversions and sales. Generally speaking video ads on the Youtube Network have higher conversion rates in comparison to ads on the Display Network. However, video ads do have a few drawbacks. For starters, they’re much more time consuming and costly to create. And having an amazing video produced still won’t guarantee conversions. You’ll need to match the right audience to the right offer and move visitors through the buying cycle.
In summary, advertising requires planning, strategy, and execution regardless of the network or campaign type you choose. So let’s put a plan in place for your Search, Display, Shopping, and Video Campaigns.
Advertising On The Search Network
Looking for low hanging fruit? The Search Network is where you’ll find them.

Oh ya! Low hanging fruit for the win! – Image Source
People on the Search Network are already searching for what you have to offer, so advertising here is generally the quickest way to generate leads. Like low hanging fruit, traffic from the Search Network is ripe and ready to convert. You won’t have to do a great deal of convincing to get them to fill out your form or make a purchase. This is why the Search Network is a great place to start.
Initial Research
When you’re just getting started with the Search Network you don’t need to do much research. You don’t need to worry about competition levels, suggested bids, average costs per click, or search volume. All of these metrics are dynamic and will be different based on account structure, geographic location, devices, time of day, day of week, etc.
Even if your research points you to a longtail keyword that looks like a goldmine it probably won’t be. Keyword match types like phrase match and broad match allow your competitor’s ads to appear for a wide range of long tail keywords. So your chances of finding the perfect long tail keyword that no one has ever found before are slim to none.
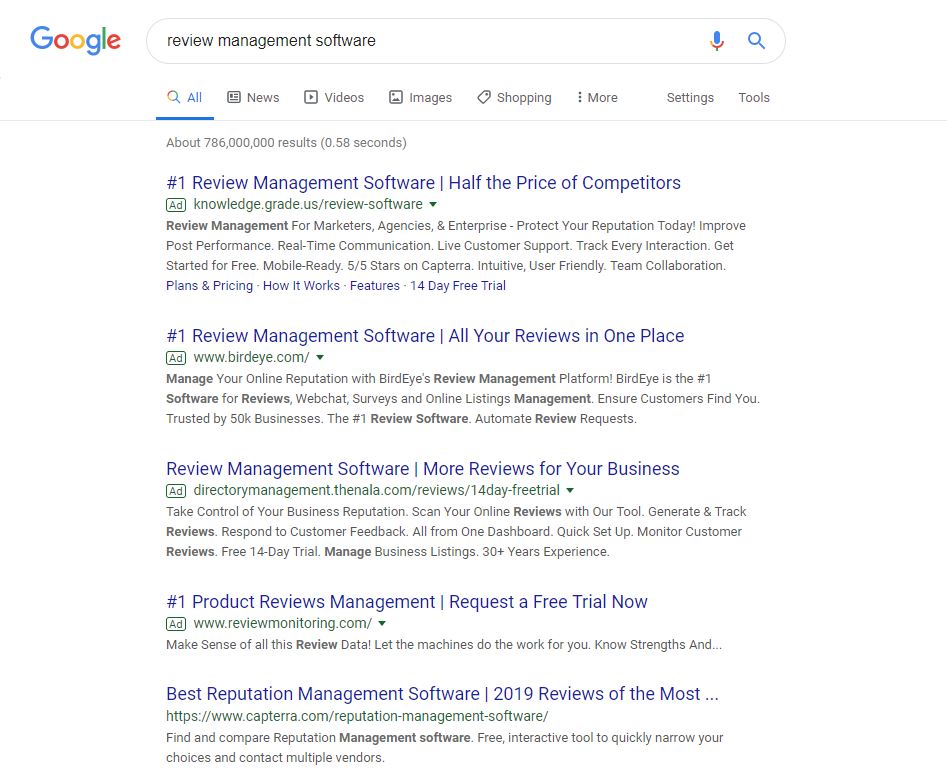
So instead of spending hours on keyword research, you can start with a few root keywords. Root keywords have the shortest word count but contain enough context to make sense. For example, you could use the root keyword “review management” instead of just “review” or “review management software”. After you’ve picked out a few root keywords you can use Thesaurus.com to find synonyms and create other root words that you might want to bid on.
Keep in mind, Google Ads Keyword Planner and other research tools can be extremely useful later on when you’re trying to grow and expand your account.
If you’re not getting enough traffic from the keywords you’ve selected then you may need to increase your bids. If your existing keywords are appearing at the top of search results and traffic is still too low then you’ll want to add new keywords. Keep in mind the more keywords you have, the more clicks you will get, and more clicks mean more expensive, so take it slow.
Keyword & Query Basics
The words and phrases you bid on in Google Ads are called keywords and they tell Google when to trigger your ad. When someone’s search matches a keyword in your account then Google could show your ad on search engine results pages (SERP). Of course, there are a lot of factors that come into play here like location, quality score, max CPC bid, etc.
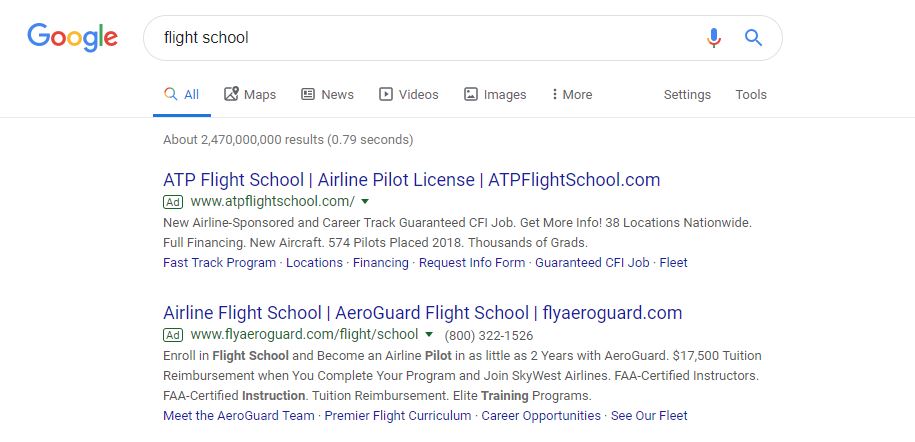
Search engine results page (SERP)
The most important thing to remember about keywords is that they all perform differently and some will be better than others.
For example, let’s say you’re a flight school. You might bid on keywords like flight school, learn to fly, commercial pilots license, and aviation courses. All four of these keyword examples will get your ad to appear on Google, but they won’t all perform the same way. Each of these keywords will vary in search volume, traffic quality, and average cost per click.
Speaking of cost per click, you’ll need to specify a bid for these keywords that’s competitive enough for your ads to be shown. If your bid is too low then your ads might rank very low on SERP or not at all.
How to Judge Whether Keywords Are Good or Bad
Sometimes the best way to determine if keywords are good or bad is to give them a test run. But it’s not the only way. There are a lot of indications that can help you decide if a keyword is worth bidding on or not. Some keywords have lower commercial intent to begin with, but that doesn’t mean that they won’t work.
Take for example these keywords: Chiropractor Open Now, Chiropractic Care, Back Pain. All of these keywords are related to someone who might be in need of chiropractic care, but one of them has more commercial intent that the others. If someone is searching for “chiropractor open now” then they want to see a chiropractor right away. If someone is searching for chiropractic care they are aware that chiropractic treatment is an option, but may not be totally convinced that it will work for them. Someone searching for back pain may never have considered seeing a chiropractor to treat their back pain. At this point, they are actively searching for possible solutions to their back pain, but may not be aware that a chiropractor can help.
Even though none of the keywords I’ve just mentioned are necessarily bad keywords they all have different levels of search intent and will perform very differently.
So how do you spot a bad keyword?
Keywords are usually only relatively bad, that is bad relative to the offer. But the only surefire way to know if a keyword will be good is to give it a chance.
If a keyword exceeds your cost per conversion goal by more than 300% then chances are its relatively bad for you. But don’t rule out bidding on the keyword again in the future if it has high search volume. You might just need to change up your landing page or test different offers. Match the right landing page to the right offer and your conversion rate will go up while your cost per conversion goes down.
Keyword Match Types
Keyword match types let you control the amount of Google searches that can trigger your ads.
There are four different keyword match types:
Broad Match
This is the everything goes match type in the sense that it will trigger your ad for the most searches compared to the other match types available.
Broad match keywords can be a little trigger happy and cause your ads to appear for irrelevant searches. For this reason, we don’t recommend using broad match keywords.
Instead, we recommend using single keyword ad groups (SKAGs) and sticking with the following three match types.
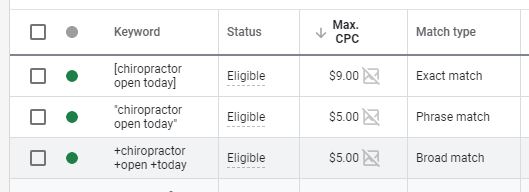
Exact Match, Phrase Match, and Broad Match Modifier
Broad Match Modifier
Placing the plus symbol in front of each word in your keyword chain creates a broad match modifier match type. This small change makes a big difference in what Google can actually use to trigger your ads.
Regular broad match allows Google can trigger your ads for searches that don’t even contain your keyword. Broad match modifier allows your ads to be shown for any query that contains all the words in your keyword. This means any search containing the words in your keyword could trigger your ad regardless of the order they appear.
For example, if you bid on the broad match keyword +chiropractor +open +today your ad could appear for any of the following searches:
- chiropractor that is open today
- open chiropractor today
- find chiropractors near me open today
Notice that words not in your keyword can be added before or after any of the words in your keyword.
Phrase Match
The phrase match type narrows Google’s ability to trigger your ads more than broad match modifier. Phrase match keywords will only show ads when searches contain the words in your keyword next to one another.
The keyword “chiropractor near me” could cause your ads to appear for searches like:
- chiropractor near me open today
- walk in chiropractor near me
- near me chiropractor
Phrase match keywords can trigger ads for searches when words appear before or after the phrase, but not between words in the phrase. The order of words in the phrase isn’t a factor so long as all the words are together.
Exact Match
Back in the day, the exact match type only triggered your ads when a user’s search was identical to your keyword. However, Google has shifted to exact match to include search intent. This means it’s no longer limited to showing your ads only when searches are identical to your keyword. These days, exact match keywords can trigger ads when searches have the same intent as identical queries.
Many advertisers long for the days when Google Ads was Adwords and exact match meant exact match. Be that as it may, this transition is here to stay and despite all the hype exact match really hasn’t changed that much.
For example, the keyword [male chiropractor] could trigger your ads for the following searches:
- chiropractor male
- man chiropractor
- male chiropractic
Yes, this does give exact match keywords more wiggle room, but there’s also a simple workaround. If you’re using SKAGs then you can use your search terms report to create new ad groups from the keywords that aren’t identical. Just make sure you exclude the new keyword from the original and vice versa.
Search Terms/Queries
The entire basis of Google’s Search Network revolves around bidding on keywords, but that’s not what you pay for.

Confused? It’s okay we get that a lot…
If you’re not paying for keywords then what are you paying for?
Search Terms (what people actually search for) determines what you pay. So a phrase match keyword like “chiropractic care” would trigger your ads to appear for multiple search terms. As you can imagine, there could be hundreds of different searches from this one keyword.
For example, if someone searches for chiropractic care near me, best chiropractic care, chiropractic care in utah, etc., your ad could be triggered. All of these are examples of search terms and they show you what people are actually typing into the search bar on Google.com. They are also what you’ll be charged for and that means each search term comes with its own unique cost per click.
For this reason, it’s crucial to keep a close eye on your search terms report. If you don’t they can quickly generate lots of clicks, but no conversions.
You can either add search terms as negative keywords or use them to create new ad groups. After all, if you know what people are searching for wouldn’t you want to target those exact terms?
Negative Keywords
Some keywords could be triggered by thousands of different search terms and not all of them are worth your hard-earned cash.
Negative keywords let you control which search terms will trigger your ads and which ones won’t. Common negative keywords include words like free, cheap, hire, job, and other words that indicate a low intent. If someone searches for “chiropractic job” then they aren’t a patient they are looking for a job. So unless you’re trying to hire someone you’re wasting your money each time that person clicks on your ad.
Fortunately, negative keywords can prevent these searches from triggering your ads. Without them, you would only be able to convert a small percentage of your traffic.
You can apply negative keywords to different levels of your account by using negative keyword lists or applying them individually.
Here’s how it works:
Negative Keyword Lists
You can create negative keyword lists and add them to as many campaigns as you wish. When you update the list with additional negative keywords they will automatically apply to the campaigns associated with your list. You can always remove campaigns from the list if needed.
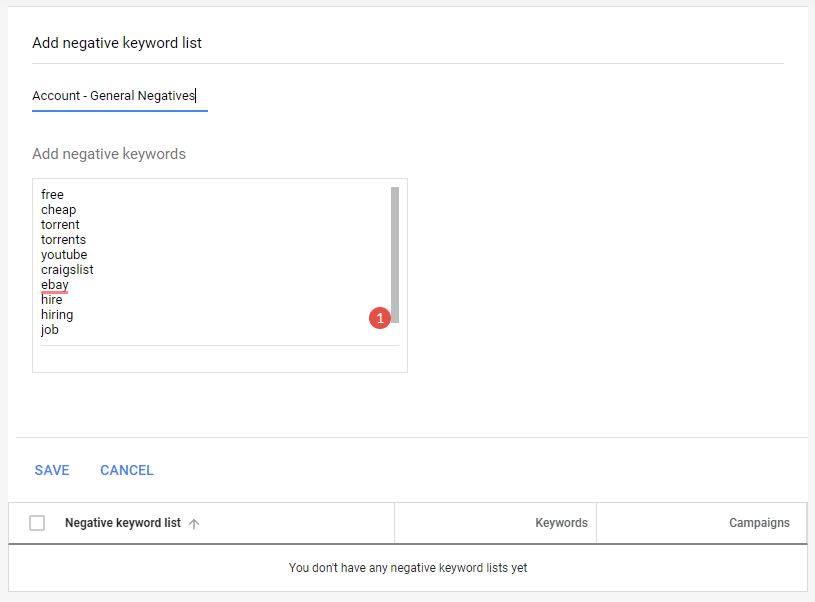
Add spammy, non-relevant, and low intent words to a negative keyword list.
You can use campaign level negative keyword lists to prevent searches with low intent from triggering ads in all of your campaigns. This is a list of negative keywords that you never want your ads to appear for so you apply it to all of your campaigns. You can add spammy, irrelevant, and inappropriate search terms to this list to exclude them from all of your campaigns at the same time.
Campaign Level
You can add negative keywords on the campaign level to exclude specific search terms throughout a single campaign.
Ad Group Level
Negative keywords added to the ad group level will exclude search terms within a single ad group, but not throughout the entire campaign. This is especially useful to prevent similar ad groups inside your account from competing with one another.
Bidding
Google Ads gives you several different options when it comes to bidding. So how do you know where to begin?
Well, if you’re new to Google Ads then you should be conservative. After all, why spend more if you don’t need to? Start your bids off low and use a manual bidding strategy so you have complete control over how much you spend on each click. If you’re not getting impressions or your average position is too low then you can always raise bids later on.
You can choose to set bids manually or select one of the following automated bid strategies:
Target CPA
This bidding strategy will automatically set bids for you to help you get as many conversions as possible at the target cost per acquisition (CPA) you specify.
Target ROAS
For the profit-minded advertiser, this strategy focuses on getting you as much value as possible at your target return on ad spend (ROAS). As a side note, you won’t be able to use this strategy if you’re not tracking conversion value.
Maximize Clicks
This strategy will attempt to get you as many clicks as possible within your budget.
Maximize Conversions
Google Ads will automatically adjust your bids to get you the most conversions possible within your budget.
Maximize Conversion Value
This bidding strategy will automatically set bids for you to help drive the highest conversion value possible.
Target Impression Share
When you really want to make sure your ads get seen you can use this strategy to automatically set your bids to hit the target impression share that you specify.
Other Bidding Strategies Overview
Google Ads is always trying to make it easier for advertisers to get the results they want. As a part of this results-driven approach, Google now helps guide your bidding choices. Just select what you want to focus on and Google will pick the appropriate bidding strategy.

Want to focus on conversion value? Then Target ROAS is the strategy for you!
You can bypass this feature by clicking the link at the bottom and opting to select a bid strategy directly.
Automated bidding strategies use historical campaign performance to optimize your bids. For this reason, it’s best to start with a Manual CPC bid strategy. In our experience, automated bidding works best after you’ve dialed things in manually.
Ad Creation
Ads are the only part of your Google Ads account that your visitors will ever see. They won’t see your keywords, bids, location, or any other targeting criteria. Your ads are like the shiny well-polished paint job on your brand new Lamborghini, but they aren’t what helps you win the race.

It’s what’s under the hood that really counts!
Writing highly relevant Google Search Ads is important, but not as important as you might think. Even though ads are what visitors see and actually click on they’re lower on the list of priorities when it comes to your advertising success.
If we were writing a list of priorities this is what it would look like:
- Conversions – Your ability to convert visitors.
- Sales – Your ability to close the deal (eCommerce advertisers not included).
- Targeting – The keywords and audiences you target.
- Ads – The creatives you design and ad copy you write.
You could write amazing ads that have impressive click-through rates, but if your visitors never convert then it doesn’t matter. This isn’t to say that you shouldn’t spend any time writing ads it just shouldn’t be your first priority. Lock in your conversions, sales, and targeting then you can focus on ad testing.
Text Ad Layout
Text ads have changed tremendously since Google Adwords made its debut. Now Google Ads allows for more headlines, longer descriptions, and different types of text ads altogether.
Currently, you can create three different types of text ads: Text Ads, Responsive Search Ads, Ad Variations.
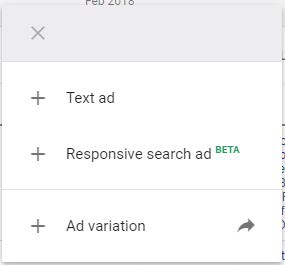
Creating Text ads, Responsive search ads, and Ad variations.
Since these choices are fairly new we’re going to breakdown each type of search ad.
Text Ad
The traditional text ad (also called expanded text ads) has room for up to three headlines and two descriptions.
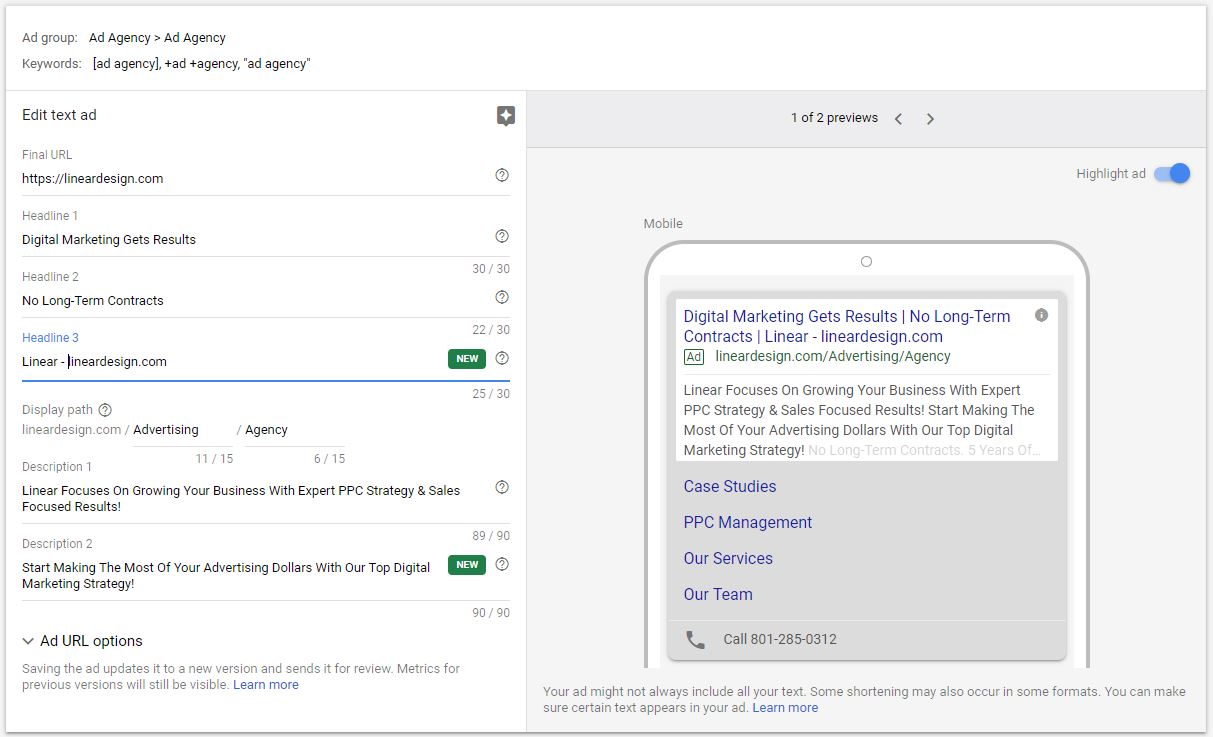
Creating a Text ad
Here’s what the anatomy of an expanded text ad looks like:
Final URL: This is where you’ll enter the website or landing page you want to take visitors to when they click on your ad. Google will use the Display Path so visitors won’t be able to see the full URL until they click on your ad. They’ll only be able to see your root domain (like www.example.com).
Headline 1: This is the first line of text in your ad copy and the first thing visitors will read. So make sure you use your keyword in the first headline. This will boost your ad relevance and help you score a higher click-through rate. Keep in mind, that you are limited to 30 characters so you may have to improvise with long tail keywords.
Headline 2: This is the second line of text that your visitors will read and it’s also a great place to test out different value propositions. It’s also limited to 30 characters.
Headline 3: The third and final headline appears after headline 2 and may not always be shown. It also has a 30 character limit. Headline 3 is a great place to list your brand or company name.
Display Path: As we mentioned earlier, the display path is shown to visitors before they click on your ad. It acts as a placeholder for your URL and should include your keyword whenever possible. The display path is limited to two 15 character paths separated by a forward slash.
Description 1: This is the first section of text that appears below your headline. You can write up to 90 characters and should try to include your keyword and a compelling call to action.
Description 2: This is the second section of text below description 1. It is also limited to 90 characters, but unlike description 1, description 2 may not always be shown.
Ad URL Options: These give you the ability to add tracking templates to ads individually. However, we usually recommend using account-level tracking templates to save time. You can also set a different final URL for mobile users.
Be sure to use all of the headlines, display path, and descriptions. Filling them in completely is one of the easiest ways to improve your ad’s performance. The more text your ads have the bigger they will be in search results. This improves your ad visibility and leads to better click-through rates.
Responsive Search Ad
Responsive search ads are still in beta testing, but so far we like what we see. You can add up to 15 different headlines and 4 descriptions. Then Google Ads will automatically test different combinations to learn what performs best. Plus, you don’t have to run responsive search ads exclusively. You can test responsive search ads against expanded text ads for a side by side comparison.
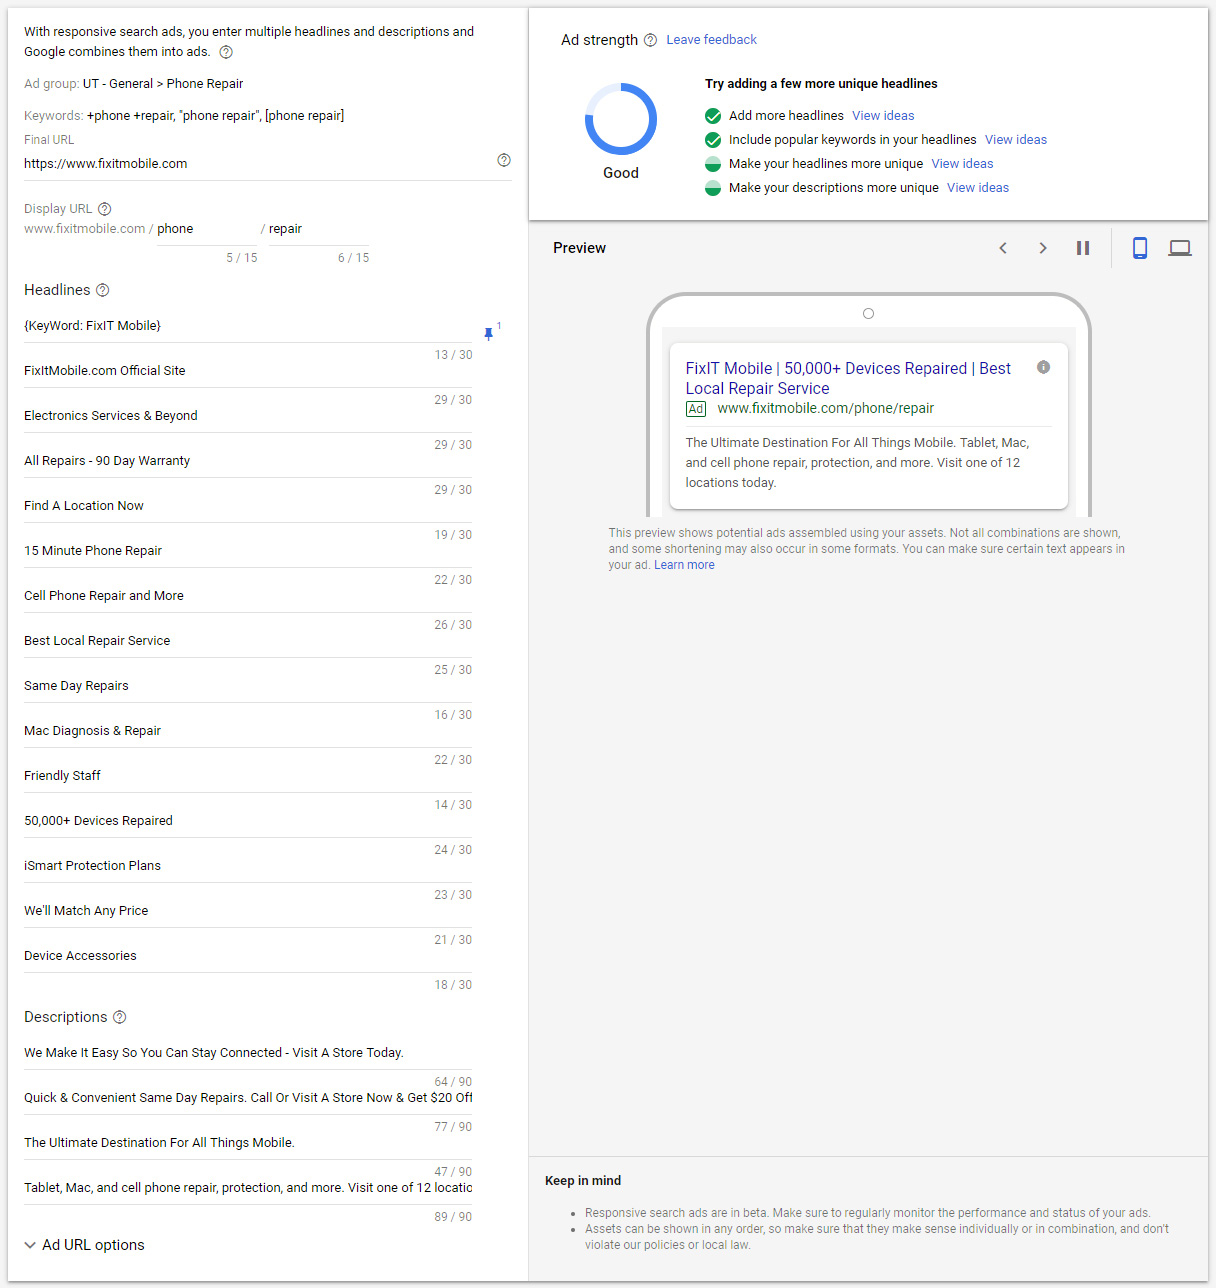
Creating a responsive search ad
Google has gone out of its way to make responsive search ads a breeze. In addition to a plethora of features and automatic testing, Google Ads also gives you guidance every step of the way.
In the upper right-hand corner, you can see a real-time Ad Strength meter. This meter analyzes your headlines and description text and estimates how well your ad will perform.
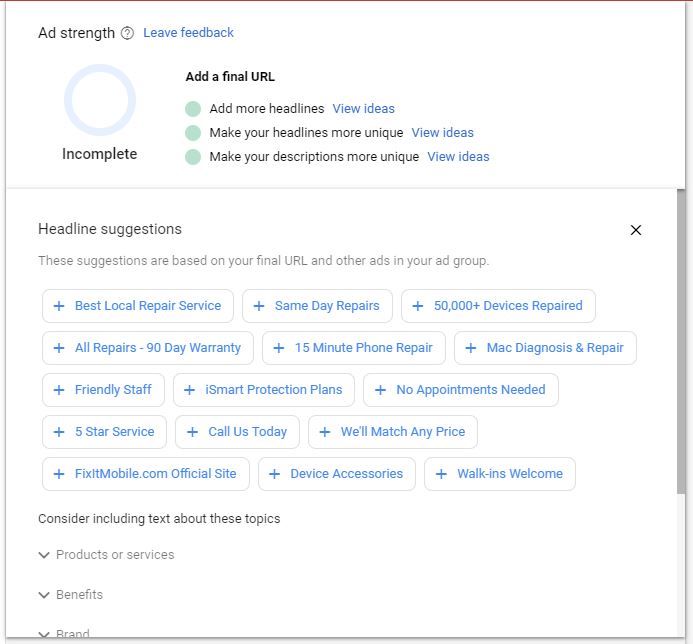
The Ad Strength Meter for Responsive Search Ads
Google Ads even analyzes your website and gives you suggested headlines that you can easily add with one click.
Call-Only Ads
Call-only ads are designed to drive more phone calls to your business. When a customer clicks on your ad, the ad calls your business instead of taking visitors to your website or landing page.
Google still gives you plenty of ways to customize call-only ads.
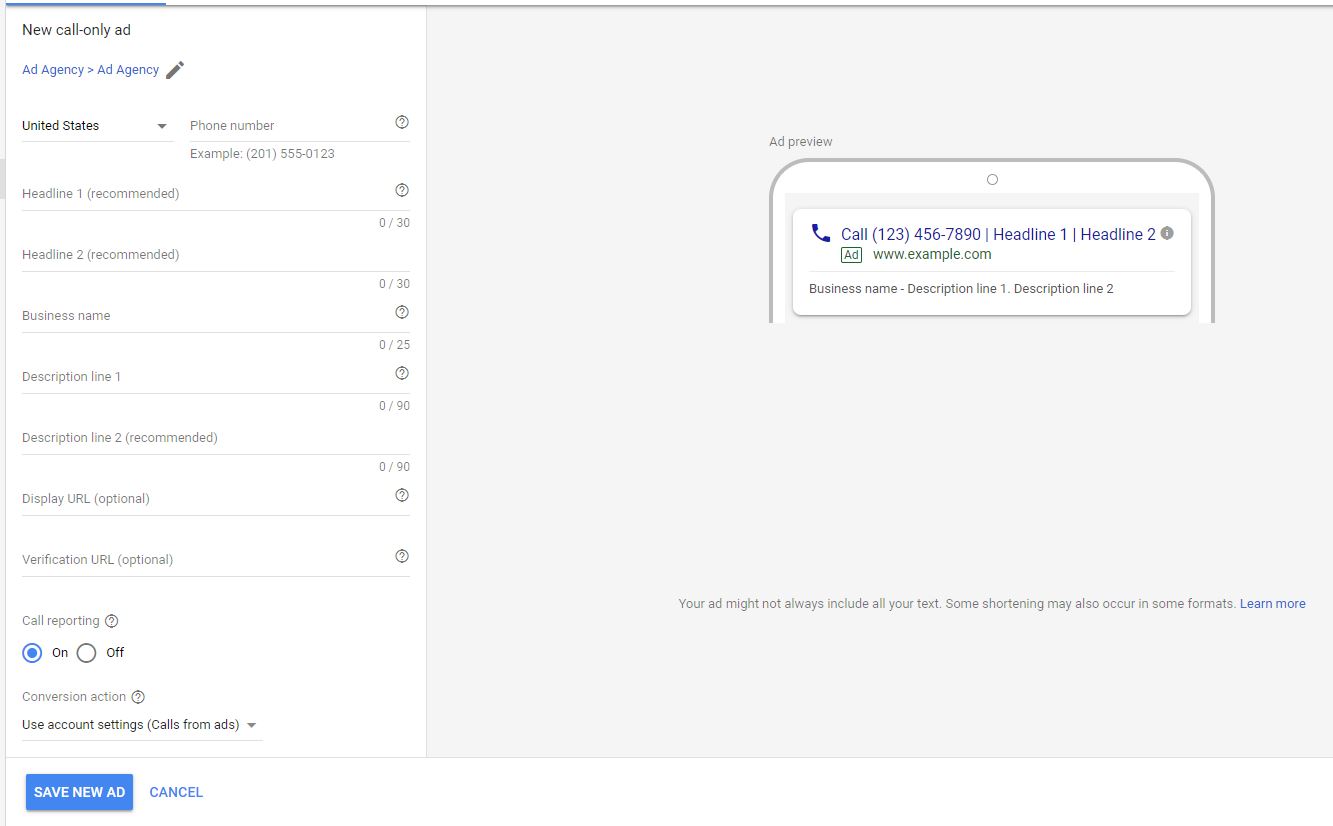
Setting up a call-only ad
To create a call-only ad you’ll need to enter two different headlines, the name of your business, and two different descriptions.
Next, you’ll need to enter a display URL and a verification URL so Google can make sure the phone number you entered matches the one on your website.
Finally, you’ll have the option to turn on call reporting and select how your conversions should be tracked. You can use the default Calls from ads conversion or create your own conversion.
Ad Variation
Ad variations aren’t necessarily a new ad type, but it is a new way of creating and testing ads. With ad variations, you can select ads from all your campaigns or specific campaigns. After you’ve chosen the campaigns you want to include you can apply filters to narrow your selection even further.
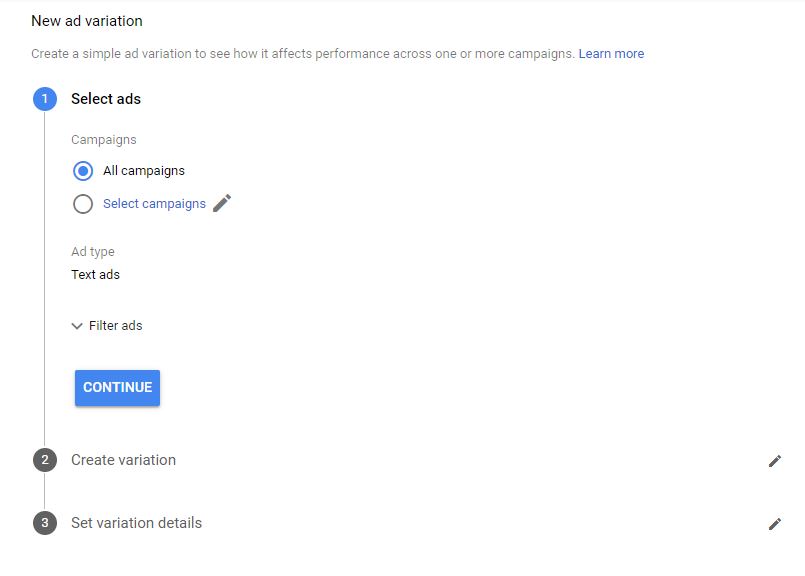
Selecting ads for your new ad variation
Once you have selected the ads you want to test then you can continue on to the next step.
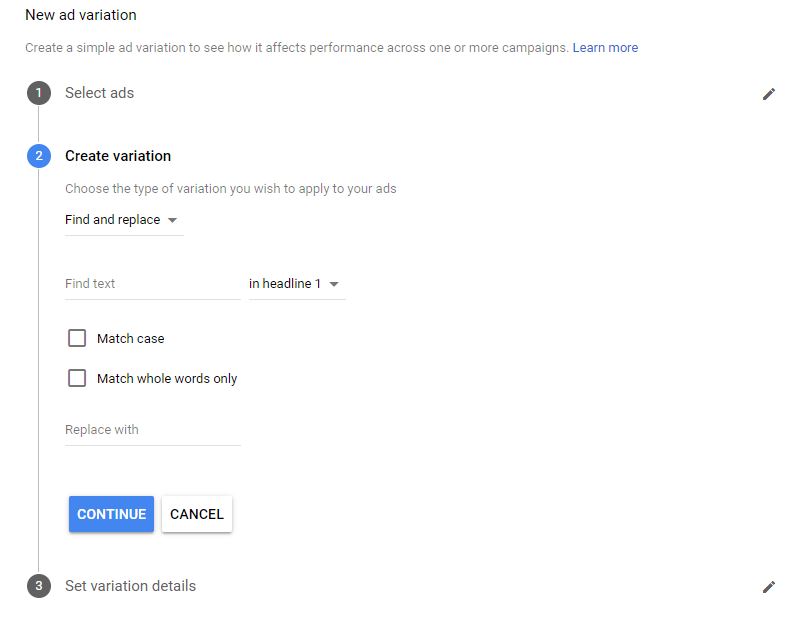
Creating your new ad variation
Now that you have your ads selected it’s time to create a new variation.
Google Ads gives you a few different ways to create your ad variants. You can either update the ad text completely, find and replace certain sections, or do a quick headline swap.
After you’ve created new ad variants you’ll need to enter in some details.
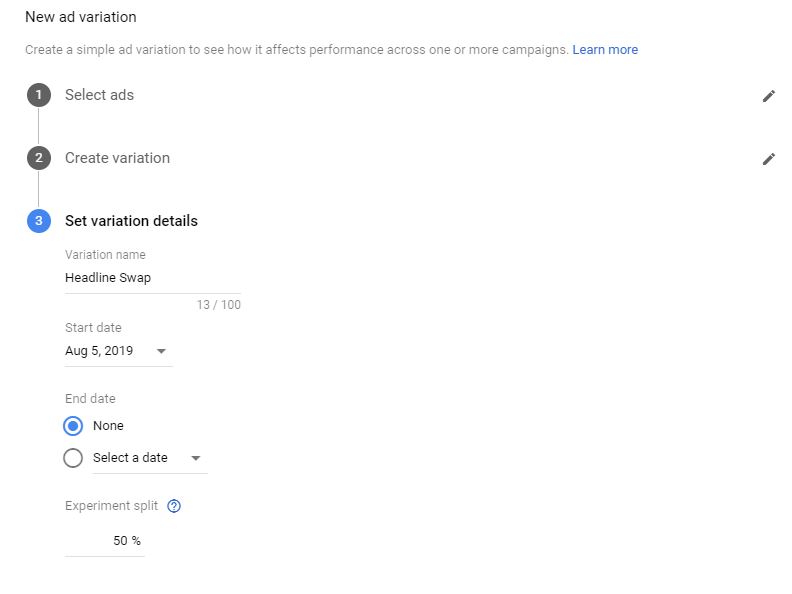
Setting your variation details
You’ll need to give your new ad variations a name, start date, and end date. Finally, enter a percentage of your budget that you want to be allocated to your new variants and you’re all done. Now you can monitor and compare the performance of your new ad variants.
Ad Copy
You could spend hours coming up with really good ad copy, but it probably isn’t worth it. We’ve run tests using dummy text, purposely misspelled words, and written things that have nothing to do with the business. However, as long as the ad was relevant at a glance people still clicked on it. This tells us that people don’t spend much time reading your ad or your competitor’s ad for that matter.
So, what should you do when it comes to creating ad copy?
- Write a compelling Headline – Your Headline should solve your customer’s problem or offer an answer to their question. Don’t leave them hanging, cut to the chase and tell them what to expect.
- Make it crystal clear – Details! Details! Details! Your ad copy should give your customers as much useful information as possible. Tell them how much your product or service will cost, how long it takes, where you’re located, and anything else that might help someone make a decision.
- Keep it simple – Don’t overcomplicate what you have to offer. If what you offer is complicated then dumb it down or get super focused on one or two easily understood benefits of your product or service.
- Offer a discount – If you have a discount to offer then include it in your ad copy. The more tangible your discount the better.
- Be different – Don’t use the same headline as everyone else. People aren’t stupid and they know that not everyone is rated #1. So, see what your competitor’s ads look like and then do something different. You’ll stand out from the crowd and get better results.
Seems kinda suspicious am I right 🤔
Pro Tip: Always have at least two ads running at the same time so you can compare how they perform. You can also expedite this process with something called multi ad group testing. Multi ad group testing is when you test one variable across multiple different ad groups. This helps you gather data faster and find the highest performing ads.
Ad Extensions
Ad extensions are like free real estate for your text ads. They don’t cost you a penny, but they sure can help your ads performance.
Ad extensions are additional lines of text that help expand the size of your ad and give visitors more information. Not only are they free, but you only need to create them once. Then you can apply them to as many campaigns as you like.
Here’s a quick breakdown of the different ad extension you can use:
- Location Extensions – List your business address in your ad
- Affiliate Location Extensions – Lists stores that sell your product
- Callout Extensions – Small text snippets about your business
- Call Extensions – Adds a click to call phone number to your ad
- Message Extensions – Lets people text you directly from your ad
- Siteline Extensions – Adds links to pages on your website
- Structured Snippet Extensions – Showcase a list of your brands, models, etc.
- Price Extensions – Display the prices of your products and services
- App Extensions – Encourage people to download your app
- Promotion Extensions – Advertise discounts, sales, and promo codes
For more info on each of these ad extensions, you can check out Google’s article on Ad Extensions.
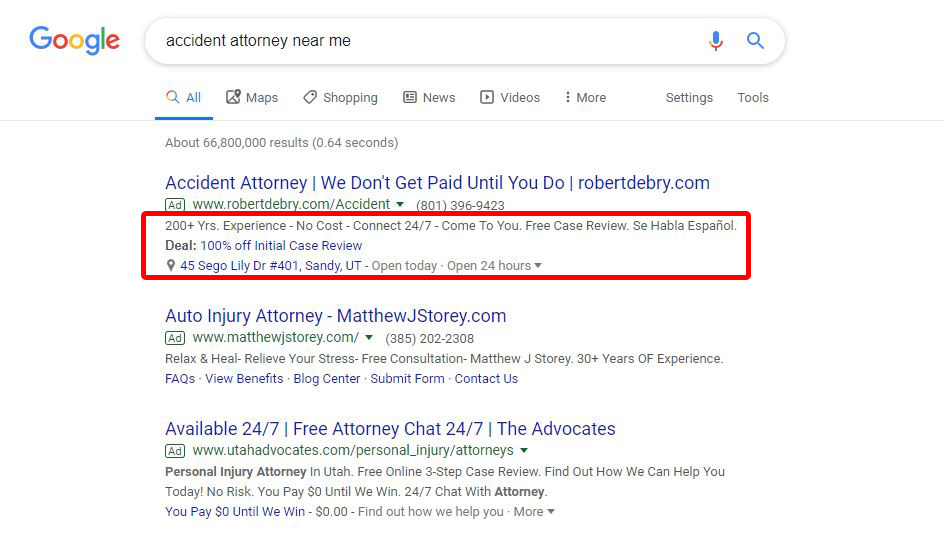
It’s hard to beat 200 years of experience…
All of these ads are pretty good, but the first one definitely stands out a bit more. Primarily because the top ad uses more of the ad extensions that are available. This makes the ad take up more space on the page and gives readers more information.
And if you’re still not convinced here’s a few more reasons to use ad extensions in your ads.
Ad Extensions Can:
- Increase your click-through rate (CTR)
- Improve your quality score
- Increase your average position
- Lower your cost per click (CPC)
The Google Ads Display Network
What does the Google Display Network and your mom have in common? They both keep getting bigger!

I think I’m funny…
Okay, mom jokes aside, the Google Ads Display Network is huge and it keeps getting bigger all the time. Currently, it reaches over 90% of all internet users in the world and has access to more than 2 million different websites.
So how does the Display Network work and why does it keep growing?
First, publishers install the Adsense code which allows ads to be shown on their website. Next, advertisers create ads and set specific targeting criteria. Now when an ad is shown on the publisher’s website and someone sees or clicks on the ad, Google pays the publisher. And of course, the advertiser pays Google.
There are many reasons why the Display Network keeps growing, but its mostly because the internet keeps growing. According to Internet Live Stats, there are over 1.74 billion websites on the internet today. That means the number of websites on the internet has nearly doubled since 2014. In addition to websites, display ads can also appear on mobile apps, alongside youtube videos, and inside Gmail accounts. So it’s no wonder that the Google Ads Display Network has continued to expand.
Basic Settings
When setting up a new Display campaign you’ll first be asked to select a goal. However, we’ve found that it’s usually best to create a campaign without a goal’s guidance.
Next, you’ll select Display for your campaign type and standard display campaign as the subtype, unless you plan on running Gmail ads.

You can create display ads to be shown on the Display Network or in Gmail
The Display Network has a few more options than the Search Network when it comes to campaign settings. For example, you can pick and choose the devices, operating systems, and networks where you want your ads to appear. So rather than setting bid adjustments, you can simply exclude your ads from ever being shown.
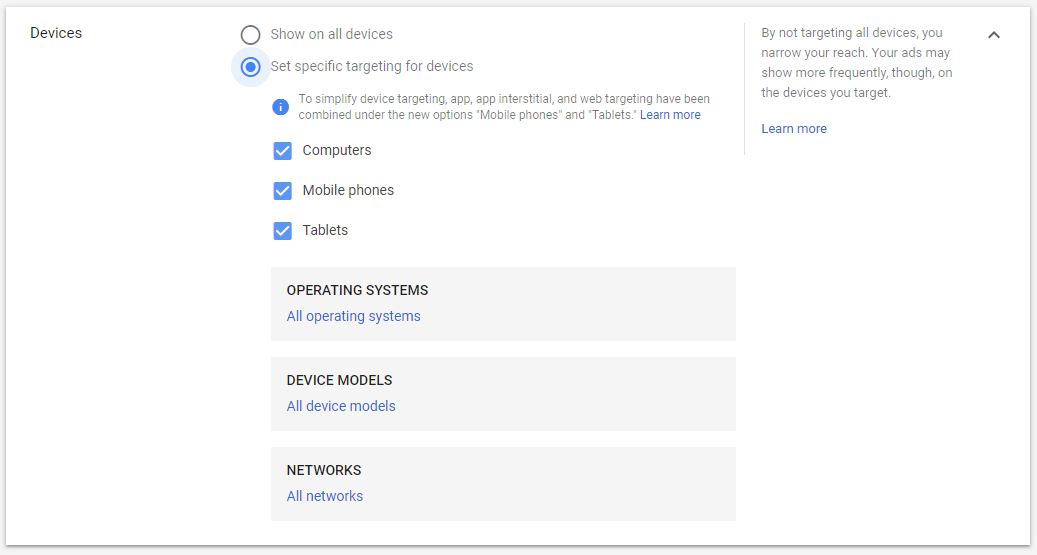
Choose the devices, operating systems, and networks where you want your ads to appear.
After your campaign is set up you can still ad bid adjustments to the devices you’ve included.
Another setting that you won’t see in search campaigns is the Conversions option. This setting allows you to create view-through conversion tracking for your display ads.
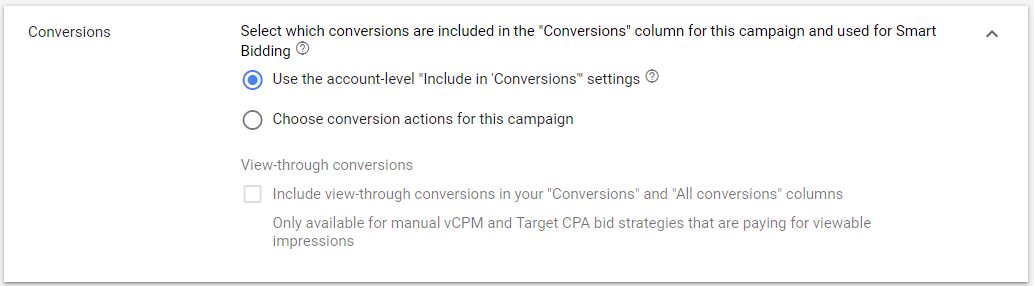
You can track conversions normally or track view-through conversions.
View-through conversions track form submissions, phone calls, sales, and other conversion actions after a visitor has viewed your ad even if they didn’t click on it.
Unlike the search network where your ads only appear on Google.com and other search engines, ads on the Display Network appear on millions of third-party sites. And that’s why Google Ads has given advertisers the ability to set restrictions based on-site content.
For example, you may want to set some content restrictions to prevent your ads from showing up on certain types of websites.
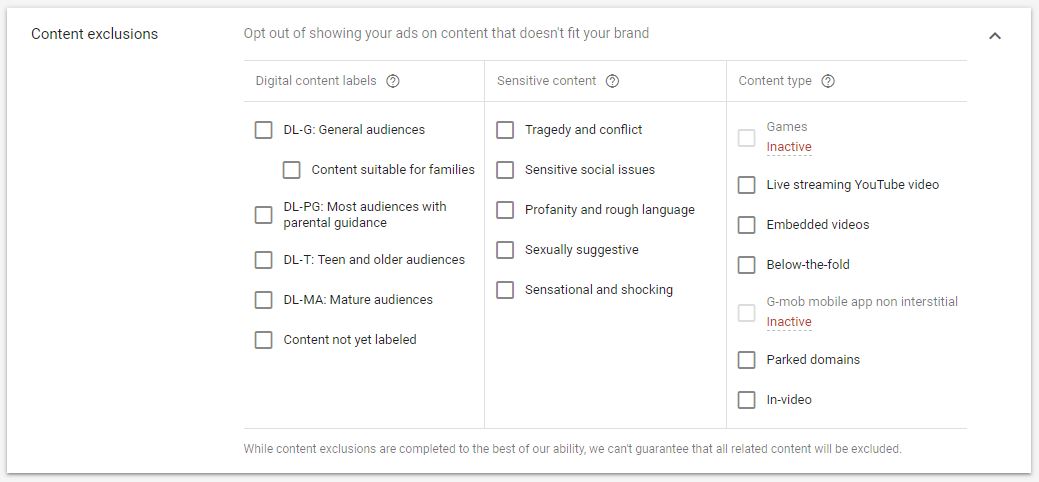
The Display Network has millions of sites, but some might not be suitable for your ads.
Setting content exclusions can prevent your ads from appearing on sites with sensitive content. This can keep your brand from being associated with websites that aren’t appropriate for your target audience.
Types of Ads
The Display Network gives you 20 different ad sizes to use and more than 5 supported formats for uploading your files. To some people, this might be a nuisance because it requires a lot more work to create than a basic text ad for the Search Network. The truth is, it does take more effort, but a lot of your competitors won’t do it and that leaves a lot of opportunity for you.
Here’s a look at all the different ad sizes you can create:

That’s a lot of banner ads…
That’s a lot of banner ads…
Just because the Display Network allows for twenty sizes doesn’t mean you must create them all. You can create as many or as few ads as you like, but some ad sizes are more popular than others.
So what ad sizes are the best? I’m so glad you asked because we wrote a blog post to cover just that:
Google Ads Display Ad Sizes: The Best Sizes, Templates, And Examples
The bottom line is the Display Network can be an extremely effective source of conversion, but like many things in life you’ll get out what you put in. So be sure to test different designs, offers, and strategies and don’t give up.
Targeting For The Display Network
When it comes to targeting the Display Network has far more options than the Search Network. However, you won’t be using different keyword match types as you do on the Search Network. Instead, you can define your target audience by demographics, interests, habits, and much more.
One of the advantages of targeting on the Display Network is the ability to continually refine your selection. Essentially you can start with a much broader audience and eventually narrow it down over time by layering different criteria on top of one another.
Each layer of targeting must match all the other layers, so by adding more targeting criteria you better fit your audience to your offer.

Retarget past website visitors or target new customers based on their interests, habits, and demographics.
Speaking of audiences, Google Ads has all different types. So you shouldn’t have any trouble building those layers we were talking about.
Here’s a breakdown of the different audience types you’ll have available to you.
Affinity
Affinity audiences allow you to target people by their interests and habits. Google Ads gives you twelve primary categories to pick from and dozens of subcategories. You can choose from options like Banking & Finance to coffee shop regulars and social media enthusiasts. No matter what categories you choose Google Ads will give you an estimated number of impressions. This number will change when you enter your bid and budget to give you a more accurate forecast.
Custom Affinity
Custom Affinity audiences let you target users by their interests and habits, but also let you add more specific targeting criteria like URLs, Places, and Apps. Google then uses this data to target people who match all of the criteria you select. When you’ve finished creating your custom audience you see the estimated reach in the upper right corner of the window.
In-Market
We’ve found In-Market audiences to be one of the more powerful and useful audience types. In-Market audiences are true to their name and let you target people who are actively researching or planning.
You can target people who are shopping for apparel, interested in online dating, searching for home decor, and much more.
Currently, Google Ads offers 22 different In-Market categories each with dozens of subcategories. This gives you hundreds of very specific targeting options from which to choose.
Custom Intent
Custom Intent audiences are like in-market audiences, however, instead of selecting from a list you’ll use keywords and URLs. The Keywords and URLs you enter then tell Google what products and services your audience is actively researching. This allows you to get very specific.
For example, let’s say you only want to target people who are interested in visiting Hawaii. You could enter keywords like Maui or Hawaii and Google will suggest other related keywords.
Remarketing
In our experience Remarketing audiences are the most powerful audiences. These are people who’ve already visited your website or interacted with your brand in some way. They are familiar with you and almost always will be more likely to convert than unfamiliar audiences.
Remarketing audiences are created in your Google Analytics account. Then you can link and import your audiences into Google Ads. You can remarket to past website visitors for up to 540 days or as few as 7 days. You can even create certain requirements that website visitors must meet to be included in your remarketing audience. For example, you could only retarget visitors who stayed on your site for more than 10 seconds. This and other settings like it can help increase the quality of your remarketing audiences.
Similar Audiences
Similar Audiences use data from your remarketing audiences to find more people who are similar to your past website visitors. These audiences can help you find more of your highest value customers.
Targeting Expansion
If you’re not getting enough traffic with the audiences you’ve targeted then you can turn on targeting expansion. This lets Google go on the hunt for more people that are similar to the ones you’ve already targeted.

Targeting expansion lets you reach more people who are similar to the audience you’ve selected.
In fact, if you’re already getting good results with the audience you’ve selected then targeting expansion might bring you even more conversions. However, if you’re current audience is not performing well, you should steer clear of expansion. There’s a good chance that it will cost you more money without improving your results.
Targeting Ideas
Do all these targeting options have your head spinning? Well, fear not Google Ads has custom targeting ideas just for you.
Google uses data from your website, landing pages, and other campaigns to create targeting suggestions.
Google Ads even comes up with targeting ideas for you.
These ideas may or may not be a good fit, but it never hurts to see what Google has cooked up for you.
Keyword Targeting
Unlike keywords on the Search Network, there are no match types on the Display Network. Instead, Google uses contextual clues to find and automatically place your ads.
On the Display Network Google has two different options when it comes to keyword targeting. You can use audience targeting or content targeting.
Here’s a breakdown of the two different targeting options:
Audience: Shows your ads to people who might be interested in your keywords and also on websites, apps, and videos that contain your keywords.
Content: Your ads will only be shown on websites, apps, and videos that contain your keywords.
Google Ads will default your keyword targeting type to audiences, however, you can change this setting later to only show your ads on pages that contain your keywords.
Topic Targeting
Is your target audience interested in specific topics? Well then, it’s your lucky day because Google Ads has hundreds of them that you can target. From broad topics like Beauty & Fitness to niche topics like Atmospheric Science, Google Ads has you covered.
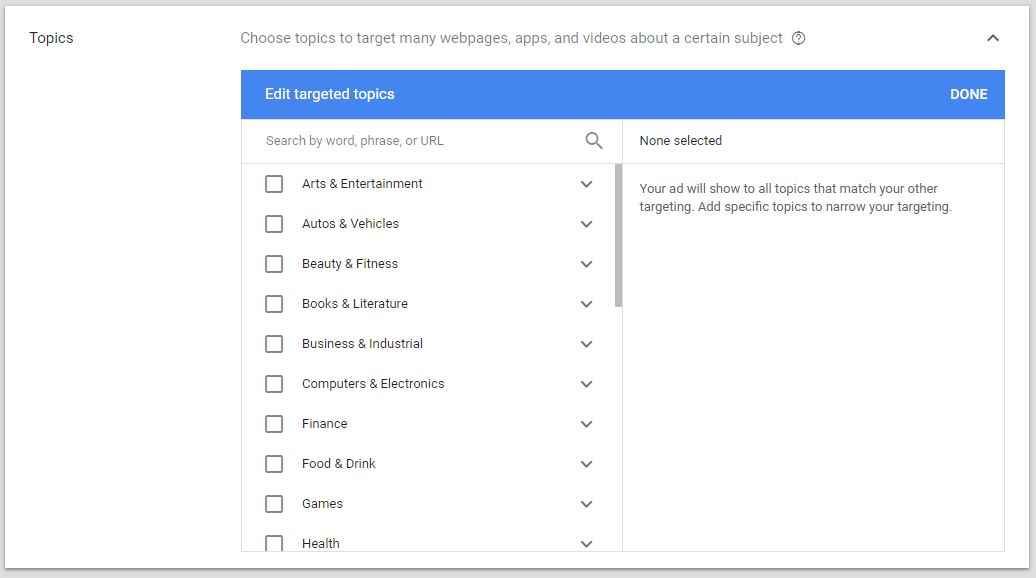
Look at all those topics ?
You can select parent topics or get hyper-specific with your targeting. Keep in mind that the more specific your topic is the smaller your audience will be.
Placement Targeting
The websites or apps that your ads actually appear on are called placements and you can target them directly with Placement Targeting.
In some ways, placements are the Display Networks equivalent to keywords and search terms on the Search Network. Placements are where your display ads actually appear whether you use placement targeting or not.
For example, let’s say you own a Haunted House so you target the topic “Halloween & October”. Then your ads appear on websites like scaryforkids.com, halloweenangel.com, and ghoulishgadgets.co.uk. These websites are all placements and keeping a close eye on them is the best way to improve your performance on the Display Network. You can see where your ads appear by opening the Placements tab in your dashboard and clicking on “Where Ads Showed”.
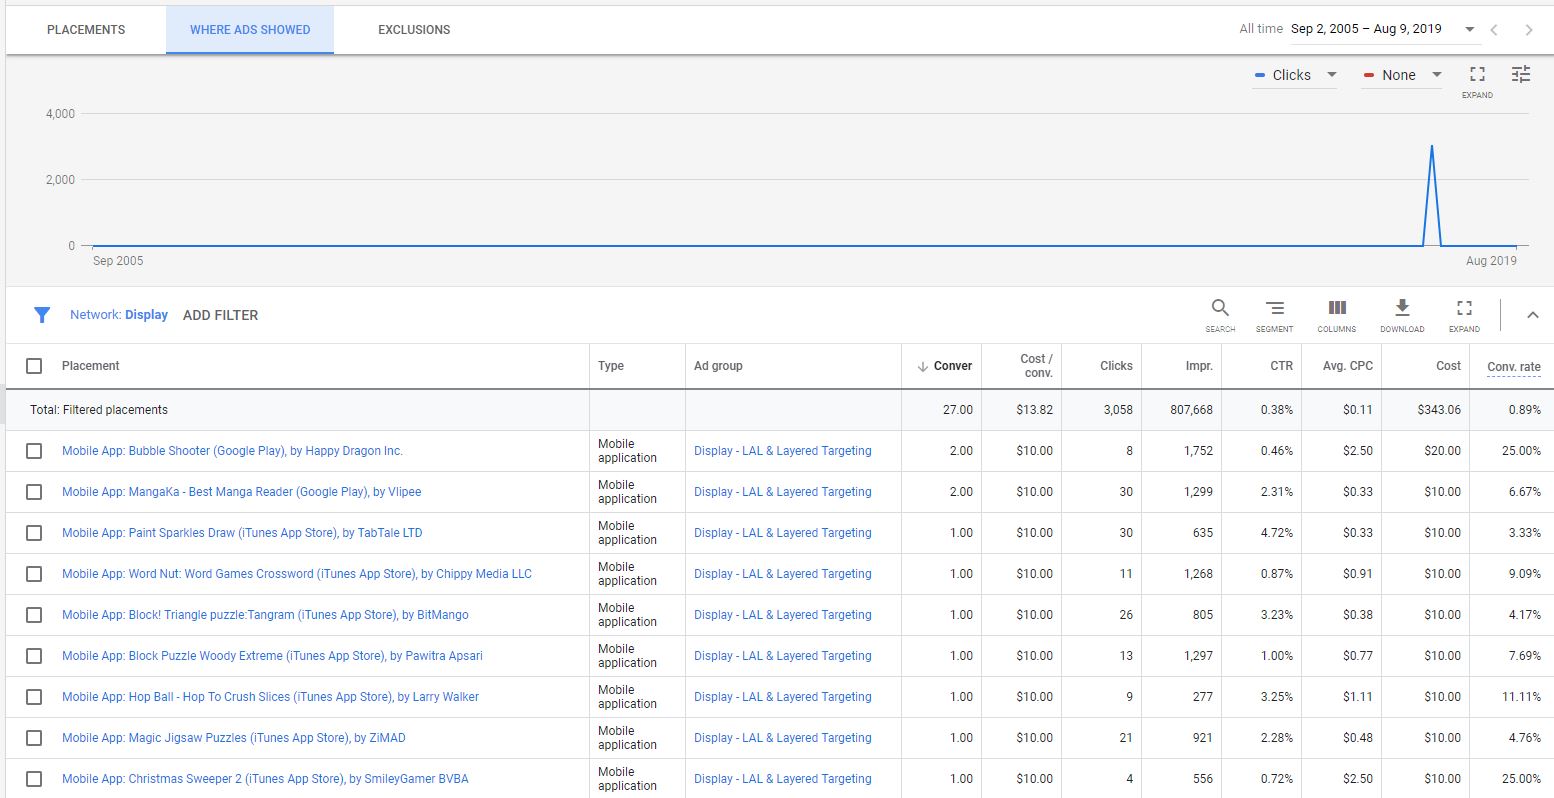
See where your display ads were actually shown
Just like search terms, all perform differently all placements will have different average CPC, CTRs, and conversions. So just like adding negative keywords, you can exclude placements that don’t perform well.
Okay, so now that you understand how placements work, let’s talk about all the placement options Google Ads has to offer.
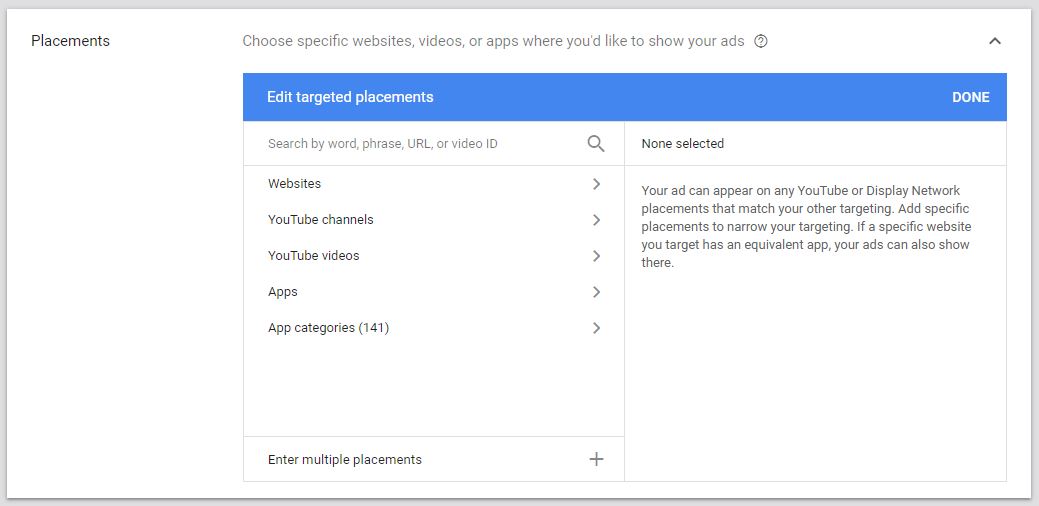
Target specific websites, YouTube channels, YouTube videos, Apps, and App categories.
Placement Targeting is the most specific targeting option available on the Display Network. You can target websites, YouTube channels, YouTube videos, Apps, and App categories. Just enter the URLs of the websites where you want your ads to appear or search for keywords to find placement suggestions.
Demographic Targeting
Demographic targeting lets you target users based on their age, gender, parental status, and household income.
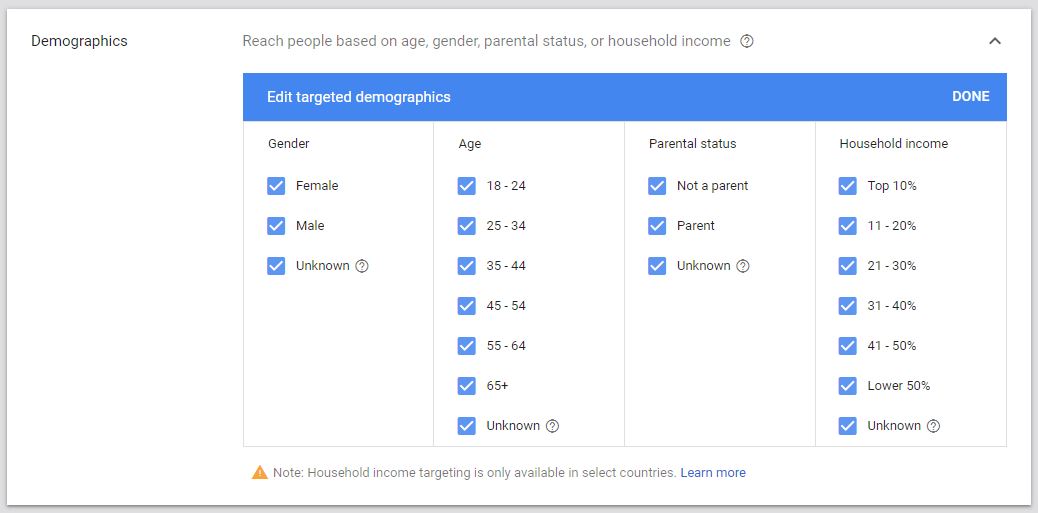
Target by gender, age, parental status, and household income.
As you can see in the picture (above) you can check or uncheck the boxes to edit your demographic targeting.
Demographic targeting and all other targeting methods have a certain degree of inaccuracy. So the best way to improve performance is to diligently monitor all of your targeting options. Over time you’ll be able to zero in on the best performing demographics, placements, topics, and audiences.
Observation & Targeting
When it comes to targeting Google Ads has two different modes. You can simplify this by looking at these options as “any” or “all”.
Here’s a breakdown of each option to better explain things:
Targeting (All)
You can use the Targeting mode to narrow your audience and require them to match all of your targeting requirements. This lets you layer on additional targeting criteria to further refine your audience. Keep in mind, the more layers you add the smaller your audience will become.
Observation (Any)
You can include everyone who matches any of your targeting requirements. This lets you observe how all of your targeting criteria perform. You can still zero in on what performs best by increasing or decreasing bids.

Choose to observe all audiences or narrow your targeting
All of the targeting options we’ve just covered will default to Targeting. However, you can change this setting by opening your ad group, selecting a targeting type, and clicking on the blue pencil.
Bidding & Budgets
Another upside to the Display Network is the relatively inexpensive cost per click. In most cases, clicks on the Display Network are cheaper than clicks on the Search Network.
You can set bids manually or choose an automated bid strategy. Manual bidding lets you set max cost per click (CPC) bids for your ad groups, keywords, topics, and placements. If you choose an automated bid strategy then Google will adjust your Max CPC bids for you.
Google Ads can recommend different automated bid strategies based on your goals
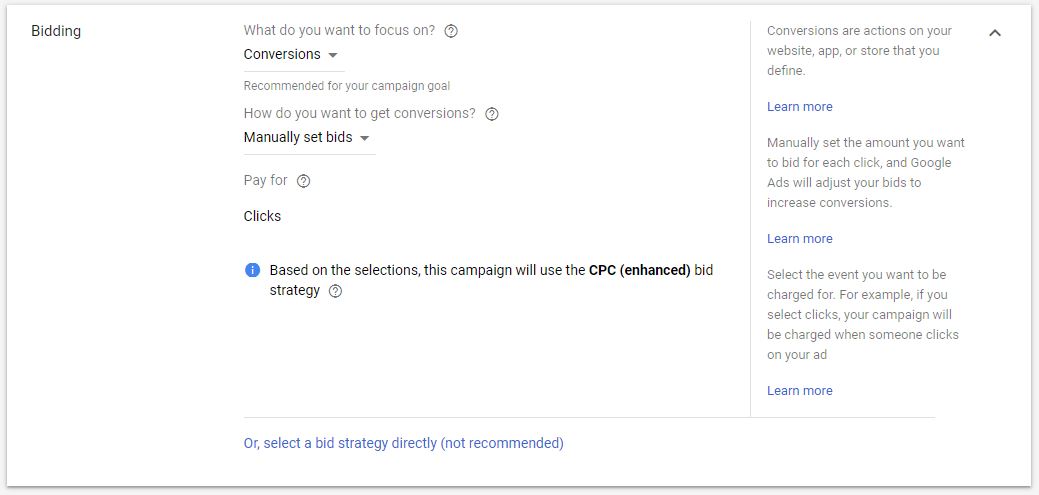
You can also tell Google Ads what you want to focus on and it will recommend the best bidding strategy for your goals.
Another feature you won’t see on the Search Network is the “pay for” setting. You can see and change this setting after selecting a bid strategy. This setting is only available on the Display Network and it lets you choose how you will be charged. However, all options may not be available depending on your account, ad history, and bid strategy.
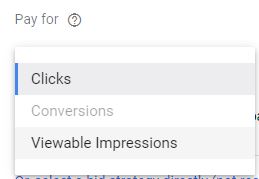
Choose to pay for clicks or viewable impressions.
You can also pay per conversion when using the Target CPA bidding strategy.
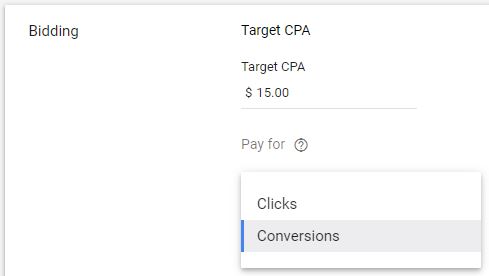
Pay Per Conversion with Target CPA bidding
No matter what bid strategy you select you’ll want to make sure you have enough budget for it to be effective.
A good rule of thumb is to set your budget to allow for a minimum of fifty clicks per day. So take your Max CPC bid and multiply it by fifty to determine your minimum starting budget.
Custom Bids
Custom bid and URL method is a new feature that allows you to set unique bids for topics, demographics, placements, and keywords.
You can find and change how your custom bids are set up by opening your ad group settings and clicking on additional settings.
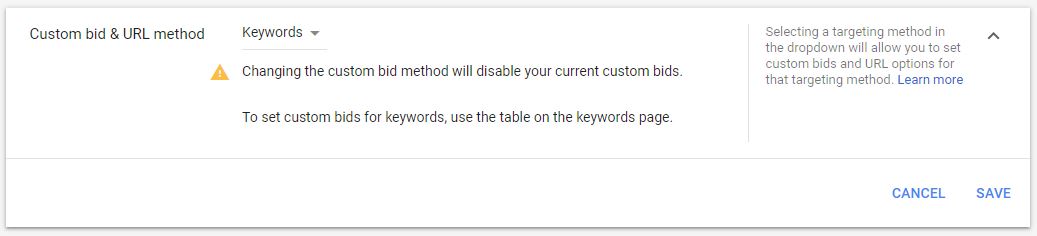
Set Custom Bids by Keywords, Audiences, Ages, Genders, Household Incomes, Parental Status, Topics, or Placements.
Setting Custom Bids can be tedious, but it also gives you more control over how your display ads perform.
Advanced Bid Adjustments
Advanced Bid Adjustments allow you to increase or decrease your Max CPC bid for top content placements. Google classifies top content as content that is more popular, gets more daily impressions, traffic, and viewer engagement.
YouTube Advertising
To start advertising on the YouTube Network create a new campaign and select Video ad your campaign type. Then you’ll have the option of choosing from several different video subtypes.
Video subtypes are more like templates than video types. So if you want a non-templated creation process I recommend selecting the custom video campaign option.
Nonetheless here’s a quick rundown of all the campaign subtypes Google Ads has to offer:
Custom Video Campaign
Customize your video campaign settings however you like with every available ad format.
Non-Skippable In-Stream
Advertise with up to 15-second non-skippable video ads.
Outstream
Serve video ads to people on their phones and tablets using cost per thousand viewable impressions (vCPM) bidding.
Drive conversions
Focus on getting conversions with video ads.
Ad sequence
Show individual viewers a sequence of ads using skippable, non-skippable, and bumper ads.
Shopping
Use sponsored cards to show viewers relevant products and encourage them to shop on your website.
Video Ad Formats
You’ll have six different video ad formats to choose from when creating campaigns for the YouTube Network. So without further delay, here’s a detailed breakdown of each video ad format.
Overlay Ads
Overlay ads are basically banner ads that appear on top of whatever video viewers are watching.

Overlay Ads are layered on top of videos
Overlay ads can be created as text ads inside your Google Ads platform or custom designed. If you choose to design these ads yourself then you’ll need to create them in the following sizes:
- 728 x 90
- 468 x 60
Skippable Ads
Skippable In-Stream Ads are the most common video ad format. These ads are viewed before during or after you watch a YouTube video. You can skip past these ads after the first five seconds, but don’t worry, you won’t be charged if your ad is skipped during the first 30 seconds.

Skippable In-Stream Ads are free unless someone interacts with it or watches it for more than 30-seconds.
Keep in mind the goal is conversions so don’t worry too much if people aren’t watching your entire video.
Non-Skippable Ads
True to their name Non-Skippable ads must be watched in their entirety. They can be 15 – 20 seconds long and you’ll be forced to pay on a Target CPM basis.

Non-Skippable Ads can’t be bypassed, you must watch them ?
As a side note, there was some rumors that YouTube was going to discontinue Non-Skippable video ads, but in truth they made them easier and less costly than before.
Bumper Ads
These are the short 6-second ads that play before YouTube videos. Like Non-Skippable Ads, Bumper ads can’t be skipped so viewers are forced to watch all 6-seconds.

Bumper Ads play before regular YouTube videos.
Since these ads are very short you’ll want to make sure your message is memorable and concise.
Sponsored Cards
This type of video ad is perfect for eCommerce advertisers. Sponsored Cards let advertisers serve ads for their products when the product is featured in the video viewers are watching.

Sponsored Cards showcase your products in YouTube videos.
You’ll need to have your Merchant Center account linked before setting up Sponsored Cards.
Display Ads
You don’t need to create video ads to advertise on YouTube. You can use text ads and banner ads to serve ads alongside the videos viewers are watching.

An example of where display ads appear on YouTube
The most common display ad sizes on YouTube are:
- 300 x 250
- 300 x 60
Keep in mind that these ads are limited to desktop devices and won’t be shown to mobile users.
Video Format Add-Ons
Video add-ons are much like ad extensions on the Search Network. They allow you to beef up your video ads at no extra cost. Currently, these add-ons come in two different flavors: Companion Banners and CTA Overlays.
Companion Banners
These are display ads that are shown alongside your video ads.
Call-to-action (CTA) Overlay
CTA Overlays allow you to pair text and visuals to your video ad making it easier for viewers to convert.
Video Ad Targeting
Targeting on the YouTube Network is almost identical to the Display Network, but there are a few notable differences.
Placements
Instead of targeting websites or apps you can target specific YouTube channels or individual videos.
Remarketing
Remarketing on YouTube is exactly the same as remarketing with Display, except you will be following them around with videos instead of banner ads.
Video Ad Bidding
Video ad campaigns default to cost per view (CPV) bidding. This bidding strategy charges you each time your video is viewed for more than thirty seconds. If your video is less than thirty seconds then you’ll be charged each time your entire video is watched.
You can also set bid adjustments for top content. This will increase your bid to get your video played more often on YouTube’s most popular content.
Other than the switch to cost per view, bidding on the YouTube Network is almost identical to bidding on the display network.
Google Shopping Campaigns
Google Shopping Campaigns are a breed of their own and have far greater requirements than any of the other networks we’ve covered so far.
Shopping Campaigns let online retailers and eCommerce stores advertise their products in search results, YouTube, and on the Display Network. You can show searchers what your products look like and how much they cost before they visit your website.
Shopping ads look very different from other ad types and often receive priority over text ads in search results. They generally appear above or to the right side of text ads.
Here’s a look at the two different screen placements for shopping ads:
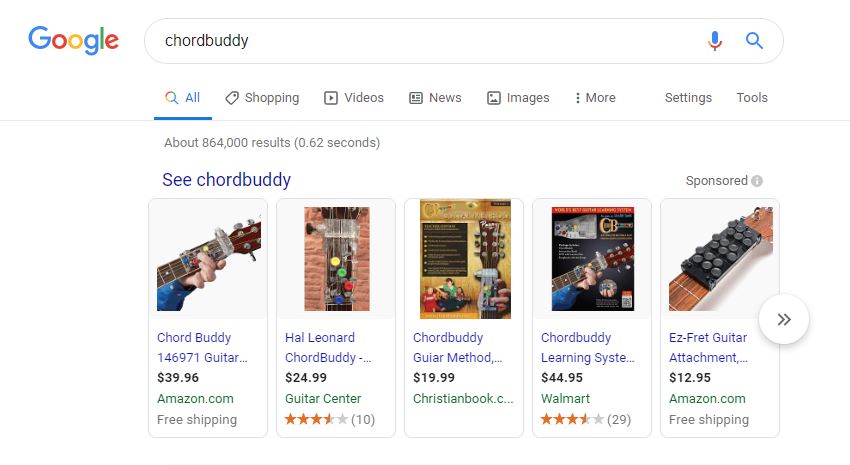
Shopping results above text ads and organic search results
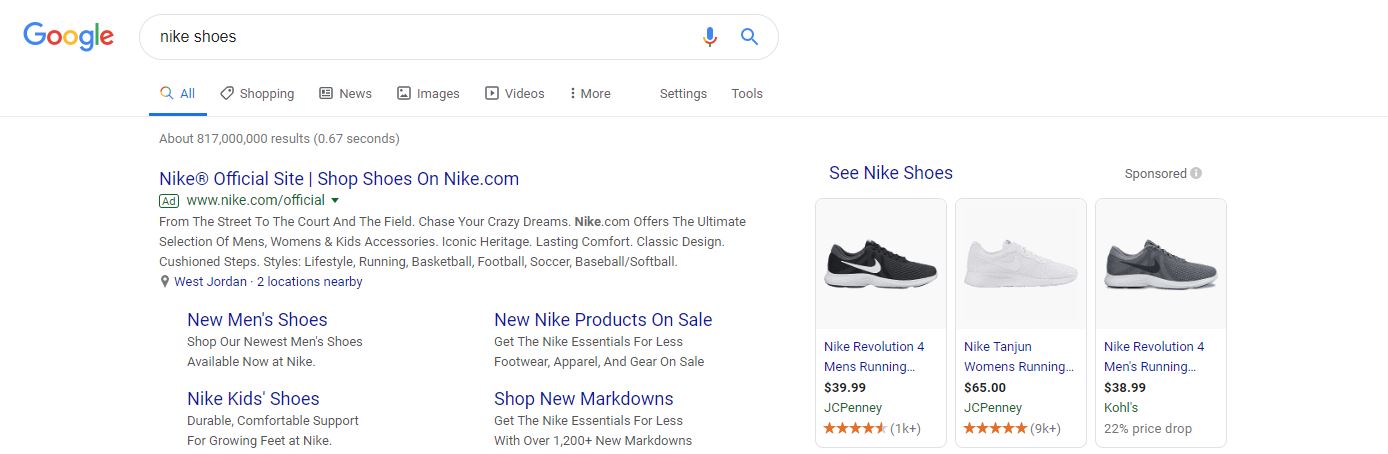
Shopping Ads appearing to the right-hand side next to text ads
As you can see shopping ads grab your attention much more than text ads which makes them a must for any company selling products online. However, there are a lot of rules to follow if you want your shopping ads to show up on Google.com.
Setting Up Account and Data Feed
Did I mention that Google Shopping has no keyword targeting capabilities?

We’re with you on this one Neil…
Ya… about that…
Instead of using keywords Google Shopping campaigns are powered by a product feed from your Google Merchant Center. So, yes, you’ll need to set up a Merchant Center account if you don’t already have one. I know it’s a pain, but if you don’t set one up you’ll never serve a single shopping ad.
So head over to merchants.google.com to sign up for your Merchant Center account.
First, Google will gather some basic information about your business like:
- The country where you’re located
- Name of your store
- URL for your website
Then you’ll be asked to agree to their terms and conditions and verify your website. You can verify your website in any of the following ways:
- Upload an HTML file to your website
- Add an HTML tag to your website’s homepage
- Link to your existing Google Analytics account
- Link with your Google Tag Manager
After you’ve verified your website you’ll be greeted by the Merchant Center dashboard. However, before you can serve shopping ads you’ll need to update your business information and set up your product feed.
Once you’ve entered all of your business information it’s time to set up your shopping feed. To get started open the Products tab and click on Feeds.
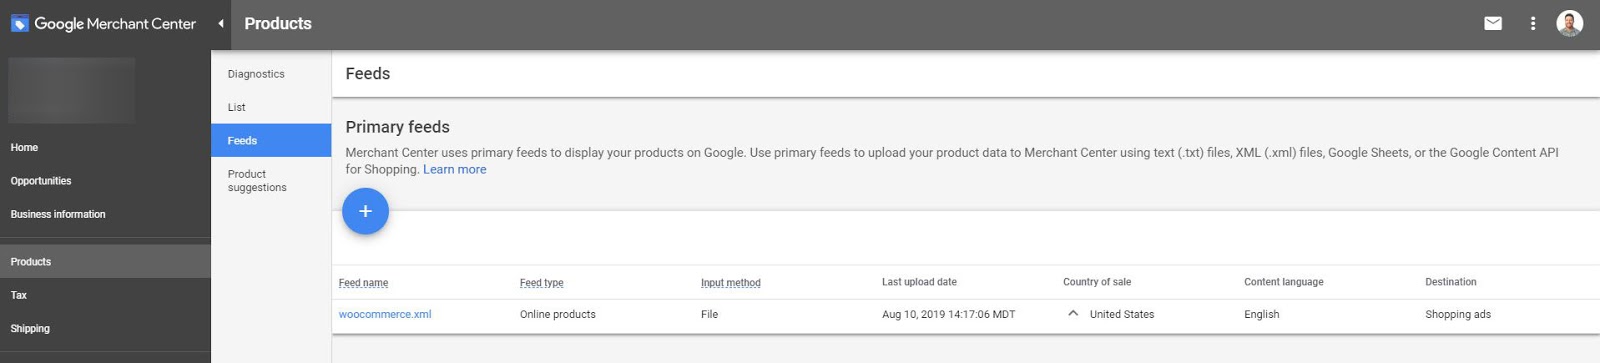
Google Merchant Center Product Feeds
From here you can create a new feed by clicking the blue plus button. After you click on it you’ll be asked to provide a target country, language, and destination.
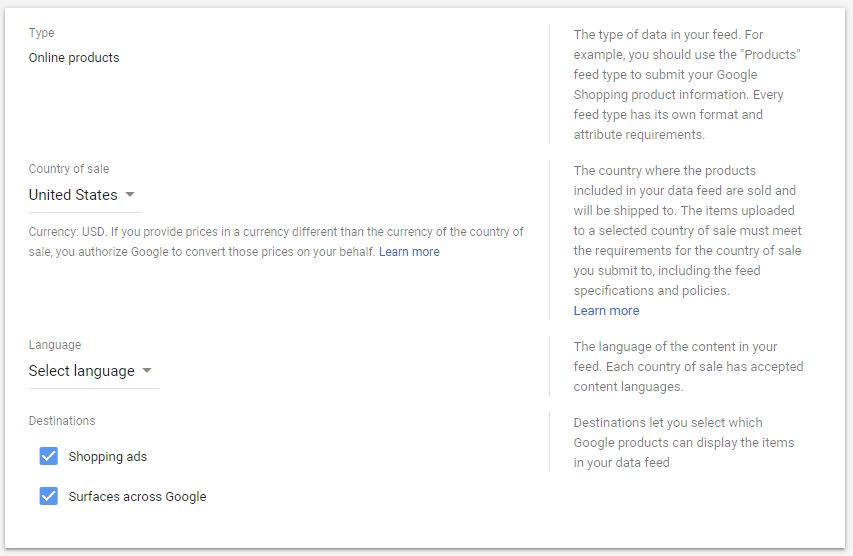
Add new primary and supplemental feeds to your merchant center account.
Next, you’ll need to let Google know what kind of feed you want to create.
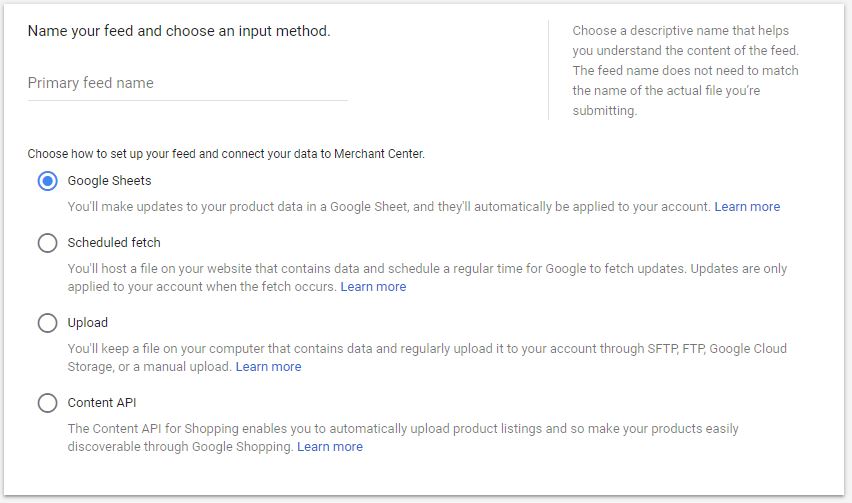
There are four separate ways to create a product feed. You can choose to link to a Google Sheet, fetch a file from your website, upload a file via FTP, or use the content API.
However, for the sake of this article, I am going to assume you are using a common platform like BigCommerce, Shopify, or WooCommerce. If you are then you’ll want to select the “Scheduled Fetch” option. This will automatically update your feed at certain intervals so any changes you make in your platform will apply to your ads.
All of these platforms have great support so you can find detailed guides for setting up each platform. Here are the guides we’ve found helpful:
WooCommerce
Google Shopping for WooCommerce: How to Set Up Your Product Feed
Shopify
Feed Mastery: It’s All in the Feed
BigCommerce
Google Shopping – Upload Your Product Feed
No matter what platform you’re using you’ll need to give Google your file name, file URL, and specify a fetch frequency.
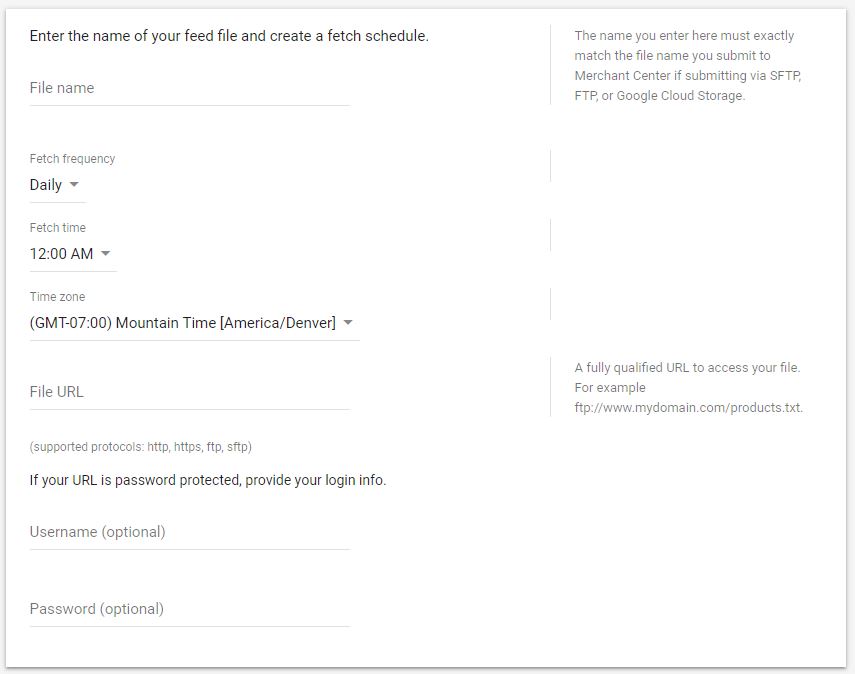
Tell Google Merchant Center where to find your product feed
You’ll also need to enter your time zone, fetch time, and the password to your feed if you have one. If everything checks out Google will populate your product feed and let you know if there are any errors that need to be corrected.
After your product feed is connected, you can open the Diagnostics tab to view active, pending, and disapproved items. If you have disapproved items you will need to correct any issues before shopping ads for that item can be served.
You should also make sure your website complies with the Merchant Center Guidelines or your ads will not serve.
Setting Up Shopping Campaigns
Now that you’ve created a merchant center account and connected your product feed its back to Google Ads to create a Shopping Campaign.
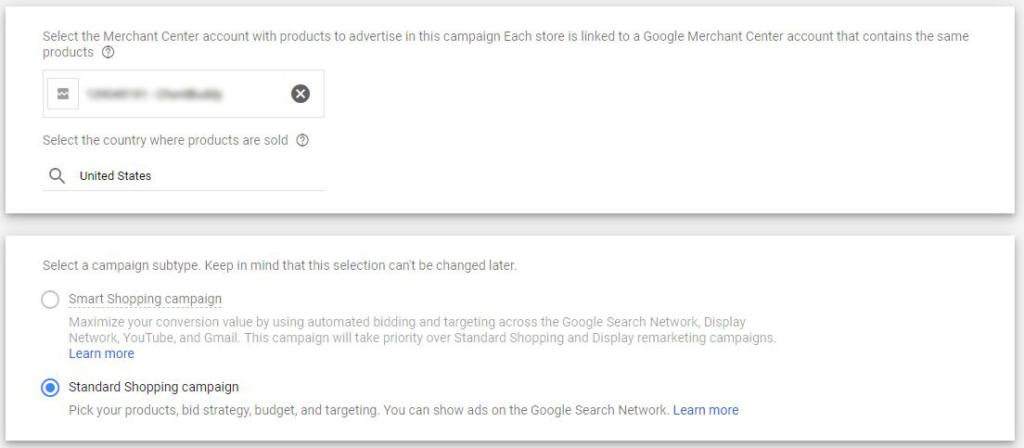
When you create a Shopping Campaign for the first time you’ll be asked to link your Google Ads account with Merchant Center. After you’ve linked your Merchant Center account you’ll be able to select it from the dropdown.
Pretty nifty huh?
Now that you’ve linked and selected your Merchant Center account you can choose to create a Smart or Standard Shopping Campaign.
Smart Shopping Campaigns serve ads across Search, Display, YouTube, and Gmail. They also use an automated bidding strategy and take priority over Standard Shopping Campaigns.
Standard Shopping Campaigns let you choose your own bidding strategy, budget, and targeting, but you’ll only be able to serve ads on the Search Network.
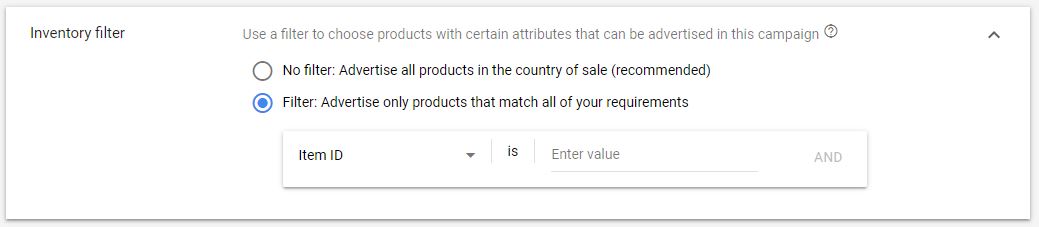
Choose what products you want to include in your Shopping Campaign.
Shopping Campaigns rely on your product feed to serve ads, not keywords, so you can make your campaigns more granular by adding filters. Filters let you only show products that meet certain criteria.
Here are some of the ways you can filter your products:
- Category
- Brand
- Item ID
- Condition
- Product Type
- Custom Labels
- Channels
You can use more than one filter to get super-specific. For example, let’s say you sell shoes, you could filter by brand and condition to only include new Nike’s.

Showcase your products and store location to nearby shoppers.
If you have local stores, you can enable local product to show your ads to nearby shoppers. When visitors click on local product ads they’ll be taken to your local storefront page. However, you’ll need to set up local product data in your Merchant Center account before enabling this feature.
Shopping Campaigns offer two different types of ad groups.
Product Shopping – These ads appear when people search for specific products like men’s golf shoes.
Showcase Shopping – These ads appear when people search for broad products like golf equipment.
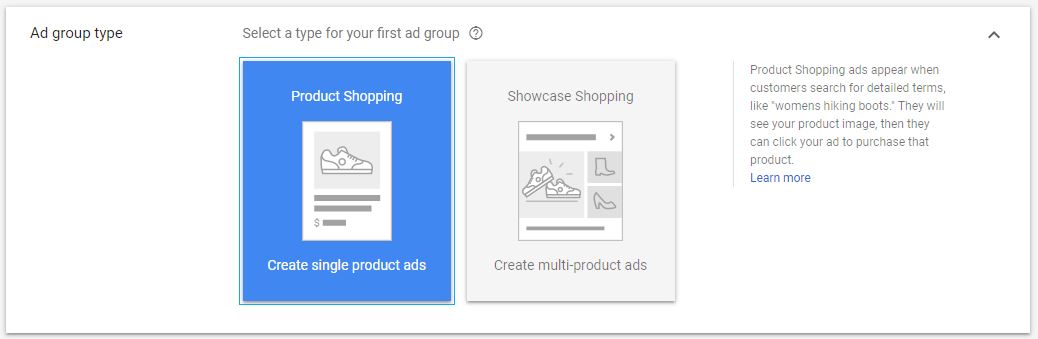
Show single products or multiple products.
Product Shopping ads are usually going to be your go-to ad group, but if you do create showcase ad groups there are a few things you should be aware of. For instance, you’ll be asked to select specific product groups.
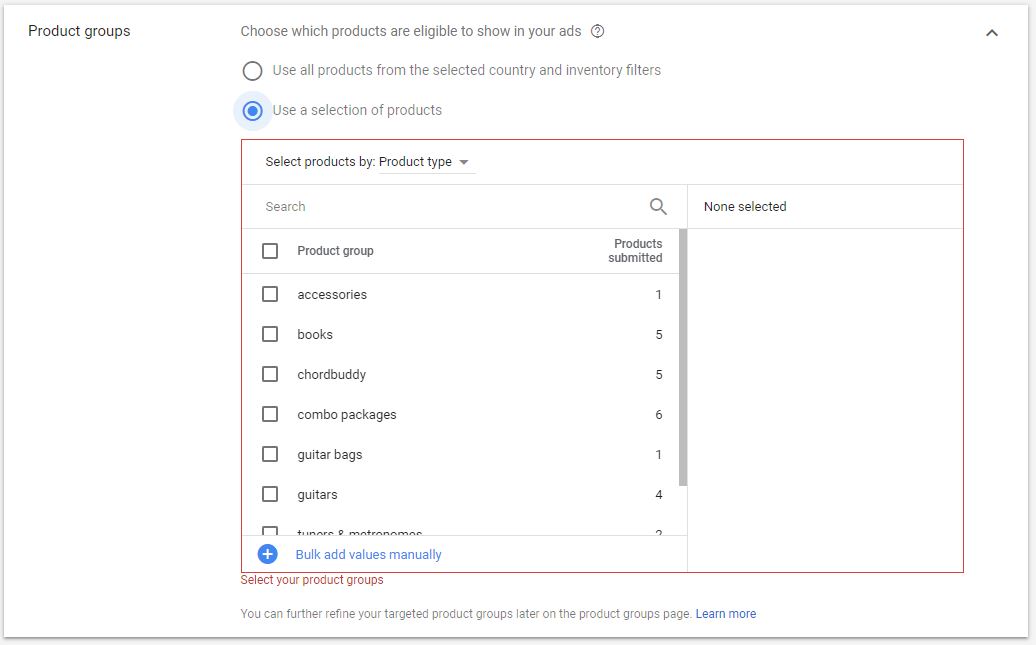
Choose which groups to include in your Showcase
They also use a different type of bid. Showcase ad groups use cost per engagement (CPE) bidding instead of cost per click (CPC) bidding.
Setting Up Your Campaigns
We recommend creating three negative keyword lists: Generic, Brand, and Product.
You can use negative keyword lists to exclude specific brand or product terms from your generic campaigns.
In your brand campaign, you’ll use negative keywords to prevent other brands from appearing. So if you’re selling Sketchers you don’t want Adidas to show up. Product campaigns are meant to be hyper-specific so you’ll want to exclude any terms that are too generic or don’t mention that specific product.
Bidding
Generic campaigns get high priority and low bids. Generic campaigns have high priority because they help you capture a larger share of the total search traffic. However, this can lead to more clicks so you can use lower bids to prevent overspending.
Brand campaigns get medium priority and medium bids. Brand names tend to have a slightly lower search volume so you can afford to bid slightly more on these terms.
Product campaigns get low priority and high bids. Searches for an exact product will be much rarer than generic and brand searches. However, they have more purchase intent and typically convert at a higher rate. This allows you to bid higher on product campaigns and still see a healthy return.
Here are a few other ways you can segment your Shopping Campaigns:
Profit Margin – Use higher bids on items with better profit margins.
Seasonality – Bid higher on seasonal items
Product Type – Bid by product types in your data feed like guitar tuners and guitars.
Single product ad groups (SPAGs) give you the most control and the best results, but they are more work-intensive. To create SPAGs you’ll need to set up ad groups for each individual product you sell. This allows you to set bids based on how each individual product performs.
Shopping Ad Optimizations
Since Shopping Campaigns rely on your product feed most of your optimization work will be performed outside of Google Ads. But that doesn’t mean you should skip over it. Optimizing your product titles, images, pricing, and descriptions can make a big difference in how your campaigns perform.
You want Google to be able to crawl your feed and find plenty of relevant search terms so it can serve your ads. Moreover, you want your ads to get clicked on when they are shown. So here are a few tips to maximize the performance of your Shopping Campaigns.
Product Title
Your product title will have the biggest impact on your overall performance. In fact, in one study improving the product title for shopping ads led to a 10x increase in traffic.
Google gives words at the beginning of your title a higher priority. So you’ll want to place the most important keywords at the front of your product titles.
Here are a few different scenarios and templates you can put to use.
Well known brand:
<brand> <category> <color> or <brand> <category> <model number>
Off brand:
<category> <color> or <brand> <category> <model number><brand>
Business to Business (B2B):
<brand> <model number / SKU> <product type> <size> <material> <color>
Clothing:
<brand> <gender> <product type> <material> <color> <style>
These structures are a good starting point, but there’s still more you can do to optimize your product titles. One way to optimize your product titles is called semantic query optimization.
Semantic query optimization, despite its name, is actually pretty simple. It just means you review your search query reports for words and phrases that actually result in sales. Then, you change your titles to include those words and phrases.
For example, let’s say you sell hats and you see that your Nixon Tropics White Hat consistently gets profitable sales from the phrase “mens snapback hats”. Then you could add these terms into your product title. So that might look something like this: “Nixon Men’s Snapback Hat Tropics White”.
To get the best results from this type of optimization you’ll need to track the performance of each title for comparison. This way you can record the changes that lead to improved performance.
Product Description
Product descriptions probably won’t have a huge impact on your performance. In fact, we’ve tested ads using completely irrelevant descriptions and seen no difference in performance. So they shouldn’t be your first priority, but that doesn’t mean you should ignore them. Check out what your competitor’s descriptions look like and use them as a template. Then try adding some of the best performing search queries to your descriptions.
Product Images
Using high-quality product images is an absolute must, but you also want to make sure your image stands out. Take a look at the images your competitors are using and be sure yours is unique. You don’t want to be using the same image as everyone else.
Product Pricing
The price of your product plays a huge role when it comes to your ad rank in Shopping Campaigns. Now you may not be able to adjust the price if the manufacturer has specified a minimum advertised price. However, if you can adjust your pricing a bit you should. We’ve found that cheaper products receive the highest impression share.
Optimization Work
Pay per click campaigns aren’t born perfect they’re optimized and improve continuously over time. If you want to learn everything there is to know about perfecting your campaigns then you can view the Google Ads Optimization guide to save time and maximize performance. If you want to maximize your ROI from Google Ads then it’s definitely worth a read.
Tracking More Than Conversions
You probably already know how important it is to track conversions like phone calls, form submissions, and sales. But if you’re a Chiropractor, Dentist, Attorney, SaaS company or any other service business you’re probably in the lead generation space. That means there’s another step after a conversion takes place. You still have to close the sale before you put money in the bank.
So how do you track the conversions that turn into sales?
You use ValueTrack and UTM parameters combined with hidden form fields and call tracking. This lets you track which keywords and placements generate the most sales. Hidden form fields are automatically populated using the ValueTrack parameters from your URL. So you can find out more information about where your leads are coming from all the way down to what keyword they used.
I recommend using CallRail or Invoca for your call tracking. These platforms use the ValueTrack parameters from your Google Ads to match callers to the traffic source, campaign, and keyword. You can even mark calls as qualified leads and leave notes.
CallRail call tracking in action
As you can see in the picture (above) call tracking software can help you identify what traffic sources, keywords and placements are turning into valuable leads. This way you don’t have to assume that a keyword is valuable just because it converts. You can know for certain which keywords turn into phone calls and form submissions. Then which form submissions and phone calls turn into paying customers.
This type of information will change the way you manage your Google Ads account because you may be willing to spend more on keywords that have a higher sales rate.
Now if you’re an eCommerce store then you’ll be focusing on the keywords that generate the highest return on ad spend. This is easier to track because your conversions will usually be a direct sale.
Scaling & Growth
Over time your account will continue to grow and expand as you add new keywords, ads, campaigns, and networks to the mix. Luckily Google Ads Editor is a free tool that can help you make large-scale changes quickly and easily.
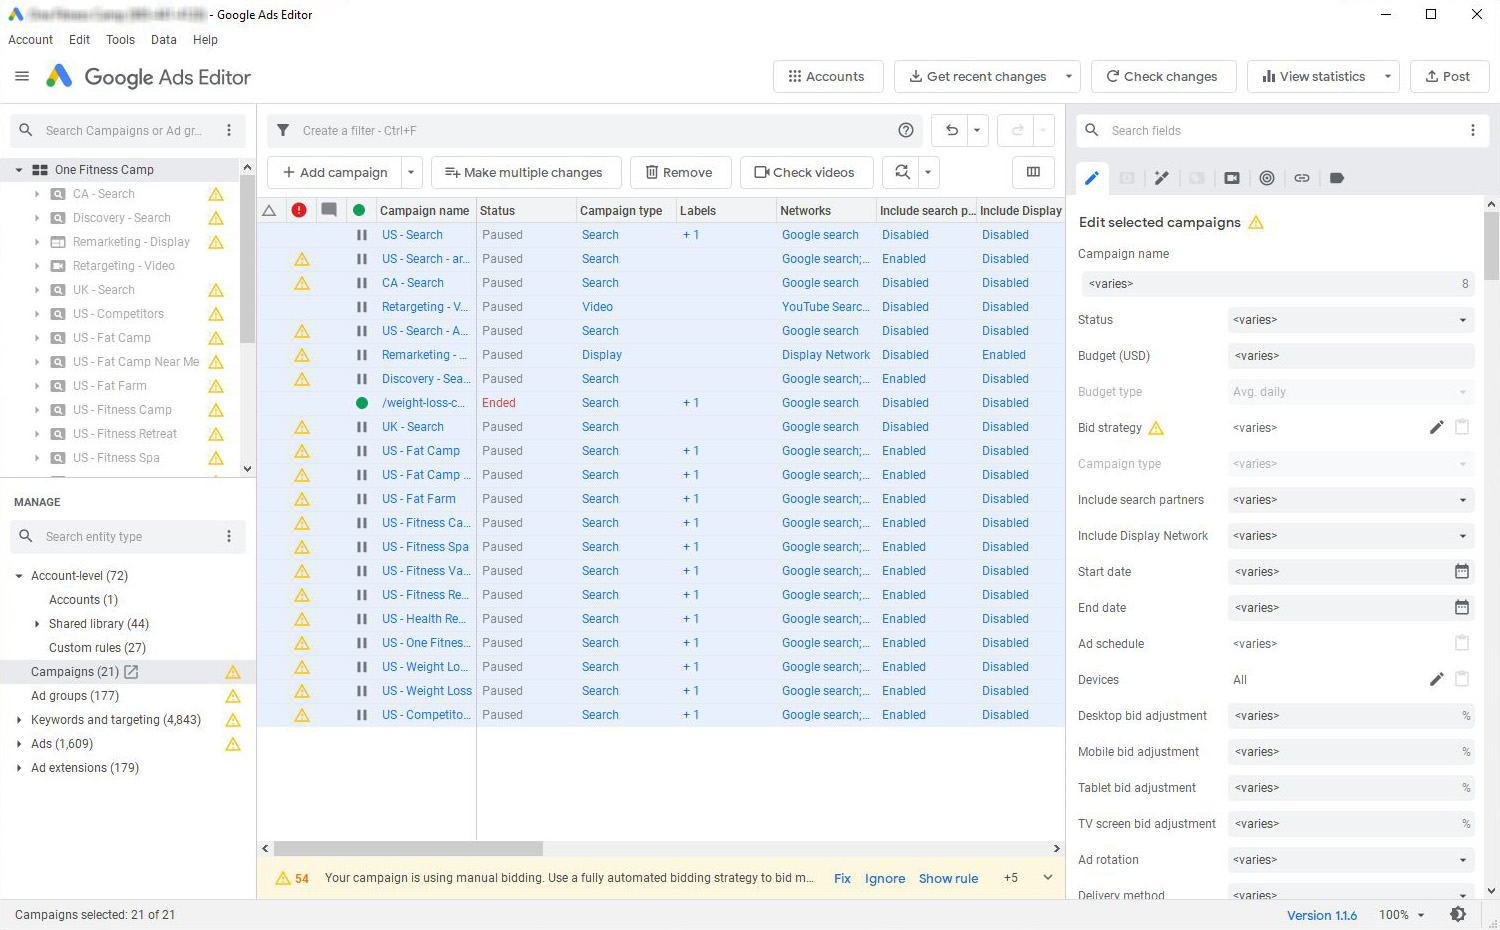
Use hotkeys to select all, find and replace, and much more.
Google Ads Editor comes in handy when you’re creating hundreds of SKAGs or restructuring large accounts. However, its best feature is that it can be used offline so you can make changes to your account without the lag of your internet connection.
Research tools will also come in handy when it’s time to expand your account. Tools like SpyFu, SEMrush, and iSpionage can help you find out what’s working for your competitors on the Search Network. While tools like WhatRunsWhere can help you see your competitors placements on YouTube and the Display Network.
If you see that your competitors have been bidding on the same keyword or using the same placement for a long time then you may want to test it out for yourself. A long history is usually an indication that a keyword or placement is performing well.
You can also set up mining campaigns using broad match keywords, low bids, and a small budget. Broad match keywords act sort of like a net and can help you find new keywords that you aren’t already bidding on. Just be sure to keep an eye on these campaigns as the cost could get out of control quickly if left unattended.
When it comes to expansion on the display network, the options are endless. You can test new, but similar, audiences, keywords, topics, and placements. Additionally, you can let Google automatically expand your targeting using the targeting expansion slider. Drag the slider to the right to increase your reach and back to the left to lower it.
Google Ads Guide Wrap Up
Google Ads is a great way to generate traffic, but it won’t guarantee you conversions and sales.
Your website and landing pages are responsible for your conversions and unless you’re an eCommerce company then you’re responsible for closing sales. That means Google Ads is only one piece of the puzzle. You also need to work to improve your website, landing pages, and sales process.
If you improve your sales rate then you don’t need as many leads to be profitable. If you improve your conversion rate then you don’t need to pay for as much traffic. So constantly ask yourself how you can improve the most important metrics. These things will move the needle for your business much faster than Google Ads by itself.
In the end, it all comes down to keeping it simple and focusing on the right things. Focus on laying a solid foundation and improve the biggest needle movers first. Take a reverse approach by improving your sales process, landing pages, and website before attempting to perfect your Google Ads account.
If anything we mentioned in this guide went over your head then be sure to check out this PPC glossary to better understand all of the terms used in this guide.

Luke Heinecke
Founder/CEO
Luke is in love with all things digital marketing. He’s obsessed with PPC, landing page design, and conversion rate optimization. Luke claims he “doesn’t even lift,” but he looks more like a professional bodybuilder than a PPC nerd. He says all he needs is a pair of glasses to fix that. We’ll let you be the judge.
Leave us a comment.
Subscribe to our blog
Subscribe to our blog
Get weekly PPC & CRO advice sent straight to your inbox.