If you’re looking to run any digital ads, there’s no way you can miss a quick course on Facebook Ads Manager.
Facebook is by far the most popular digital advertising platform in the world. (And also the most widely used social media platform.) According to Statista, 94% of marketers advertise on Facebook.

94% of marketers advertise on Facebook – Image source
But here’s the thing: while Facebook has one of the most prolific and advanced ad platforms in the world, it also means that navigating the Ads Manager – Facebook’s self-service ad platform – can seem daunting to first-time users.
Even if you hire an ad agency like Linear to take care of your Facebook ad campaign management, it will be beneficial to know your way around the Ads Manager. You will be able to see the results and review the ongoing campaigns in your own right.
In this up-to-date Facebook Ads Manager guide, we’re going to explain everything you need to know, down to the nitty-gritty details and “how-to” guidelines.
Feel free to reach through the entire guide for the full Facebook Ads Manager course or click on one of the below section titles to navigate right to it.
In this guide on Facebook Ads Manager, we’re going to cover:
- What is Facebook Ads Manager?
- How to set up a Facebook advertising account?
- How to navigate the Facebook Ads Manager?
- How to set up ad campaigns in the Ads Manager?
- How to view campaign results in the Ads Manager?
Ready to study? Let’s go!

Let’s learn the basics of Facebook Ads Manager.
What is Facebook Ads Manager?
As mentioned before, Facebook Ads Manager is the self-service ad management platform for Facebook and Instagram ads.
Advertisers use Ads Manager to upload their Facebook ad campaigns, set budgets, and monitor results.
You can see how the Ads Manager looks in practice.

That’s how Facebook Ads Manager looks like
As you may notice, there are lots of menu items on each side of the campaign reports. Each of them expands to several additional menus. We’ll take a look at the most important navigation tips soon enough!
In addition to the general campaign-level overview, you can navigate between ad campaigns, ad sets, and ads.
If you’re new to the Ads Manager, here’s a list of some things you can do there:
- Set up your Facebook and Instagram ad campaigns
- Edit your ad campaigns’ objective, targeting, and budgets
- Review your campaigns’ results on the campaign, ad set, and ad level
Essentially, the Ads Manager is the only tool you need to run a Facebook ad campaign.
To access your Facebook Ads Manager, use this link.
Additionally, you can download the Facebook Ads Manager mobile app to make small changes to your ad campaigns on a mobile device.

Facebook Ads Manager app
However, it is much easier to set up your Facebook ad campaigns on desktop.
How to set up your Ads Manager account
If you don’t yet have a Facebook advertising account set up, you won’t be able to access the Ads Manager.
Let’s take a look at the quickest way to get started.

Step 1: Set up your Ads Manager account
All of your company’s Facebook pages, pixels, ad accounts, and other assets are managed through Facebook Business Manager.
Here’s the difference between the two:
- Facebook Business Manageris a platform for managing your Pages and ad accounts. · You can see who’s working on what and what they have access to.
- Facebook Ads Manager is strictly for managing your ad campaigns.
To create a Facebook Business account, you need a Facebook profile. You can use your Facebook username and password to sign into Business Manager.
To create a Business Manager account:
- Go to business.facebook.com/overview.
- Click on “Create Account.”
- Enter a name for your business, your name, work email address, and click “Next.”
- Enter your business details and click “Submit.”
For additional guidelines on Facebook Business Manager setup, see this official guide by Facebook.
Once you have the Business Manager account set up, you can easily create an advertiser profile.
While this may all sound difficult in theory, the process is pretty straightforward.

Creating a Facebook ad account isn’t really that hard
Create an Ad Account
To create a Facebook ad account for your business, go to the Facebook Business Manager and navigate to the “Ad accounts” section.
Click on “Add” and select “Create a New Ad Account.”

Create a new Facebook Ads Manager account
Next up, you can name your ad account. The best practice is to use your business’s name. Select your preferred time zone and currency and proceed.

Name your Facebook ad account.
If you’re creating the ad account for your business, select “My business” in the next and last stage of the account creation process.

Select “My business.”
The next step will be giving all relevant team members access to the ad account. If you are the admin, assign yourself admin-level access. Only members with admin access can set up payment information.

Assign admin permissions to yourself
Next up, you will need to set up the payment information.

Add payment information
Add your company’s credit card details and other relevant information such as Tax information. Once this is done, you’ll be ready to start advertising.

Set up your payment profile
And voila! You now have a Facebook advertising account.
Before you start to set up your first ad campaigns, see if you want to share access to your ad account with additional people or your advertising agency partners.
You have two options to share access to partners:
- Partner to share assets with: give a partner access to your ad account.
- Partner to request assets from: ask for permission to work on someone else’s account (if an agency has already created an ad account for your company).
To add additional team members to your ad account, navigate to the “Users” menu and click on “People.”
Set up the Facebook Pixel
There is just one last step: You should set up a Facebook Pixel.
The Facebook pixel is a snippet of code you put on your website. It will send Facebook the data from your website or from inside your online product or mobile app so that you can:
- Show ads to past website visitors using retargeting on Facebook.
- Allow Facebook to find new people who are most likely to convert on your ad offers through creating Lookalike Audiences.
- See reporting in Ads Manager about conversions and your website visitor numbers.
Here’s how to set up your Facebook pixel:
- Go to Ads Manager > Events Manager
- Click the + button labeled ‘Connect a Data Source’ and choose ‘Web.’

- Select ‘Facebook Pixel’ and hit the ‘Connect’ button
Next up, all you need to do is follow Facebook’s guidelines.

Create a new Facebook Pixel
You have three options to set up the Facebook pixel:

Options for setting up the pixel
Option 1: Connect to a partner platform
Some large marketing tracking tools like WordPress and Google Tag Manager integrate with your website to manage pixels and website tracking.

Set up pixel via a partner
Benefits of using a partner to manage your pixels include:
- Not having to edit your website’s code.
- Automatically tracking user actions during a website visit.
Option 2: Email your pixel to a developer
The second method is the most popular one: installing your Facebook pixel with a developer’s help.
Choose ‘Email Instructions to a Developer’ in the install pixel menu. Enter your in-house web developer’s email and copy the codes from any events (website actions) you want them to include using the ‘Get Event Code for Conversions’ button.
Option 3: Manually install your pixel yourself
If you have access to your website’s header section’s code, you can also add the pixel code on your own.
Go to Ads Manager > Events Manager > Pixels and click on “Set Up” and select “Install Code Manually,” then follow the prompts included in the popup guidelines.

You can add the pixel to the website on your own.
Once you’ve set up the Facebook pixel, verify that your pixel is active.
And that’s it — your Facebook Ads Manager account is complete. It’s time to explore it.
How to navigate the Facebook Ads Manager?
To navigate the Facebook Ads Manager like a pro, you will need to know about three various top-level navigation sections:
- Navigate between campaigns, ad sets, and ads.
- Access the Facebook Ads Manager menu for events, audiences, and billing.
- Edit your ad campaign reports’ columns and breakdowns.
Navigating between campaigns, ad sets, and ads
First things first!
Your Facebook ad campaigns have three levels, ad campaign, ad sets, and ads.

Facebook ad campaign hierarchy
Each ad campaign can contain several ad sets, and each ad set can include multiple ad creatives.
You can switch between your ad campaigns, ad sets, and ads by using the menu items above your advertising reports.
- The Account Overview tab gives you a glance at your ad account performance. This view includes metrics like the total reach, spending, and demographic breakdowns.
- Navigate to the Campaigns tab to see the high-level results for each campaign you’re running.
- On the Ad Sets level, you can see each ad set’s performance across or within campaigns.
- Click on Ads for an overview of each ad creative’s performance.

Navigate between campaigns, ad sets, and ads
Another simple way to zoom into one particular campaign in the Ads Manager is to simply click on its name. As a result, you’ll be taken to the ad sets level and see all the ad sets included in the campaign.
To access your Facebook ad account setup information and create new Facebook audiences, click on the 9-dots menu in the top left-hand corner.
Now, you can see links to Event Manager, Audiences, Business Settings, and much more. Remember this menu well as you’re going to need it often!

The most important menu in the Facebook Ads Manager
The last (but not least) important selection in the Facebook Ads Manager is ad report columns and breakdown.
To edit the metrics you see in your advertising reports in the Facebook Ads Manager, navigate to the small three-bar menu that resembles columns.

Edit your advertising report’s metrics
If you’re interested in some specific KPIs and metrics, scroll down and select “Customize columns” to choose the exact data you want your report to show.

Select custom ad report columns
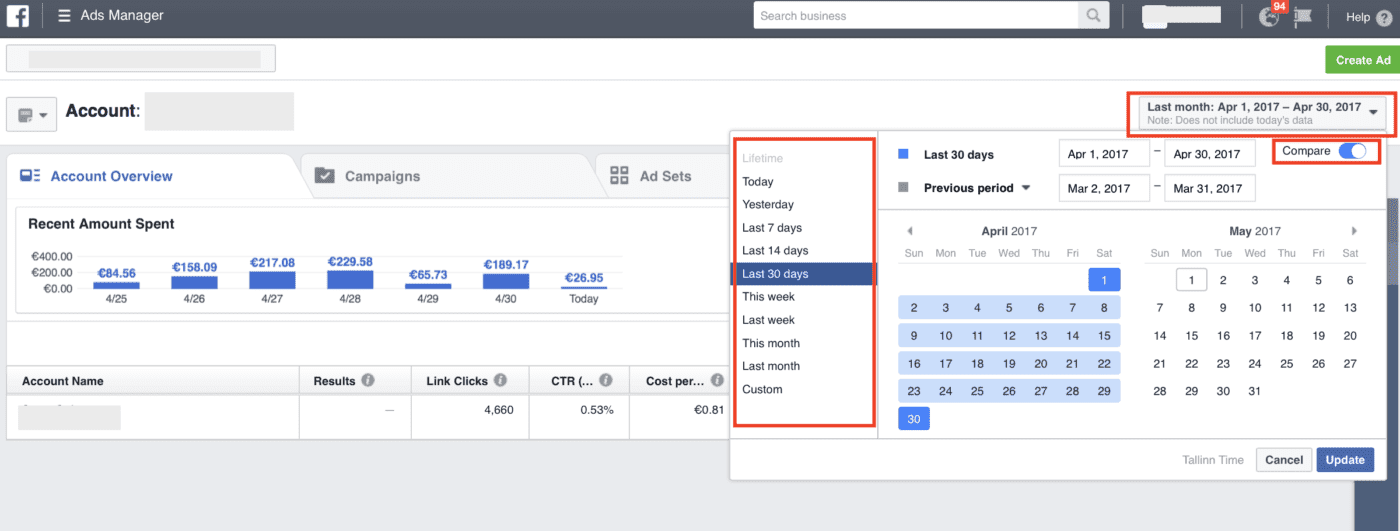
If you’re looking to see Facebook advertising results during a specific period, you can set your preferred dates by clicking on the time-and-date selection in the top right corner of your Ads Manager.
The most popular periods that advertisers check are “past 7 days” and “past 30 days.”

Select period for ad reporting
Pro tip: If you have a Facebook Ads Manager setup that you frequently use (with custom timeframe and columns), bookmark the link for faster access the next time. 😉
Finally, there’s one crucial question that we haven’t discussed yet…
How will you get new ad campaigns set up in the Ads Manager so that the results will start to pour in?
Let’s find out!
How to set up ad campaigns in the Facebook Ads Manager
Setting up a new Facebook ad campaign takes around one hour, from start to finish. Let’s learn how to do it!
Step 1: Create a new ad campaign
To set up a new Facebook advertising campaign, click the green “Create” button in the top-left corner of your Ads Manager account.

Create a new Facebook ad campaign
First, select the campaign objective.
Facebook uses this information to determine the campaign’s goals, available ad formats, budgeting options, and delivery optimization.

Select your campaign objective
You can choose between different campaign objectives:
- Brand Awareness: Increase the awareness of your business or product.
- Reach: Show your ads to as many people as possible.
- Traffic: Send people from Facebook or Instagram to your website’s landing page, a blog article, your app, etc.
- Engagement: Reach people who are the most likely to engage with your ad.
- App Installs: Send audience members to the App Store or Google Play Store, where they can download your mobile app.
- Video Views: Reach people in your target audience most likely to watch your video ads.
- Lead Generation: Collect leads (people’s emails and phone numbers) for sales and other marketing purposes.
- Messages: Connect and communicate with your audience on Messenger, Instagram Direct, and WhatsApp.
- Conversions: Reach people who are most likely to take a specific action, such as make a purchase, add items to a shopping cart, sign up, etc.
- Catalog Sales: Promote the products in your Facebook store’s product catalog to generate sales.
- Store Traffic: Drive more foot traffic to your brick-and-mortar business venues by advertising to people located nearby.
Here’s another tip: commit to a naming convention for your campaigns ahead of time, so your campaigns stay consistent and organized.

You’re doing great this far!
Once you’ve named your campaign, Facebook will take you to the next stage of campaign creation. Now, it’s time to set up your target audience, budget, and other technical aspects.
Up next, it’s time to set the budget.
Step 2: Set up your ad campaign budget
You’ll have the option of setting either a Daily Budget or a Lifetime Budget.
With Daily Budget, Facebook will spend up to the amount you specify on a per-day basis. In contrast, Lifetime Budget is the total amount that Facebook can spend over the ad campaign’s entire runway period.
Tip: We recommend using a lifetime budget (not a daily budget) to start. Over the last year, tests from real clients indicate that daily budgets can put a “ceiling” on conversions. By contrast, Lifetime Budget lets the campaign use ad spend when users are most likely engaging with the ad.

Set your Facebook ad campaign budget
Next up, you’ll be guided to the audience setup phase.
Step 3: Set up your ad campaign’s target audience
Here, you can select which markets you want to advertise to and the target audience you want to reach.

Facebook ad targeting options include:
- Saved Audiences
- Custom Audiences
- Lookalike Audiences
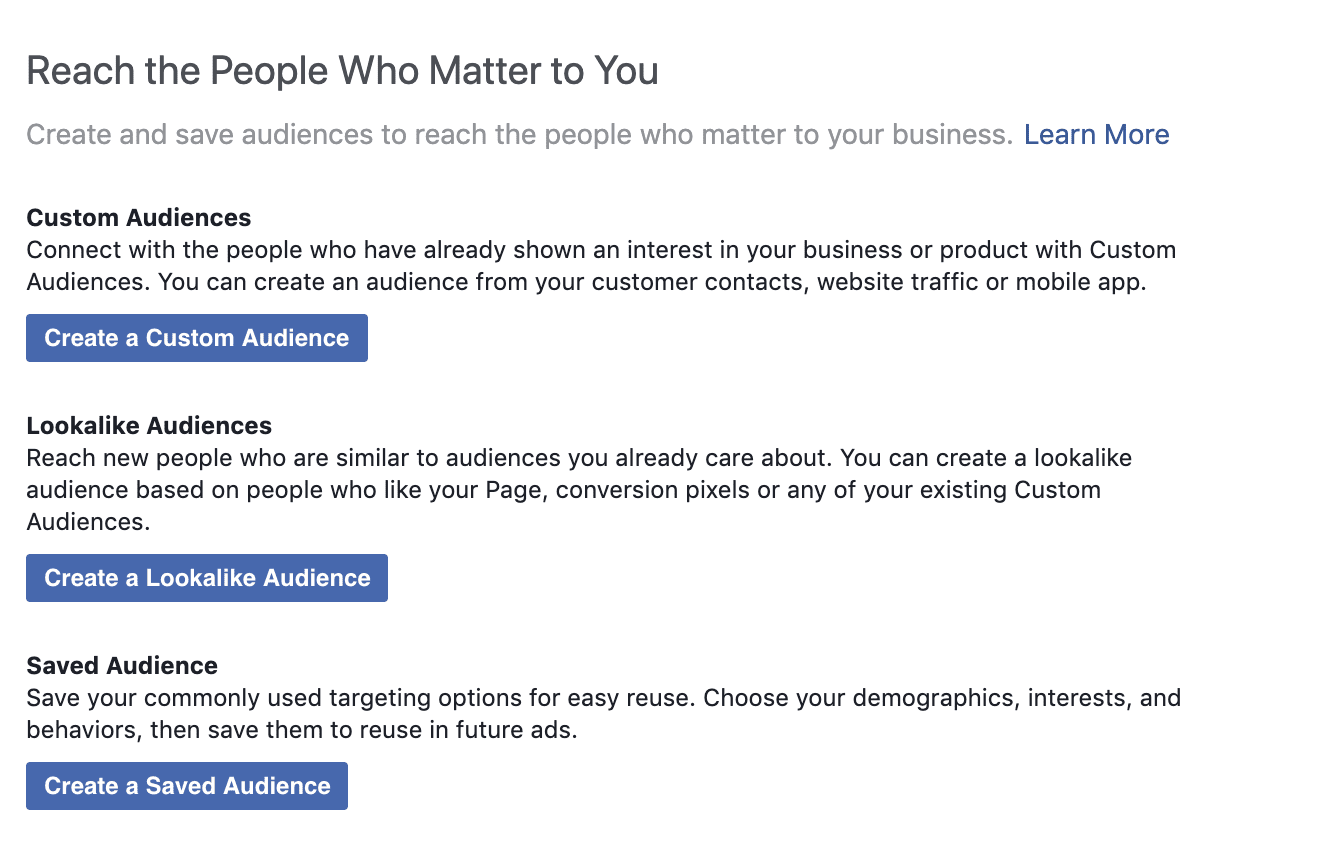
Facebook ad targeting options
The Saved Audiences let you reach Facebook and Instagram users based on their location, demographics, interests, etc.
If you’re just getting started with Facebook advertising, try creating a Saved Audience. Define your target audience based on the following demographic selections:
- Location
- Age
- Gender
- Language
- Detailed targeting
- Connections
Pro tip: You can be so granular as to target people passing your competitors’ brick and mortar stores or any other specific area of a city. Simply set a pin right on the location map to target an area surrounding it.
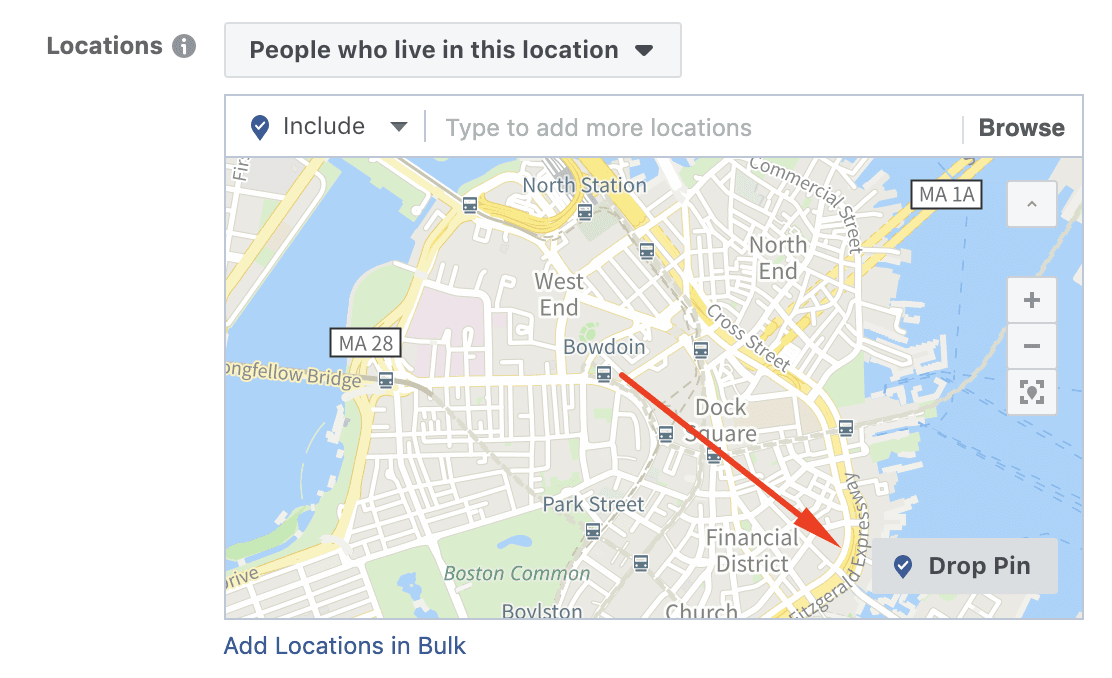
Target people in particular locations
You can also target audiences connected to your Facebook or Instagram pages, users who engaged with your mobile app, or people who have engaged with your Facebook events:
- People who like your Page
- Friends of people who like your Page
- Exclude people who like your Page
- People who have used your app
- Friends of people who have used your app
- Exclude people who have used your app
- People who responded to your event
- Exclude people who already responded to your event
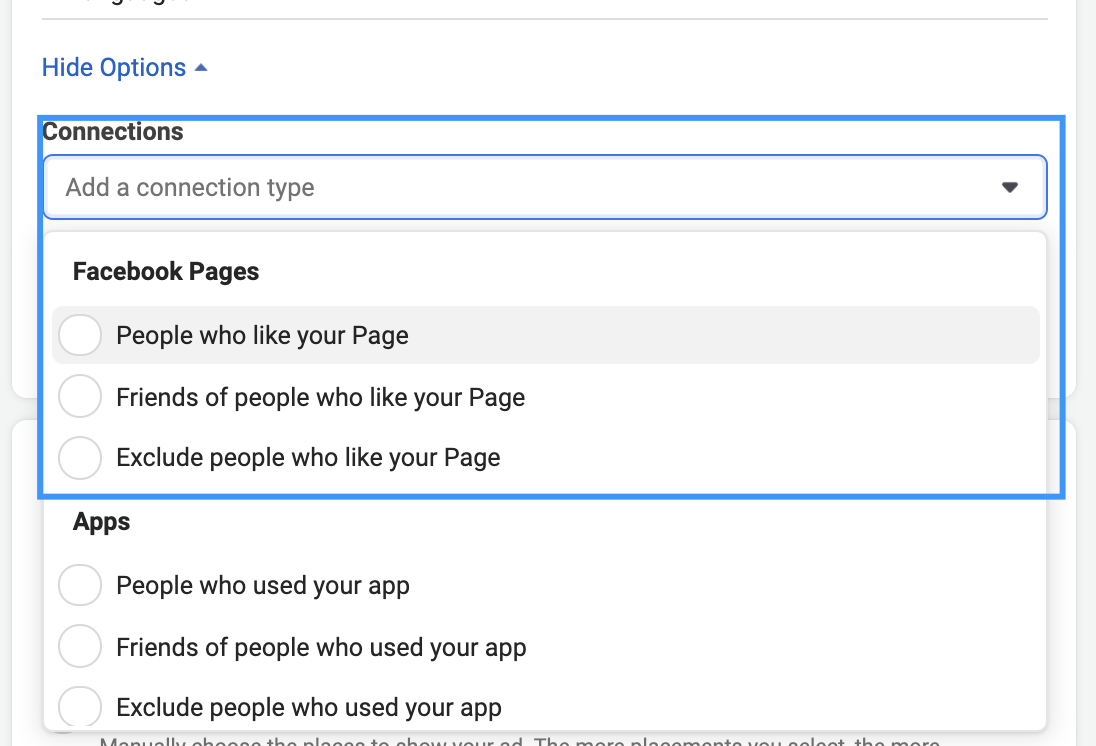
Target people connected to your Facebook page
Pro tip: Keep your Facebook target audiences broad, larger than 100k people – this will leave room for Facebook’s ad algorithms to work their magic.
Need some extra guidance? For more information on Facebook targeting, see this guide: Facebook Ad Targeting in 2020 – Reach the Right Audience for Higher ROI.
Now that you’ve set up the audience, it’s time to decide where exactly the ads will appear: Facebook placements.
Step 4: Set up your ad placements
You’ll have the option to choose Automatic Placements or Manual Placements. Facebook recommends that all advertisers use automated placements, and it usually really does work better.
Especially if you’re just starting, select the “automatic placements” option.
Select to use automatic placements
Placement options may slightly change depending on the objective you selected for your ad campaign. However, if you use automatic placements, there’s no need to worry about it.
Step 5: Set up your ad creatives
We’ve finally made it to the last step of campaign setup in the Facebook Ads Manager: the ad creatives.
It’s time to set up your ad creatives!
Select the dropdown for ‘Create Ad.’ On the right side of the screen, you can see what your ad will look like.
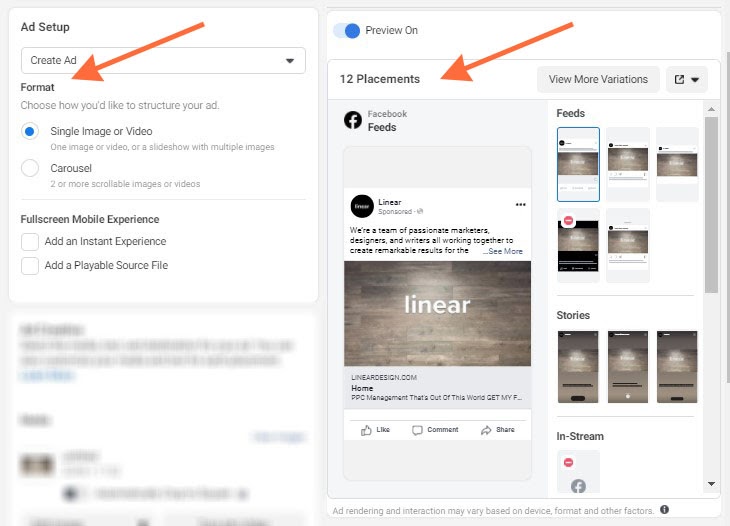
Set up your ad creatives
You’ll be able to select what ad type you’d like to use:
- Single image or video ad
- Carousel ad
- Collection ad
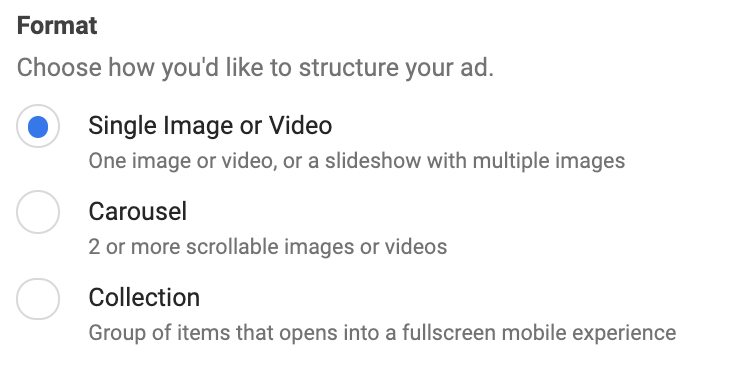
Select your Facebook ad type
If you select the Collection ad format, you will have to make one more decision and choose the template you’d like to use. To run Collection ads, you will first need to set up a Facebook Product Catalog.
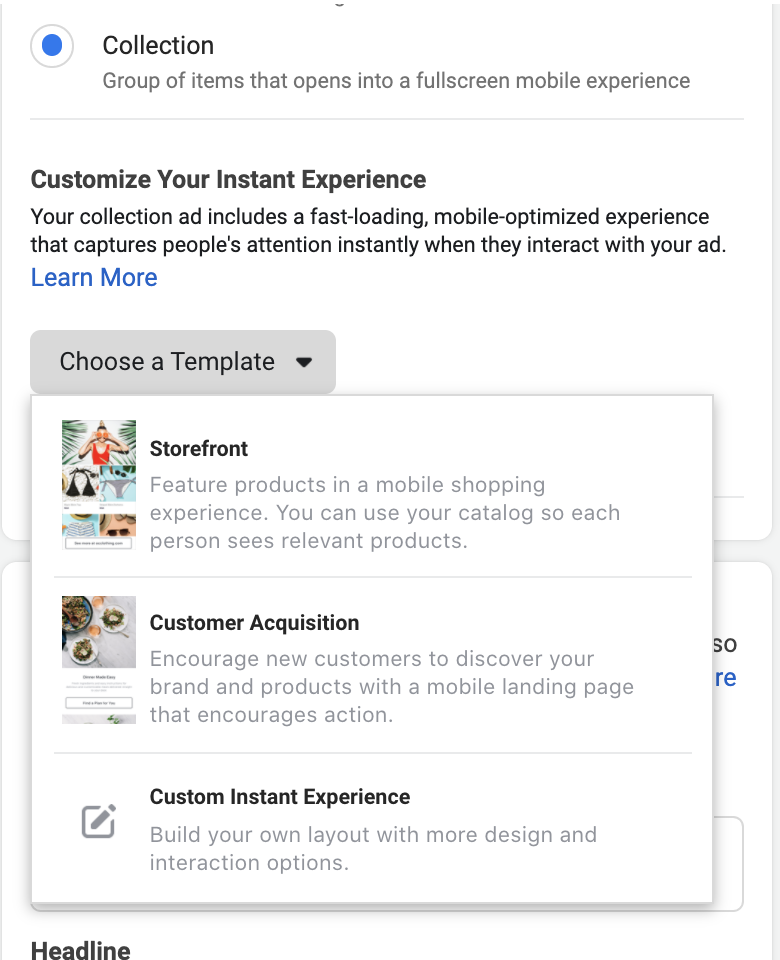
Customize your collection ad experience
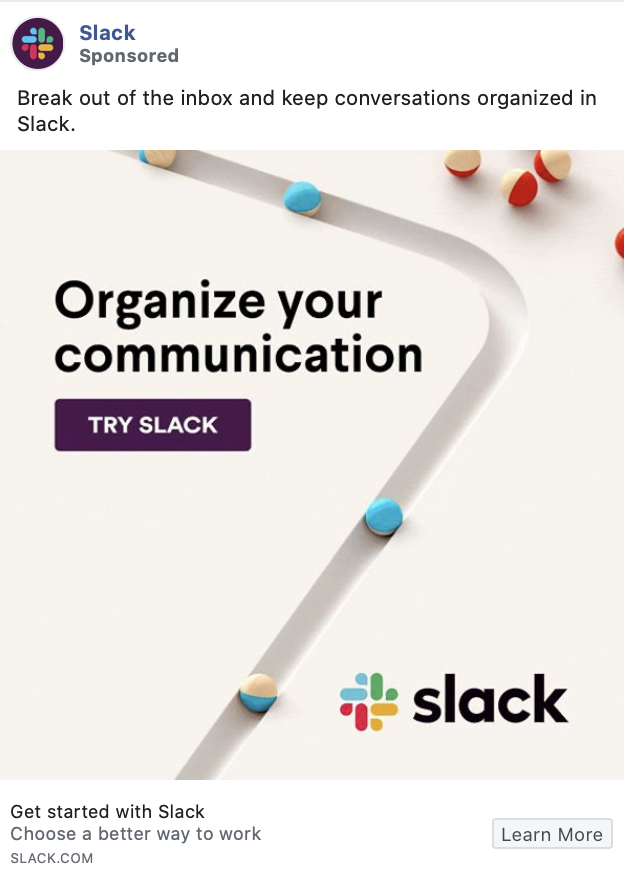
If you want to use a single image or video creative, all you need to do is upload your ad visuals, insert the ad text, and add the URL of your website.
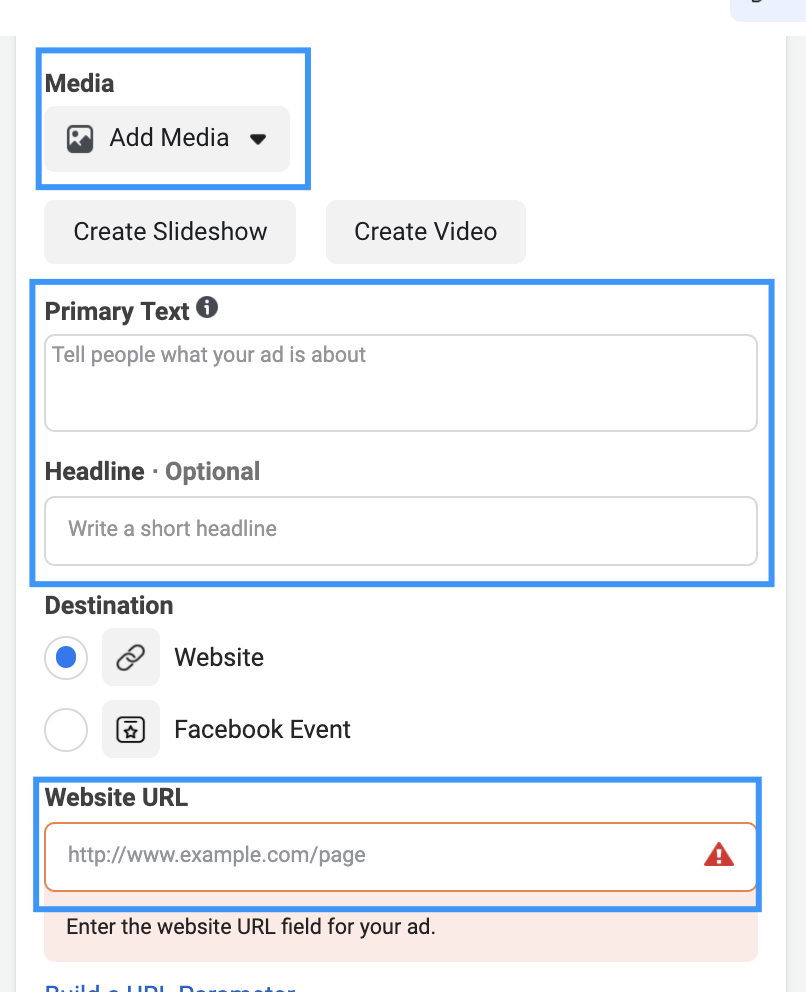
Set up your Facebook ad creative
Here’s an overview of the customizable ad creative elements in Facebook Ads Manager:
- Media: This is your ad creative’s picture or video. Include multiple creative assets and make sure that they’re customized for all supported placements like Facebook feed and Instagram Stories.
- Primary Text: This is the ad text that goes above your Facebook ad image.
- Headline: This is the bold short text that goes under your Facebook ad image. Headlines have a 25-30 character limit. Keep it short and sweet!
- Description: This is the ad text that goes below your headline. You can use this text section to include an additional slogan.
- Website URL: That’s the link to your website.
- Display Link: This is a shortened version of your website URL.
- Call to Action: This is a button that directs the audience to take a specific next step. Make sure your CTA and destination match!
Facebook Ads Manager allows you to use up to 50 ad creatives per one ad set. However, you’re not going to need this many. It is best to upload 5-10 different ad creatives to launch your first Facebook ad campaign.
Step 6: Publish your Facebook ad campaign
Once you have uploaded all the ad creatives, go ahead and set your ad campaign live.
You can keep making edits to it also after the publishing, so you’ll get a chance to double-check everything. 👍

You can fix campaign setup mistakes any time.
After you have published your Facebook ad campaign, leave it running for at least 24 hours (or until the ad set collects at least 50 conversions) before measuring the results.
Facebook ad campaigns have a learning phase – the period when Facebook’s ad delivery system has a lot to learn about your ad set. During the learning phase, the algorithms explore the best way to deliver your ad set – so performance is less stable and cost-per-action (CPA) is usually higher.
While Facebook’s algorithms never stop learning about the best way to deliver your ads, the ad sets exit the learning phase as soon as performance stabilizes. This usually happens after around 50 optimization events since the last significant edit.
However, it is still alright to sneak a peek at your campaigns with an ongoing learning phase. Let’s learn how to navigate the Facebook Ads Manager’s reporting system.
How to view your ad campaign results in the Facebook Ads Manager?
To check your Facebook advertising reports, log in to the Facebook Ads Manager. You can see all your active and completed ad campaigns on the dashboard.
You can also organize your ads in many various ways: by dates, objectives, etc., and zoom into particular campaigns to measure the performance of every single ad set or ad creative.
Filter your ad results by dates
To dive into a particular Facebook ad campaign’s results, select the campaign by clicking on its name. Next up, you’ll be able to see the ad sets and ads and review the performance of every individual ad.
Want to see different metrics in your Facebook Ads Manager report?
To see additional metrics, navigate to the Columns section, and choose a different report setup.
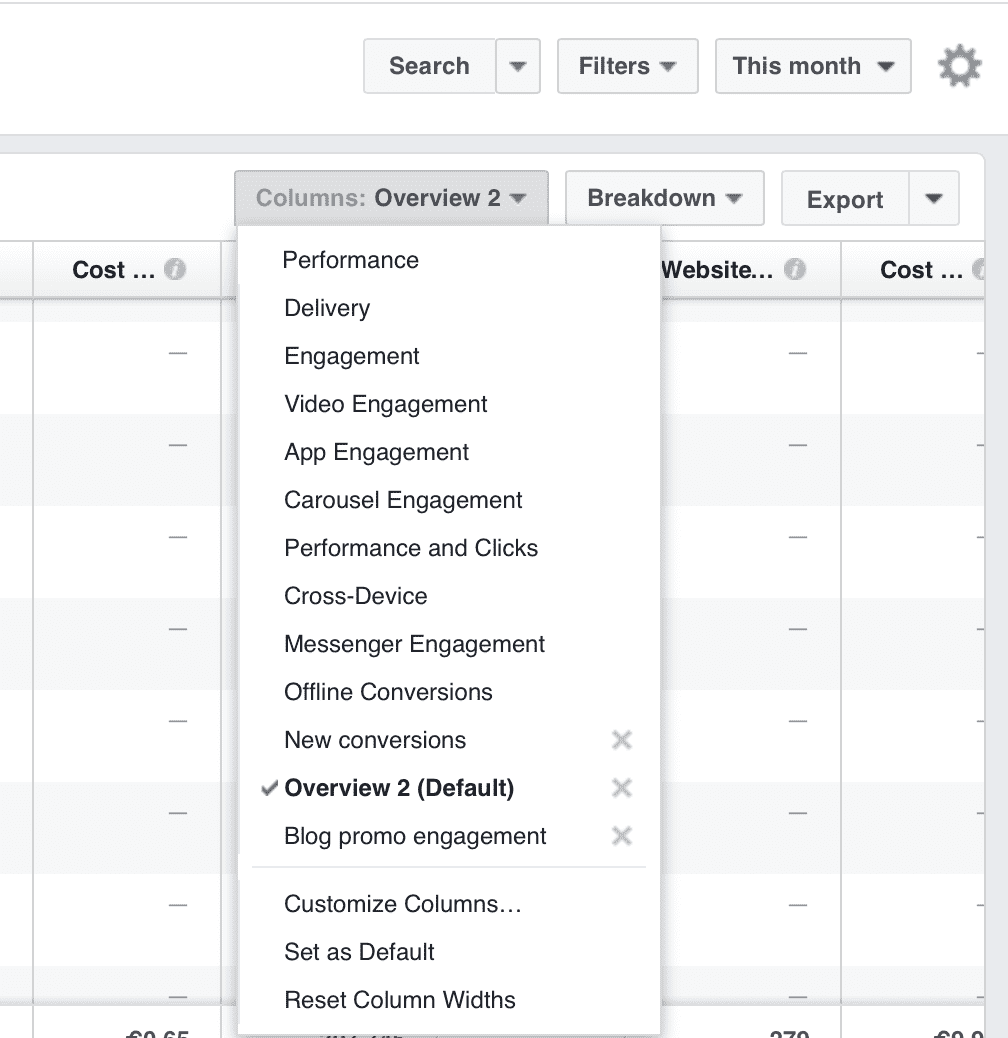
See additional campaign metrics.
As you can see above, there are a lot of options. I’ve summarized them for you next.
Facebook Ads Manager Campaign Metrics
Take some time to browse the available campaign metrics to decide which ones you want to view. Facebook splits its columns into six main categories:
Performance:
- Performance: Results, Frequency, Impressions, Clicks, Relevance Score, etc.
- Cost: Cost per Result, CPM, Cost per 1,000 People Reached
Engagement:
- Page Posts: Page & Post Engagements, Likes, Comments, Event Responses, etc.
- Cost: Cost per Page Engagements, Likes, Event Responses, etc.
- Messaging: New Messaging Conversations, Replies, etc.
- Cost: Cost per New Messaging Conversations, Replies, etc.
- Media: 2, 3, 10 Second Video Views, 25%, 50%, 100% Video Watches, Instant Experience View Times, etc.
- Cost: Cost per Video View Times and Cost per ThruPlay
- Clicks: Link Clicks, CTR, Unique Clicks, etc.
- Cost: CPC, Cost per Unique Click, etc.
- Awareness: Estimated Ad Recall Lift People & Rate (how many people would say they recall seeing your ad)
- Cost: Cost per Estimated Ad Recall Lift People & Rate
Conversions:
You can select between Total, Unique, Value, Cost, and Unique Cost to include these metrics.
- Standard Events: All of Facebook’s standard conversions
- Custom Events: All the conversions that you created and named to track better
Settings:
- Object Names & IDs: Account Name & ID, Campaign Name & ID, Ad Set Name & ID, Ad Name & ID, etc.
- Status & Dates: Date Created, Last Edited, Ends, Errors, Reporting Starts, Ends, etc.
- Goal, Budget & Schedule: Objective, Bid Strategy, Budget, Schedule, etc.
- Targeting: Ad Set Settings for Location, Age, and Gender, etc.
- Ad Creative: Page Name, Ad Creatives, etc.
- Tracking: URL Parameters, Facebook Pixel, Events, etc.
A/B test:
- Split
- Variable
Optimization:
- Optimization Events
- Cost per Optimization Event
- Last Significant Edit
Which metrics should you review on the Facebook Ads Manager?
The most important numbers to check in your Facebook Ads Manager reports are the quantity of results, cost-per-result, and return on ad spend.
Based on these key metrics, you’ll be able to understand whether your ad campaign corresponds to your expectations. If the results are worse than you expected, consider making changes to your target audience or improving your ad creatives.
Below, you can find additional information about the metrics that you should track v.s. Vanity metrics that do not contribute to your advertising success.
Important Ads Manager metrics:
- Results: This is just how many conversions or completions of your goal you’re getting.
- Cost-per-result: This is how much you spend to get a new lead, new customer, etc. If your goal is conversions, then this will be cost-per-conversion.
- Click-through Rate: This is the number of Link Clicks divided by Impressions. If your CTR is below 1%, it says that your ad either isn’t compelling or your audience is way off.
- Ad Frequency: This number shows the ad impressions divided by reach – or the average number of times a person has seen your ad. Everyone knows how it feels to see the same ad a million times – you get tired of it.
- Quality Ranking: A grade given by Facebook. It tells you how relevant your ads are to your target audience.
Vanity metrics:
- Reach: Unless you’re running a huge budget on brand awareness, reach doesn’t mean anything. Even if your reach is good, if you’re not getting any reactions to your ads, people are scrolling right past.
- Clicks: This is different than your Link Clicks – these are people who just tapped on your ad. Either to expand it if your ad copy is long or to drop it alike. They don’t mean anything.
- Cost-per-click: The real number you’ll focus on is your cost-per-result. Don’t waste time measuring clicks against each other.
- Impressions: Similar (but different) to reach; this is how many times Facebook showed your ad in total. Again, unless people are reacting to your ad, there’s no point in tracking it.
Using Facebook Ads Manager Breakdown menu
In addition to the campaign-level metrics that you see in your Facebook Ads Manager, you can break down your advertising results by additional aspects by using the Breakdown menu.
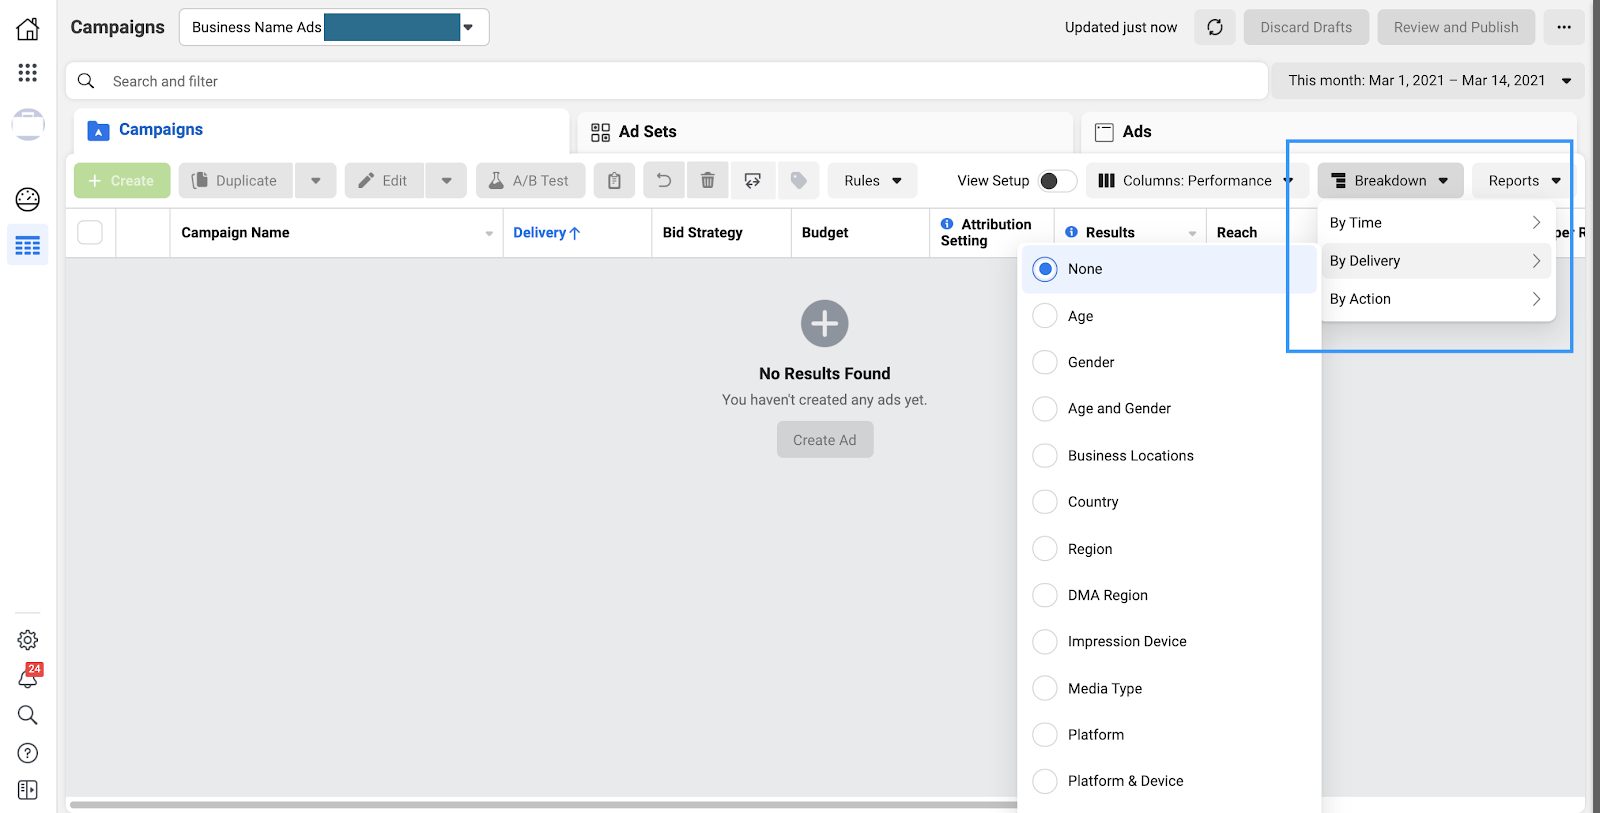
Use the Breakdown menu to see more data.
The Breakdown feature lets you filter your ad campaign results by:
- Delivery: age, gender, location, browsing platform, platform, device, time of day, etc.
- Action: conversion device, destination, video view type, video sound, carousel card, etc.
- Time: day, week, two weeks, month
One of the popular use cases of the Breakdown menu is viewing campaign results per gender or age to find out who’s your customer. You can also break down the campaign results by placement to see whether your ads appear on desktop or mobile, on the Facebook newsfeed or Instagram, etc.
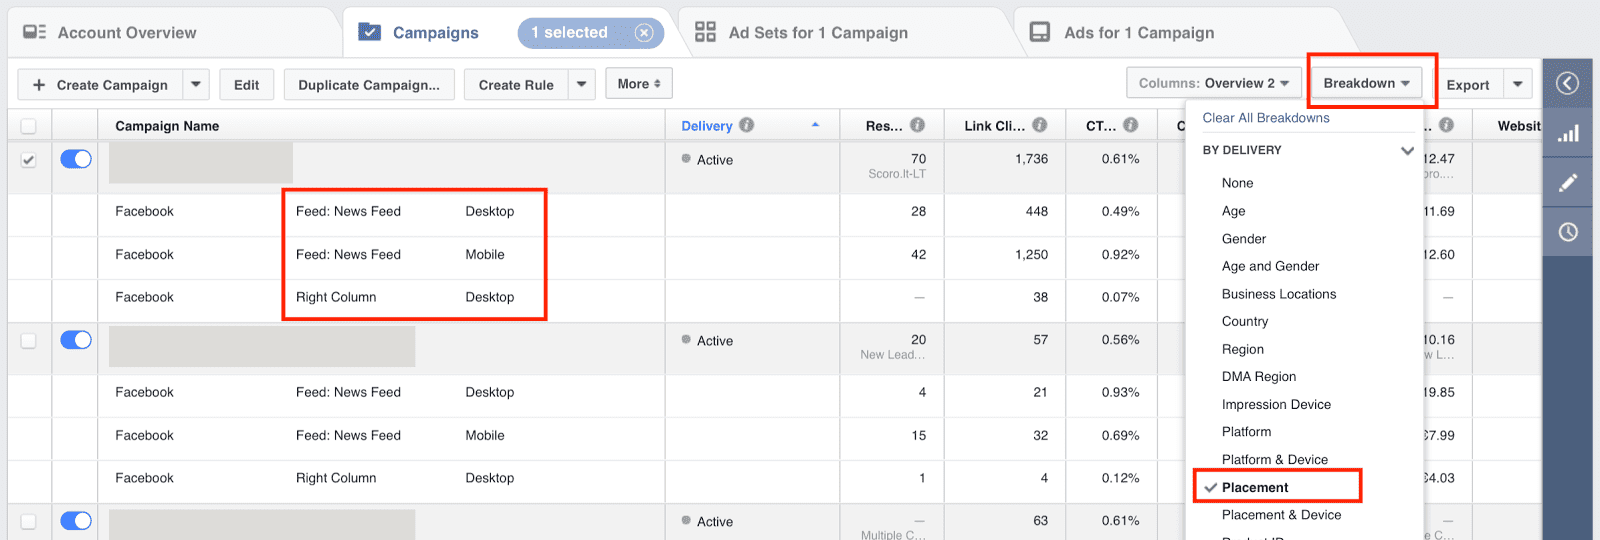
Use additional breakdowns for more insight.
How to filter your Facebook ad campaigns in the Ads Manager?
You can search and filter your Facebook ad campaigns for faster reporting by using the Search function.
Start typing to the white text area above the campaign navigation menu to search and find campaigns, ad sets, or ads by their name or ID. You can also filter your campaigns by delivery type, objectives, audience information, placements, last time the ad set was changed, etc.
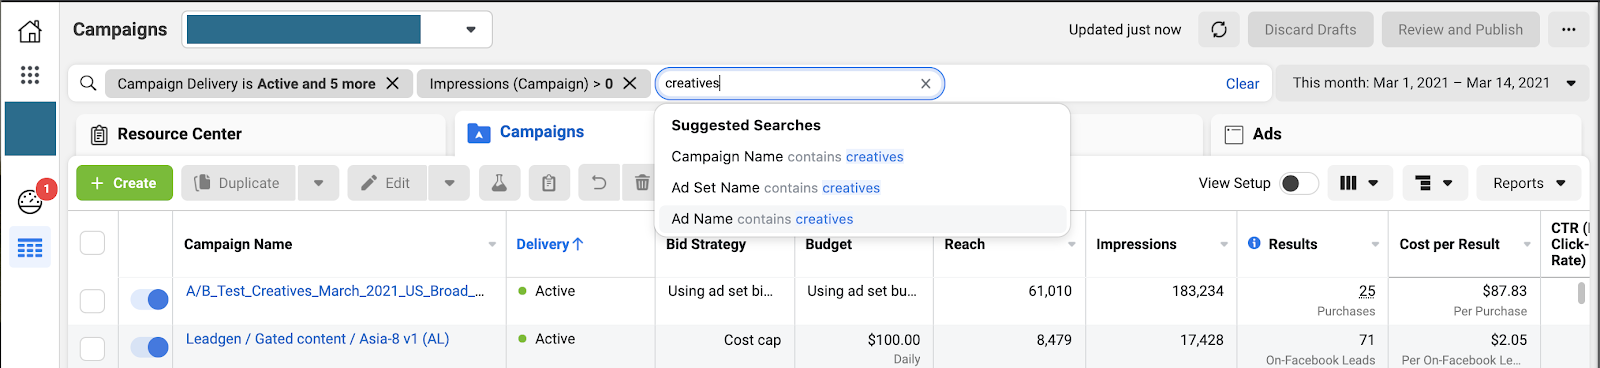
Search your campaigns based on name or ID
You can add several filtering conditions to find what you’re looking for.
Save your Facebook Ads Manager reports
For faster reporting in the future, Facebook allows you to save your custom ad reports. It is super convenient!
Once you are happy with your ad report, click on the “Reports” button in the top-left corner of the Ads Manager and select “Create Custom Report.” Once you have saved a report like this, you can access it any time in the future.
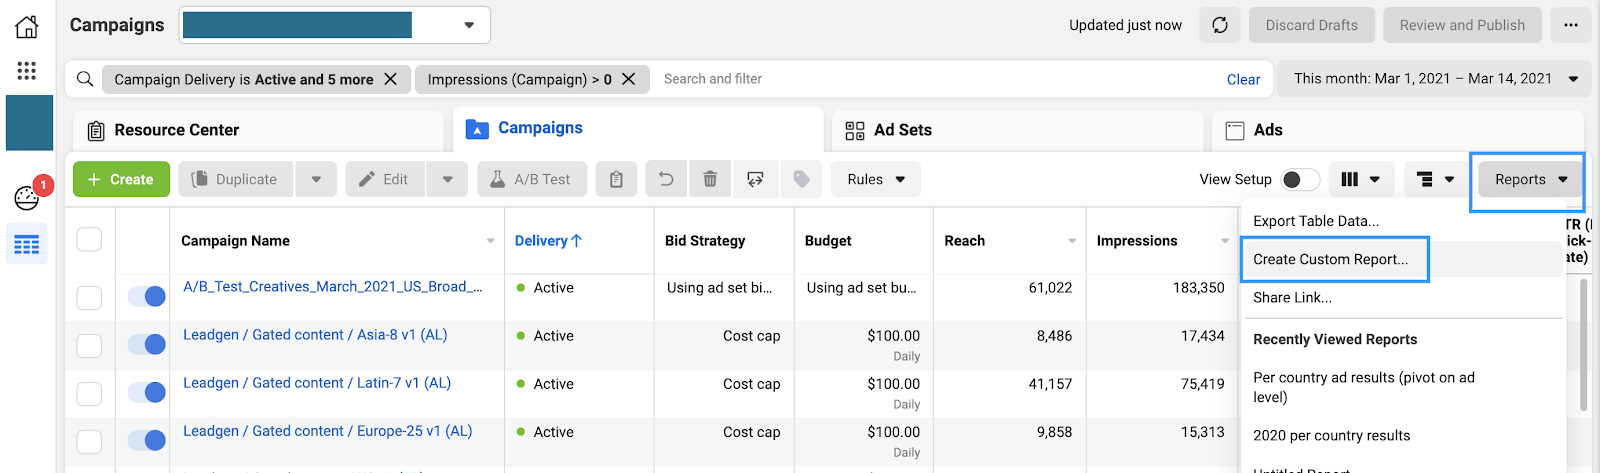
Save your Facebook Ads Manager reports.
Pro tip: For even faster reporting, you can schedule the reports to be sent to your (and your team’s) mailboxes once a week or once a month.
How to set up auto-optimization rules in the Ads Manager?
Finally, you can set up automated campaign management rules that make changes to your Facebook campaigns based on a set of predefined rules.
You can explore the rule-setting process under the “Rules” tab.
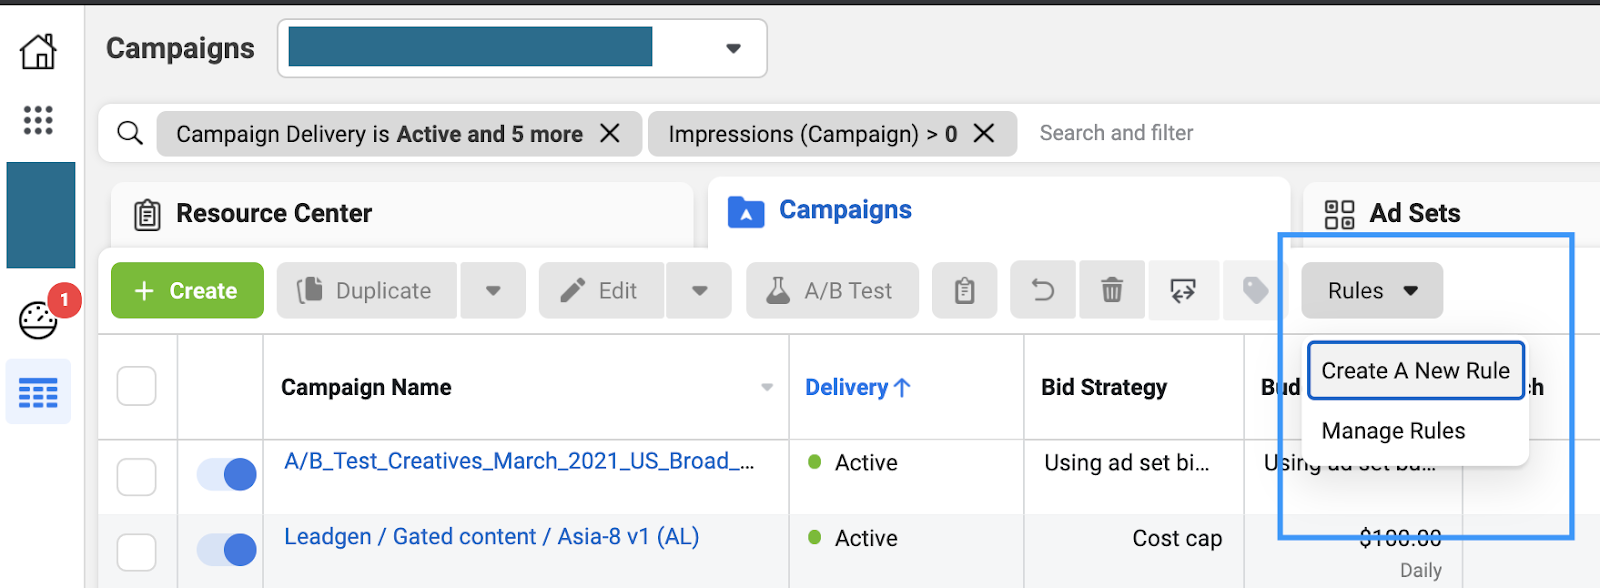
Set up automated ad management rules
There are a few actions you can choose for your rule to perform when the predefined conditions are met:
- Turn Off/On Campaigns, Ad Sets, and Ads
- Adjust Budgets (Increasing, Decreasing, or Scaling Daily and Lifetime Budgets)
- Adjust Manual Bids (Increase, Decrease or Scale Bids)
- Send Notification Only (This send an email to your subscriber of choice)
Once you select the action, you can set the conditions that need to be met before an action is taken. The more common ones include:
- Spent
- Lifetime Spent
- Frequency
- Results
- Cost Per Result
- Mobile App Install
- Cost per Mobile App Install
- Mobile App Purchase ROAS
- Website Purchase ROAS
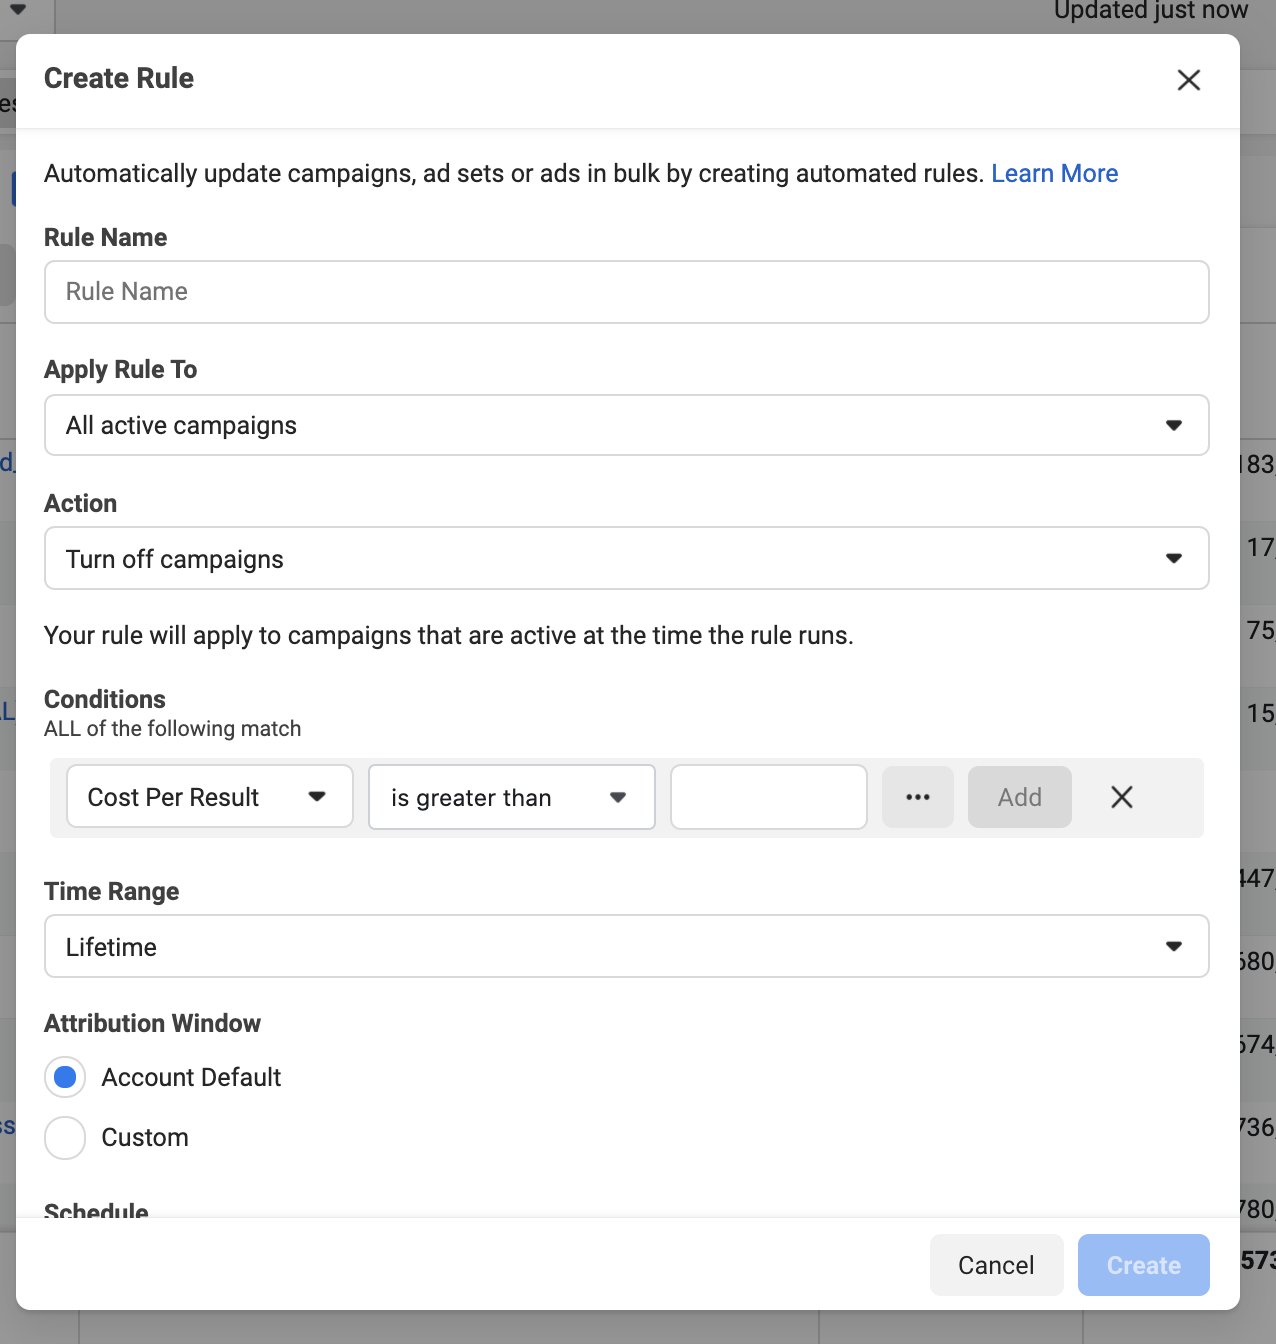
Create your Facebook ad rule set
You can select the three dots next to the Conditions form to further refine each specific condition by level or time range. You can also add more conditions by clicking on the “Add” button.
After you’ve set your conditions, you can choose the time range for all of the conditions to occur. You can select between Lifetime, Today, Yesterday, Last 2, 3, 7, 14, 28, and 30 days.
Next up, you can set the schedule for how often Facebook checks your account to see if the conditions have been met. It can run as often as about every 30 minutes, once a day, or at a custom schedule.
After you select who gets the notifications, you’ll name the rule and create it.
The Facebook rule will start working immediately, and you can relax – as much as an account manager can relax, anyways.
Conclusion
Congratulations, you have mastered the black belt in the art of Facebook Ads Manager!

Congratulations!
Now, it is time to put your hard-won new skill set to work: set up your Facebook Ads Manager account and launch your first advertising campaign.
If you’d like to learn more about marketing on Facebook, check out these guides:

Evie Welborn
Account Manager
Evie is dedicated to keeping an eagle eye on her PPC and digital marketing accounts. When she’s not scouring through her accounts to make sure they’re flawless, she can be found ascending new heights in the local mountains or hiding inside the rock climbing gym when it’s too cold.
Leave us a comment.
Subscribe to our blog
Subscribe to our blog
Get weekly PPC & CRO advice sent straight to your inbox.